Description
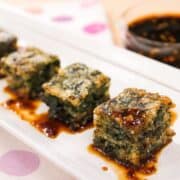
A popular Thai street food, these garlic chive dumplings are chewy in the middle and crispy on the outside, and the chives just melt in your mouth. Easy to make, and can be done ahead of time as well!
Ingredients
Dumplings
- 230 g (½ pound) garlic chives
- 2 tsp sugar
- ½ Tbsp soy sauce
- ½ tsp salt
- ¼ tsp baking soda (optional)
- 2 tsp neutral oil
- 1 clove garlic, finely grated or minced (can also sub a ¼ tsp garlic powder)
- ¼ tsp white pepper
- 100g rice flour
- 100g tapioca starch
- 1 cup (240 ml) water
Dipping sauce
- 1 Tbsp sugar
- 1 Tbsp water
- 1 Tbsp vinegar
- 1 ½ Tbsp sweet soy sauce (I use ABC kecap manis)
- 1 Tbsp soy sauce
- 2-3 tsp sambal oelek or pounded or minced Thai chilies to taste
Want to save this recipe?
Instructions
- Cut about 1.5 inch off the bottom of garlic chives and discard. Some garlic chives can harbour a lot of dirt at the bottom between the leaves, if this is the case, shake them in a bowl of cold water to remove the dirt before using.
- After washing dry off the chives as best you can! If there is a lot of water left in the chives it will make the dough mushy. I shake off the water as much as possible, (use a salad spinner if you have it), then lay them on a tea towel, cover them with another, and roll them gently between the two towels.
- After washing and drying the chives (see important note) cut the chives into small pieces, a little shy of 1 cm, and place in a mixing bowl. Add salt, sugar, soy sauce, baking soda, white pepper, oil and garlic and mix until combined. Let sit for at least 20 minutes or until the chives look wilted, and liquid has been drawn out of them.
- Meanwhile, make the dipping sauce by combining vinegar, water and sugar and stir until the sugar is dissolved. Add all remaining ingredients are stir to combine. This sauce will keep in the fridge for weeks!
- Make the batter: Combine water, rice flour and tapioca starch in a pot and stir until there are no more lumps. Turn the heat on LOW and stir the mixture constantly with a spatula. As the flour starts to cook and congeal into lumps, pull the pot off heat occasionally to smush any flour lumps against the sides to break them up. Continue stirring CONSTANTLY just until the mixture is thick enough that the chives can be evenly suspended in the batter (think Greek yogurt consistency), then remove from heat and continue stirring to break up any lumps of flour. Be careful not to cook the batter too much or you will have a hard time incorporating the chives into it.
- Off heat, stir the chives into the batter until well combined.
- Grease a 7-inch round cake pan with oil (or use any heat proof container of your choice, but smaller containers will increase cooking time). Line the bottom of the pan with parchment paper. Pour the batter into the pan and smooth off the top.
- Preheat a steamer with boiling water. If you're not using a bamboo steamer lid, wrap a towel around the lid of the steamer to prevent water from dripping onto the surface of the dumplings. Alternatively you can cover the pan with foil. Steam the dumplings for 15-20 minutes over rapidly boiling water, or until fully cooked. Timing will change depending on the container you're using and how thick the batter is. If you have a thermometer, the internal temp of the centre of the batter should reach a minimum of 190°F.
- Let the dumpling completely cool, or chill until ready to eat (it'll be easier to cut when cold). You can keep it at this stage for up to 1 week. When ready to eat, run a knife along the sides and flip it out. Use a sharp knife, grease it with oil, and cut the dumplings into bite-sized pieces. If there is a lot of dough sticking to the blade between cuts, wipe it off and re-oil the blade.
- Fry the dumplings: In a non-stick pan, add just enough oil so it comes up just below half the height of the dumplings. Heat until hot and fry them on both sides until well browned and crispy, making sure to not let them touch while in the pan or they will stick together. Drain excess oil on a paper towel-lined plate.
- Serve while they're hot and crispy with the dipping sauce!