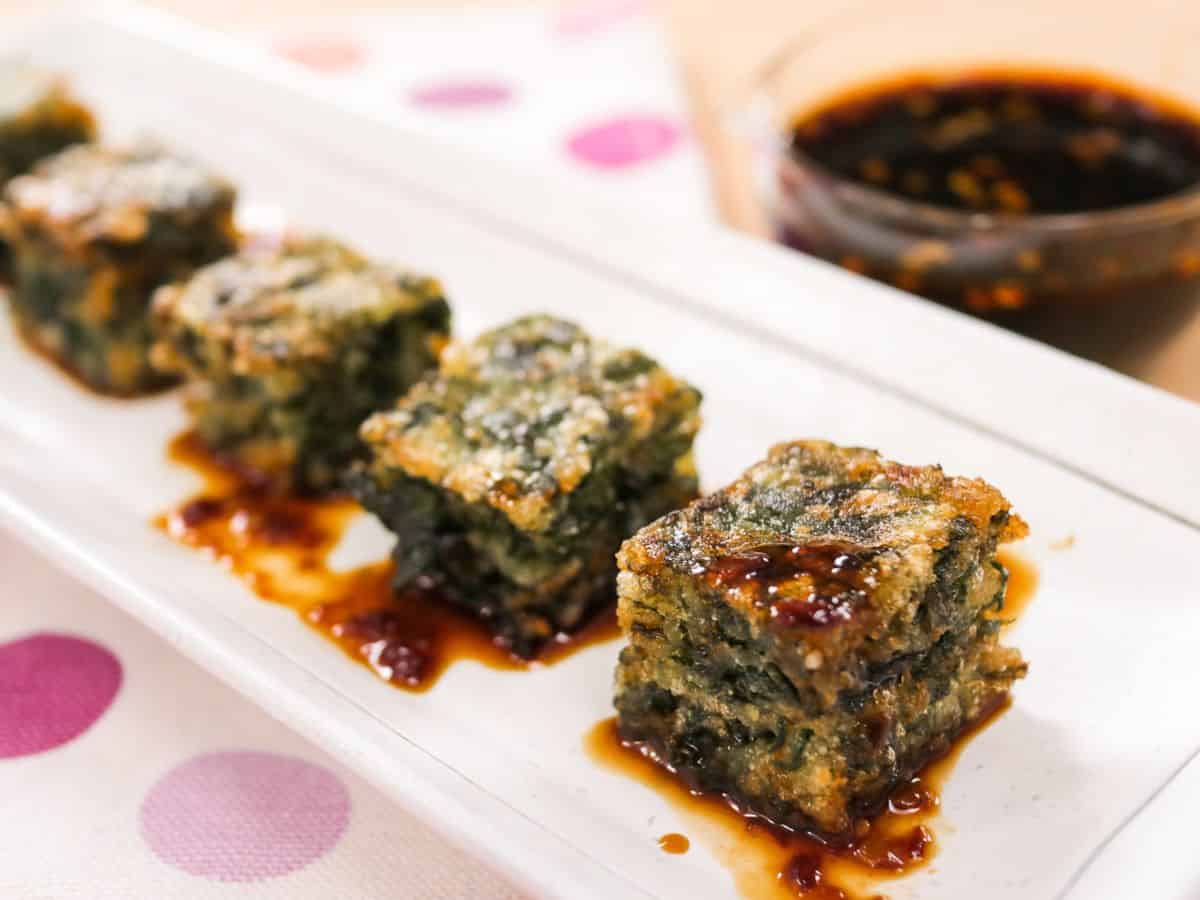
Don't let the amount of vegetables in this popular street food throw you off. I didn't love vegetables as a kid and I would devour these every time. Garlic chives become so tender they almost melt in your mouth, and with the soft & chewy dough that is crispy on the outside...and the sweet & sour dipping sauce...oh man...these are a MUST try.
Want to save this recipe?
What is Kanom Gui Chai?
There are two types of kanom guichai ขนมกุ๊ยช่าย in Thailand. The classic version is the stuffed version, which is much harder because you have to make a dough and wrap the garlic chives inside. These are the ones I grew up eating, but after watching my grandmothers (both of them!) painstakingly make the dough (which is not easy) and wrap each dumpling (even more not-easy)...I had zero desire to go through the same ordeal, lol.
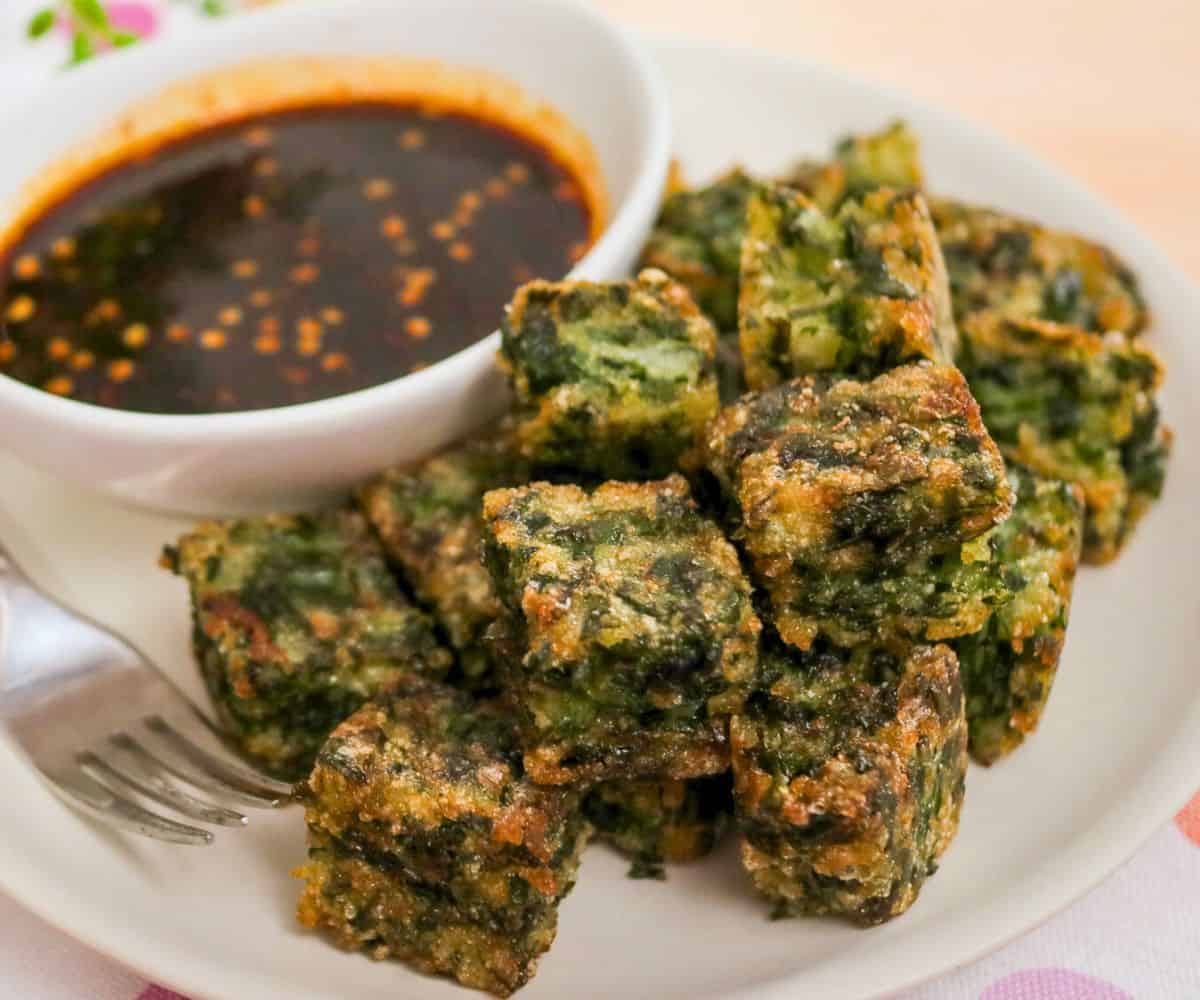
Then there are these fried ones, which I only discovered later in life and fell in love with them immediately. They are a thousand times easier, but deliver the same flavours that I love in the classic ones. Instead of stuffing, the chives are mixed right into the batter, so no fiddly wrapping required! And IMO they're just as delicious if not more because they are crispy! Oh yeah, and it happens to be gluten-free and vegan and all that good stuff 🙂
Still have some leftover garlic chives from this recipe? Then it's time to make an authentic pad thai, or my best pork dumplings (gyoza)!
Watch The Full Video Tutorial!
All my recipes come with step-by-step video tutorials with extra tips not mentioned in the blog post, so make sure you watch the video below to ensure success - and if you enjoy the show, please consider subscribing to my YouTube channel. Thank you!
Ingredients and Notes
Here are all the ingredients and important notes about them. Amounts and full instructions are in the recipe card below!
Dumplings
- Garlic chives, also known as Chinese chives or nira (in Japanese), are available at most Asian grocery stores. Some garlic chives can harbour a lot of dirt at the bottom of the plant where the leaves are joined, so you need to cut off about 1.5 inch off the bottom and then shake them in a bowl of cold water to remove the dirt before using. IMPORTANT: After washing dry off the chives as best you can! If there is a lot of water left in the chives it will make the dough too soft. I shake off the water as much as possible, then lay them on a tea towel, cover them with another, and roll them gently between the two towels.
- Sugar
- Soy sauce
- Salt
- Baking soda (optional). Baking soda is added to maintain a more vibrant green colour.
- Neutral oil
- Garlic, finely grated or minced, or you can substitute with garlic powder. If you have some garlic oil handy you can use garlic oil instead of the neutral oil and omit the garlic altogether.
- White pepper
- Rice flour. If you're buying rice flour from Thailand, be sure to get the one in the red bag which is regular rice flour. DO NOT GET glutinous rice flour in the green bag.
- Tapioca starch. While rice flour provide tenderness, tapioca starch will add a bit of bounce and chew.
- Water
Dipping sauce
- Sugar
- Water
- White vinegar, or rice vinegar
- Sweet soy sauce, I use ABC kecap manis or Thai Healthy Boy Brand sweet soy sauce. You can also substitute dark brown sugar.
- Soy sauce
- Sambal oelek or minced Thai chilies. Can be omitted if you want to make this not spicy
How to Make Crispy Garlic Chives Dumplings
Here's a bird's eye view of the process. If this is your first time I recommend watching the video tutorial, especially so you can see the texture of the dough. Full instructions are in the recipe card below!
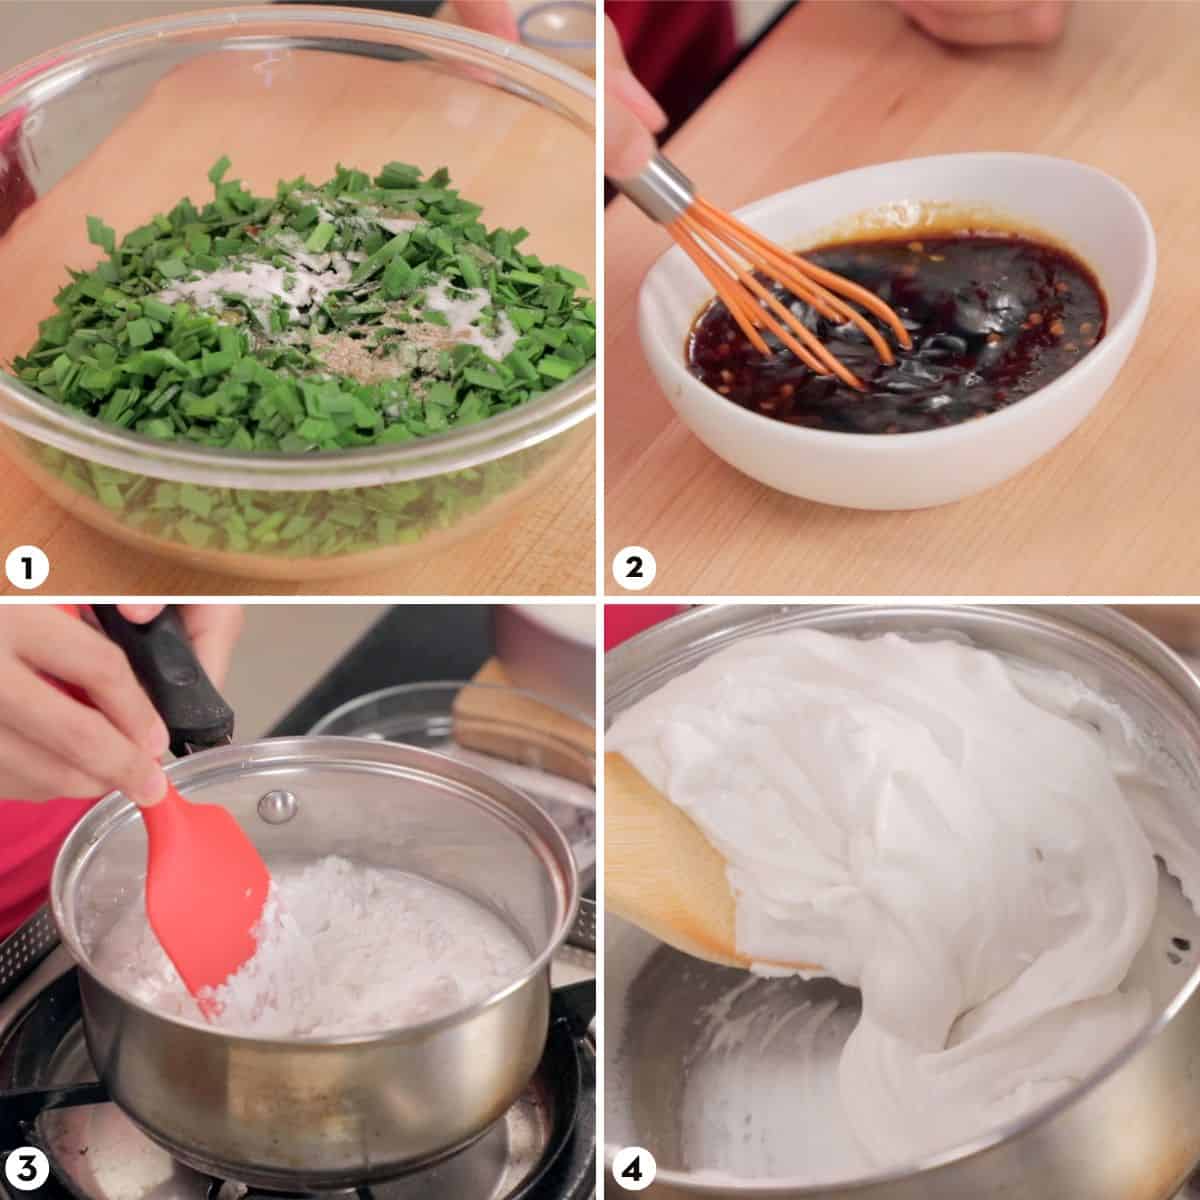
- Place the chives in a mixing bowl, and add salt, sugar, soy sauce, baking soda, oil, white pepper and garlic, and mix until combined. Let sit for at least 20 minutes until the chives are wilted.
- Meanwhile, make the dipping sauce by combining all ingredients and stirring until sugar is dissolved. This sauce will keep in the fridge for weeks!
- Make the batter: Combine water, rice flour and tapioca starch in a pot and stir until there are no more lumps. Turn the heat on LOW and stir the mixture constantly with a spatula.
- As the flour starts to cook and congeal into lumps, pull the pot off heat occasionally to smush any flour lumps against the sides to break them up. Continue stirring CONSTANTLY just until the mixture is thick enough that the chives can be evenly suspended in the batter (it can be thinner than in the pic). Remove from heat and continue stirring to break up any lumps of flour to make sure the consistency of the batter is even throughout.
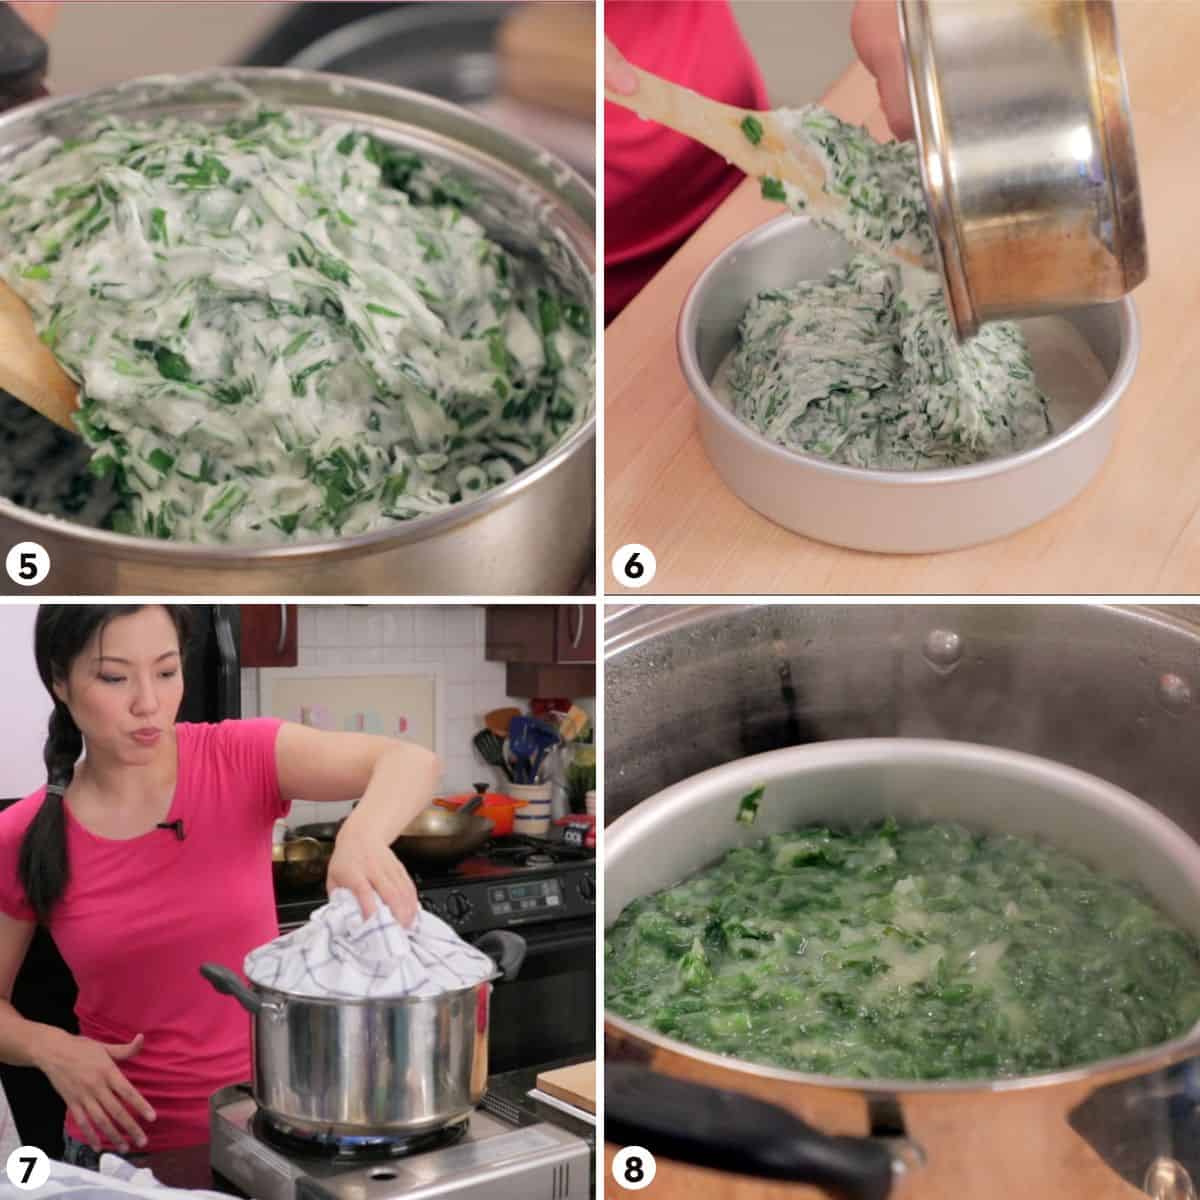
- Off heat, add the garlic chives into the batter until well combined.
- Grease a 7-inch round cake pan with oil (or use any heatproof container). Line the bottom of the pan with parchment paper. Pour the batter into the pan and smooth off the top.
- Preheat a steamer with boiling water. If you're not using a bamboo steamer lid, wrap a towel around the lid of the steamer to prevent water from dripping onto the surface of the dumplings. Alternatively cover the dumplings with foil. Steam the dumplings for 15 - 20 minutes if using a 7-inch round pan, but this can be longer if you're using a smaller container (and therefore the batter is thicker). If you have an instant-read thermometer, the internal temperature of the middle should reach 190°F.
- Let the dumpling cool completely then you can keep them in the fridge for up to a week until ready to eat.
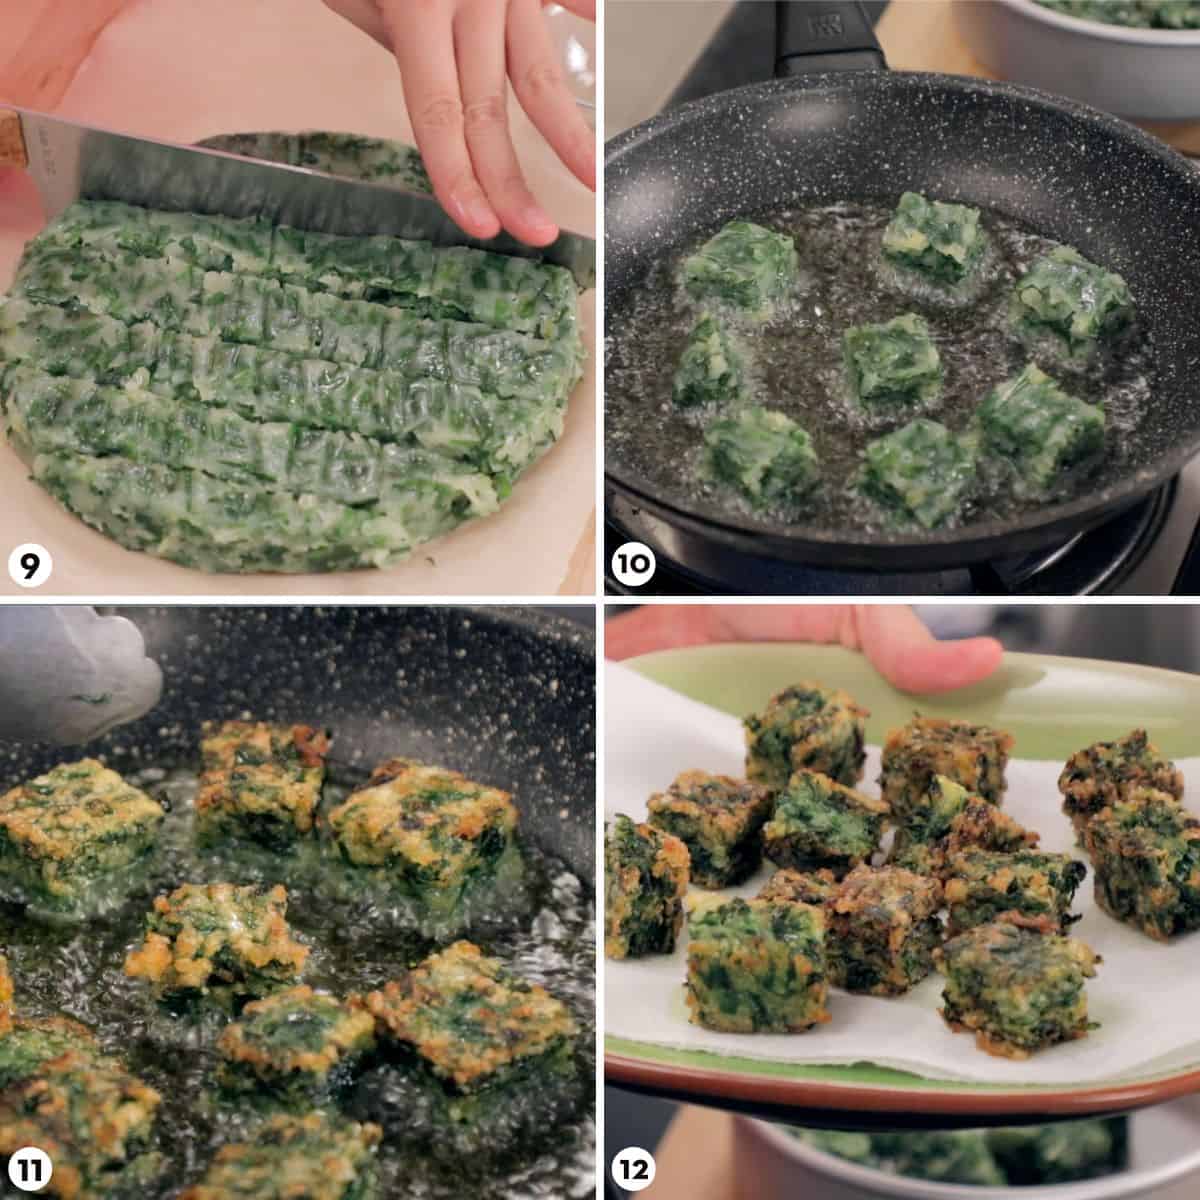
- When ready to eat, use an oiled knife to cut the dumplings into bite-sized cubes. If there is a lot of dough sticking to the blade between cuts, wipe it off and re-oil the blade.
- To fry: In a non-stick pan, add just enough oil so it comes up just below half the height of the dumplings. Heat until hot and fry them until well browned and crispy, making sure to not let them touch while in the pan or they will stick together.
- Flip and fry them on the other side until well browned.
- Drain excess oil on a paper towel-lined plate and serve while they're hot and crispy with the dipping sauce!
Advance Prep Tips
These are the perfect make-ahead appetizers. You can steam the batter and keep it in the fridge. When ready to eat, cut and fry them up (or you can cut them in advance so all you need to do is fry!). The dipping sauce will also last you a long time in the fridge as well.
Can these be made in the air fryer?
The raw batter has to be steamed in a steamer, but you might wonder if the frying part can be done in an air fryer. I have tried this, and while it "works" it's really not as good because the dumplings came out not nearly as well browned and quite a bit drier.
But were they "fine"? They were fine. And if you're really not in the mood to pan-fry things and are willing to compromise on deliciousness, then here's what you do:
- Toss the cut dumplings in a generous amount of oil.
- Place them in an air fryer basket without letting them touch, then air fry at 400°F (200°F) for 4-5 minutes or until well heated through and slightly browned on the exterior. Don't try to cook them longer to get them more browned because they will dry out too much.
Recipe Card
Print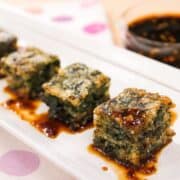
Crispy Garlic Chive Dumplings (Guichai Tod)
- Prep Time: 15 mins
- Cook Time: 45 mins
- Total Time: 1 hour
- Yield: Serves 4-5
Description
A popular Thai street food, these garlic chive dumplings are chewy in the middle and crispy on the outside, and the chives just melt in your mouth. Easy to make, and can be done ahead of time as well!
Ingredients
Dumplings
- 230 g (½ pound) garlic chives
- 2 teaspoon sugar
- ½ tablespoon soy sauce
- ½ teaspoon salt
- ¼ teaspoon baking soda (optional)
- 2 teaspoon neutral oil
- 1 clove garlic, finely grated or minced (can also sub a ¼ teaspoon garlic powder)
- ¼ teaspoon white pepper
- 100g rice flour
- 100g tapioca starch
- 1 cup (240 ml) water
Dipping sauce
- 1 tablespoon sugar
- 1 tablespoon water
- 1 tablespoon vinegar
- 1 ½ tablespoon sweet soy sauce (I use ABC kecap manis)
- 1 tablespoon soy sauce
- 2-3 teaspoon sambal oelek or pounded or minced Thai chilies to taste
Want to save this recipe?
Instructions
- Cut about 1.5 inch off the bottom of garlic chives and discard. Some garlic chives can harbour a lot of dirt at the bottom between the leaves, if this is the case, shake them in a bowl of cold water to remove the dirt before using.
- After washing dry off the chives as best you can! If there is a lot of water left in the chives it will make the dough mushy. I shake off the water as much as possible, (use a salad spinner if you have it), then lay them on a tea towel, cover them with another, and roll them gently between the two towels.
- After washing and drying the chives (see important note) cut the chives into small pieces, a little shy of 1 cm, and place in a mixing bowl. Add salt, sugar, soy sauce, baking soda, white pepper, oil and garlic and mix until combined. Let sit for at least 20 minutes or until the chives look wilted, and liquid has been drawn out of them.
- Meanwhile, make the dipping sauce by combining vinegar, water and sugar and stir until the sugar is dissolved. Add all remaining ingredients are stir to combine. This sauce will keep in the fridge for weeks!
- Make the batter: Combine water, rice flour and tapioca starch in a pot and stir until there are no more lumps. Turn the heat on LOW and stir the mixture constantly with a spatula. As the flour starts to cook and congeal into lumps, pull the pot off heat occasionally to smush any flour lumps against the sides to break them up. Continue stirring CONSTANTLY just until the mixture is thick enough that the chives can be evenly suspended in the batter (think Greek yogurt consistency), then remove from heat and continue stirring to break up any lumps of flour. Be careful not to cook the batter too much or you will have a hard time incorporating the chives into it.
- Off heat, stir the chives into the batter until well combined.
- Grease a 7-inch round cake pan with oil (or use any heat proof container of your choice, but smaller containers will increase cooking time). Line the bottom of the pan with parchment paper. Pour the batter into the pan and smooth off the top.
- Preheat a steamer with boiling water. If you're not using a bamboo steamer lid, wrap a towel around the lid of the steamer to prevent water from dripping onto the surface of the dumplings. Alternatively you can cover the pan with foil. Steam the dumplings for 15-20 minutes over rapidly boiling water, or until fully cooked. Timing will change depending on the container you're using and how thick the batter is. If you have a thermometer, the internal temp of the centre of the batter should reach a minimum of 190°F.
- Let the dumpling completely cool, or chill until ready to eat (it'll be easier to cut when cold). You can keep it at this stage for up to 1 week. When ready to eat, run a knife along the sides and flip it out. Use a sharp knife, grease it with oil, and cut the dumplings into bite-sized pieces. If there is a lot of dough sticking to the blade between cuts, wipe it off and re-oil the blade.
- Fry the dumplings: In a non-stick pan, add just enough oil so it comes up just below half the height of the dumplings. Heat until hot and fry them on both sides until well browned and crispy, making sure to not let them touch while in the pan or they will stick together. Drain excess oil on a paper towel-lined plate.
- Serve while they're hot and crispy with the dipping sauce!


Natalia says
They steamed version is fully cooked as is, but is it tasty? No doubt taking the next step and frying them for the crisp and crunch will elevate them, but I don't want the oil. What are your thoughts?
Tom L says
I would love you to do a recipe for a variation on this dish: the round leek dumpling with the pink dot in the center.
margay says
Hi! is it regular rice flour or glutinous rice flour? thank you!
Pailin Chongchitnant says
Regular. If glutinous rice flour is called for it would always be indicated as the two are not interchangeable.
Tina Bances says
Hi,
I can't wait to try this recipe. One question I have is could I air fry the cubes?
Pailin Chongchitnant says
You can....technically...but they won't be as good.
Cara says
Hey, this looks like a delicious recipe I'm eager to try out. Just one question: would it be possible to make this using wheat flour mixed to the same consistency as the rice flour used in this recipe? Would there be any problems with flavor/texture? Thanks again!
Pailin Chongchitnant says
Using wheat flour would completely change the texture of these. Will it cook? Yes. Will it be good? No idea!
Elizabeth says
I can't wait to try this recipe, Thanks You For Sharing!! I have loads of regular chives in my garden and don't live near an Asian market. Has anyone tried making this recipe with regular chives?
I have a packet of garlic chive seeds on order for batches in the coming years.
Pailin Chongchitnant says
It won't work with regular chives, sadly!
Elizabeth says
Thank you for the reply. Since posting my question, I harvested pounds of regular chives. They required a fair amount of sorting and cleaning but ultimately I had enough to make 6 batches of dumplings. The end result was not as tasty as the garlic chive dumplings we had experienced for the first time before trying to make them, but the regular chives did work. I added fresh and dried garlic to try and make up for the substitution of regular chives vs garlic chives. I fried all the batches and froze them. They reheat wonderfully! Crispy outside, moist and chewy inside. I've planted garlic chives so I can make your original recipe in the future. Until I can harvest or find garlic chives at market, I'll make do with regular chives. Great Recipe! Thank you so much for sharing!
Pailin Chongchitnant says
Well that is good to know! I did not want to recommend it as I knew it would not be as tasty, but good to know that you enjoyed them nonetheless, and it's a great way to use pounds and pounds of chives! Thanks for reporting back 🙂
Nat says
These look amazing! Do you think they’d handle being frozen after steaming (so that all you’d have to do to cook them is thaw & fry)? I would love to meal prep a bunch of these, so just trying to figure out the best way to go about it.
Thanks in advance 🙂
Pailin Chongchitnant says
I've never done it myself, but I'm going to guess that they'll freeze just fine.
Jaimee says
I cannot find garlic chives in my neck of the woods, would scallions work?
Aidan says
Absolutely not. They have much more water in them and are much stronger in flavor. It might not be the worst thing you've had, but it sure wouldn't be worth all that work.
Ethan says
Can’t wait to try this —just literally got back from Thailand and this was the first thing we looked up today…didn’t even know their name but they were one of our favorite things we had! Awesome vendor in the Bangkok Noi neighborhood was making these and one other vegetable dumpling…they were little “pucks” filled with chives with dough on the outside…any clue what those were? Anyway wish these falangs luck. Love your site; we’ll let you know how we do. Krap khun ma krap, Pai!
Pailin Chongchitnant says
That's essentially the same thing except it's the "Wrapped" version and this is the mixed version, wrapped one is much harder to make.
Ting says
Delicious!! I doubled the recipe and used a whole pound of chives, they were gone in an instant. Made another batch today. Thank you for never failing us!
Important Note: make sure you stir the flours in cold water to completely dissolve in a slurry before gently heating it and make sure you stir constantly, this batter will clump instantly! That was the only tricky part of this recipe.
Elizabeth says
I love making pot stickers at home but it's always a huge project, so this recipe really caught my eye! Bought a bunch of garlic chives and it was a great success. Do you think it could be adapted to a version with ground meat and other veg (e.g. cabbage)? Not sure what the additional liquid from those ingredients would do when steaming the cake. Any prospective tips would be greatly appreciated. Thank you!
Pailin Chongchitnant says
Hmm so using cabbage will be fine, the meat you will need to cook it off first before mixing into the dough. Never seen or tried it but something to experiment with!
Kim says
So easy and so delicious!
Tanisha says
Hi, do you have the nutritional information for these?
Pailin Chongchitnant says
I do not, unfortunately, sorry about that!
Sheryl says
Hi Pai! Love this recipe because I miss the street food in bkk. May I know how long I can keep this in the fridge before frying?
Pailin Chongchitnant says
it should last up to one week 🙂
Sheryl says
I tried it, and it was delicious. The lady at the market sold me more chives than recommended when she heard I was making this dish. So I ended up with ~300g, which made it extra crunchy and flavourful. I wasn't able to get the same yogurt like consistency for the dough as you did and my dough clumped up even after stirring (cos i walked away for a few seconds to pick up a serving bowl). So I added extra water to the hot pan. Recipe is very forgiving. It still turned out good. Thanks for a great snack Pai, I had this for breakfast 🙂 sauce was excellent too. I couldn't find sambal oelek, so I added sambal belacan.
Maya says
Would there be a possibility to substitute the tapioca starch with corn starch?
Regards M
Anna says
Can this be crisped up in an air fryer for less oil?
Pailin Chongchitnant says
Hmm, maybe. I think you'd need to at least brush them with plenty of oil first otherwise the hot air will just dry out the surface. Give it a go and let me know how it works!
Ann says
How many does this serve?
Pailin Chongchitnant says
It fills one 7-inch round cake pan, so for an appetizer probably enough for 4-6 people depending on what else you're serving.
Cath Kerry says
I had them in a restaurant last week so delighted to find your recipe. Worked perfectly, fantastically crispy - thank you. (BUT "gluten free and vegan and all that good stuff" - not necessarily. This is feeding into the food phobics. If you are not a celiac, gluten is NOT unhealthy! Your recipe is delicious. Leave it at that.)
Ariane says
so what? cause it can encrease eatingproblems in non allergics you want to ban filter words that help people who desperatly need them?! Maybe also ban bras since men usually do not need them either, or blood thinners, those can harm those who do not need them too
Debra Cohen says
I do believe this is what I had in a Thai restaurant last night, except they called it Guay Chai, and it was cut into triangles and browned on all sides. They were outrageously delicious! I'm going to make this recipe because I think it's the same thing. Thank you for this recipe. I've never heard of garlic chives before, but there is an Asian Market in my area so I will look for them there. Thanks again!
jules says
I’ve been looking for this recipe for years, but I didn’t know what it was called!! these came out even better than the ones at my favorite restaurant (they just call them chive rice cakes). Mostly followed the recipe, will probably be making them again tomorrow. They’re that good. Thank you so very much!!!
Pattarin says
Very crispy and delicious as expected. I added some chopped bamboo shoots and dried shrimps and doubled the recipe. Worked out really well too. Thank you!
Adam The HTK Intern says
Awesome!
Noon Walker says
Yes, I cooked กุยช่ายทอด. Cut into small pieces and freeze them. Grab few pieces to eat for a meal. Save time and yummy 🤤.