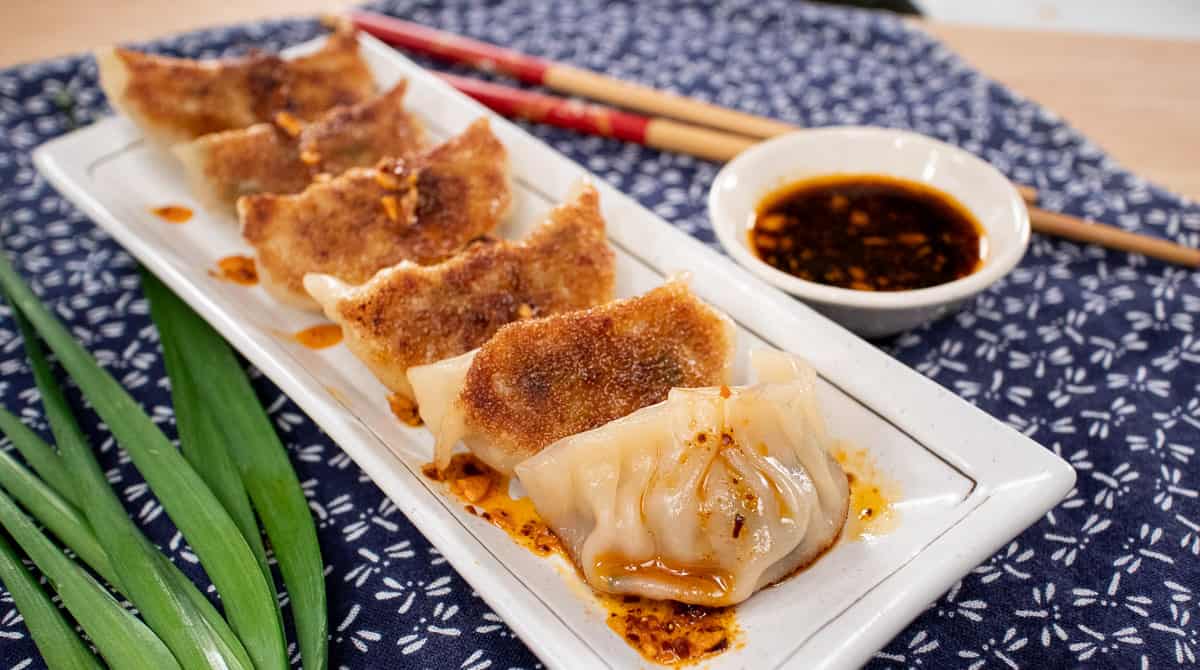
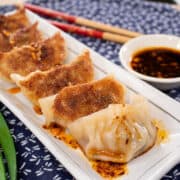
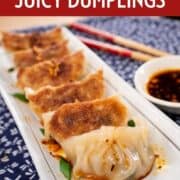
Whether you call them potstickers, gyoza, or just dumplings, one thing for sure is they are awesome. These are more of a "gyoza" because of the flavours used. The filling is a classic pork and cabbage (the best kind, IMO), but read on and I'll share many secrets to making the juiciest, most delicious filling that will beat any restaurant. And don't forget to watch the video tutorial for both the pretty and the fast-and-easy ways to wrap dumplings!
If you're a dumpling lover, you've got to also try my super popular shumai recipe. It's faster and easier, but just as tasty!
Want to save this recipe?
Ingredients
Here are all ingredients you'll need for these to-die-for gyoza:
- White peppercorns (black is okay too)
- Garlic
- Ginger
- Napa cabbage
- Salt
- Ground pork (preferably not lean)
- Toasted sesame oil
- Soy sauce
- Dashi powder (optional but highly recommended; if not using add 1 teaspoon more soy sauce)
- Sugar
- Tapioca starch or cornstarch
- Garlic chives or green onions
- Dumpling wrappers, store bought
Dipping Sauce
- Rice vinegar
- Soy sauce
- Sugar (optional, but Thai people like to add this to lessen the sharpness of the vinegar)
- A little drizzle of rayu (Japanese chili garlic oil, optional but highly recommend!) You can also use another chili oil of your choice.
How to Make Pork Dumplings
Here's a bird's eye view of how to make these tasty dumplings, but be sure the watch the video tutorial, and also read the following section about tips for making these dumplings extra good!
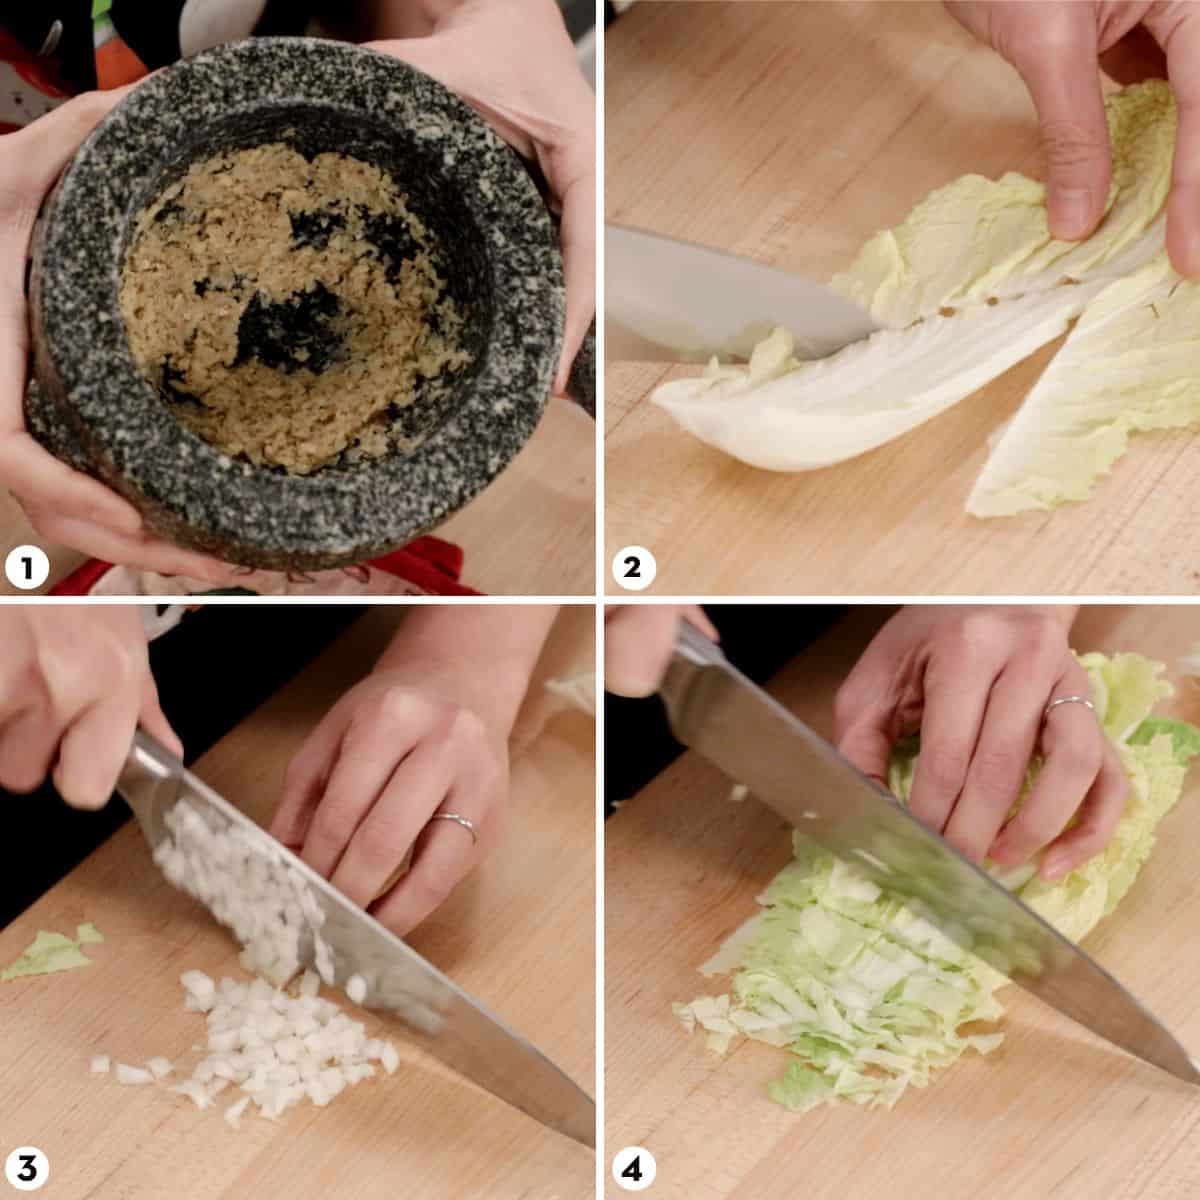
- Pound the garlic, white peppercorns, and ginger into a paste.
- Separate the stems from the leaves of napa cabbage.
- Finely dice the stems.
- Chop the leaves into ribbons.

- Saute the herb paste until aromatic, then add the napa cabbage stems.
- Cook until the stems are soft and looks like a thick paste.
- Add the napa cabbage leaves and cook until the leaves are wilted and the mixture is mostly dry.
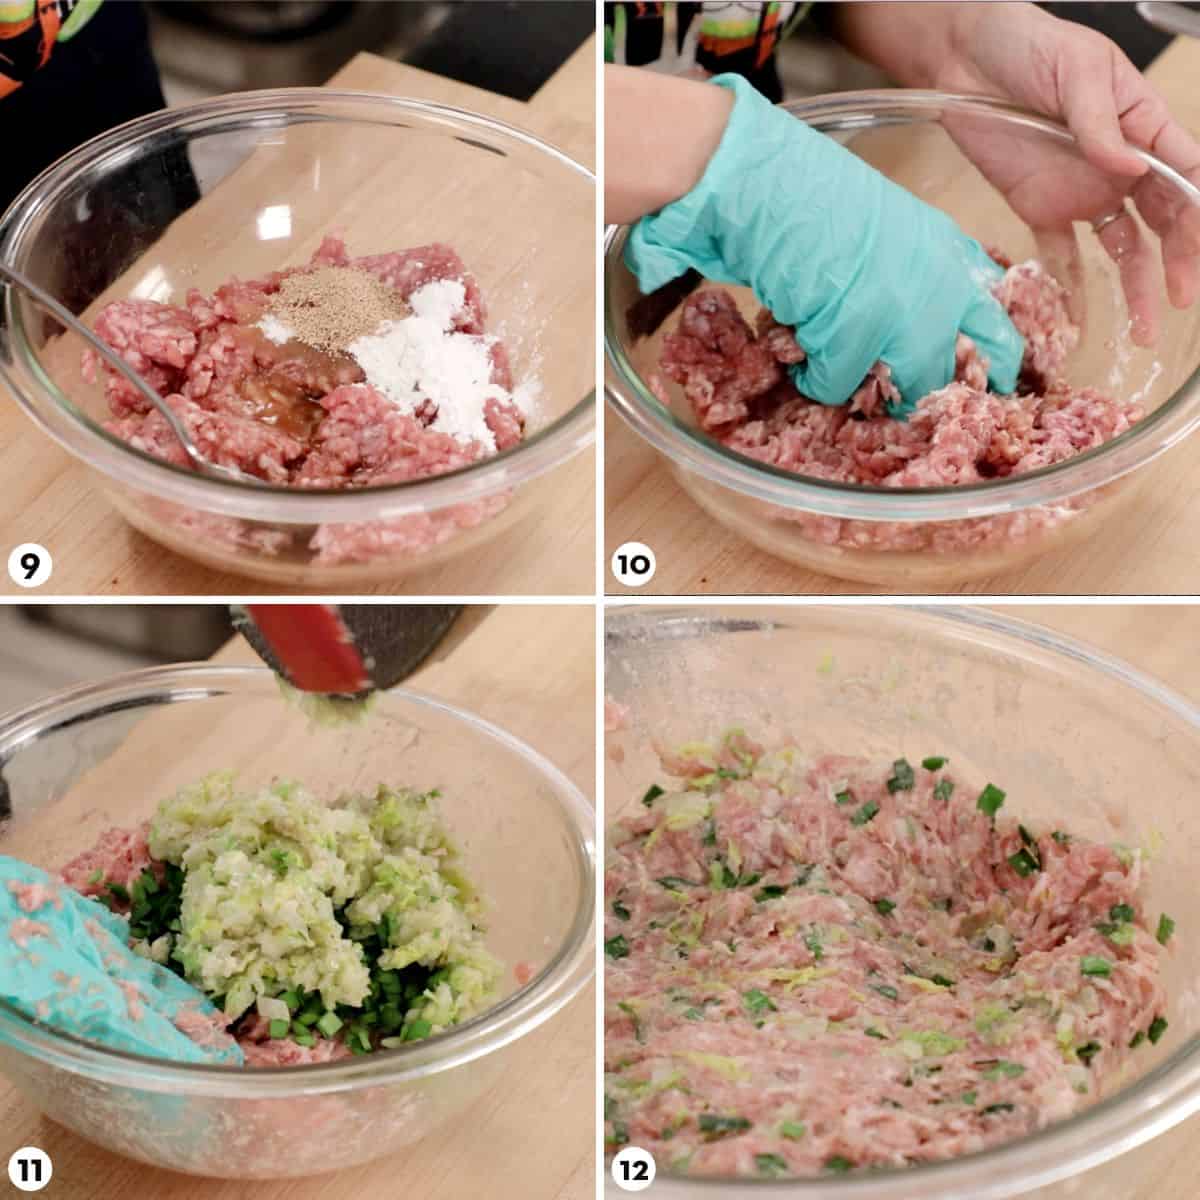
- Combine all of the seasonings, starch and the pork.
- Knead well until the mixture looks like a fine paste.
- Add the cooled cabbage mixture and the garlic chives.
- Mix gently until well combined.
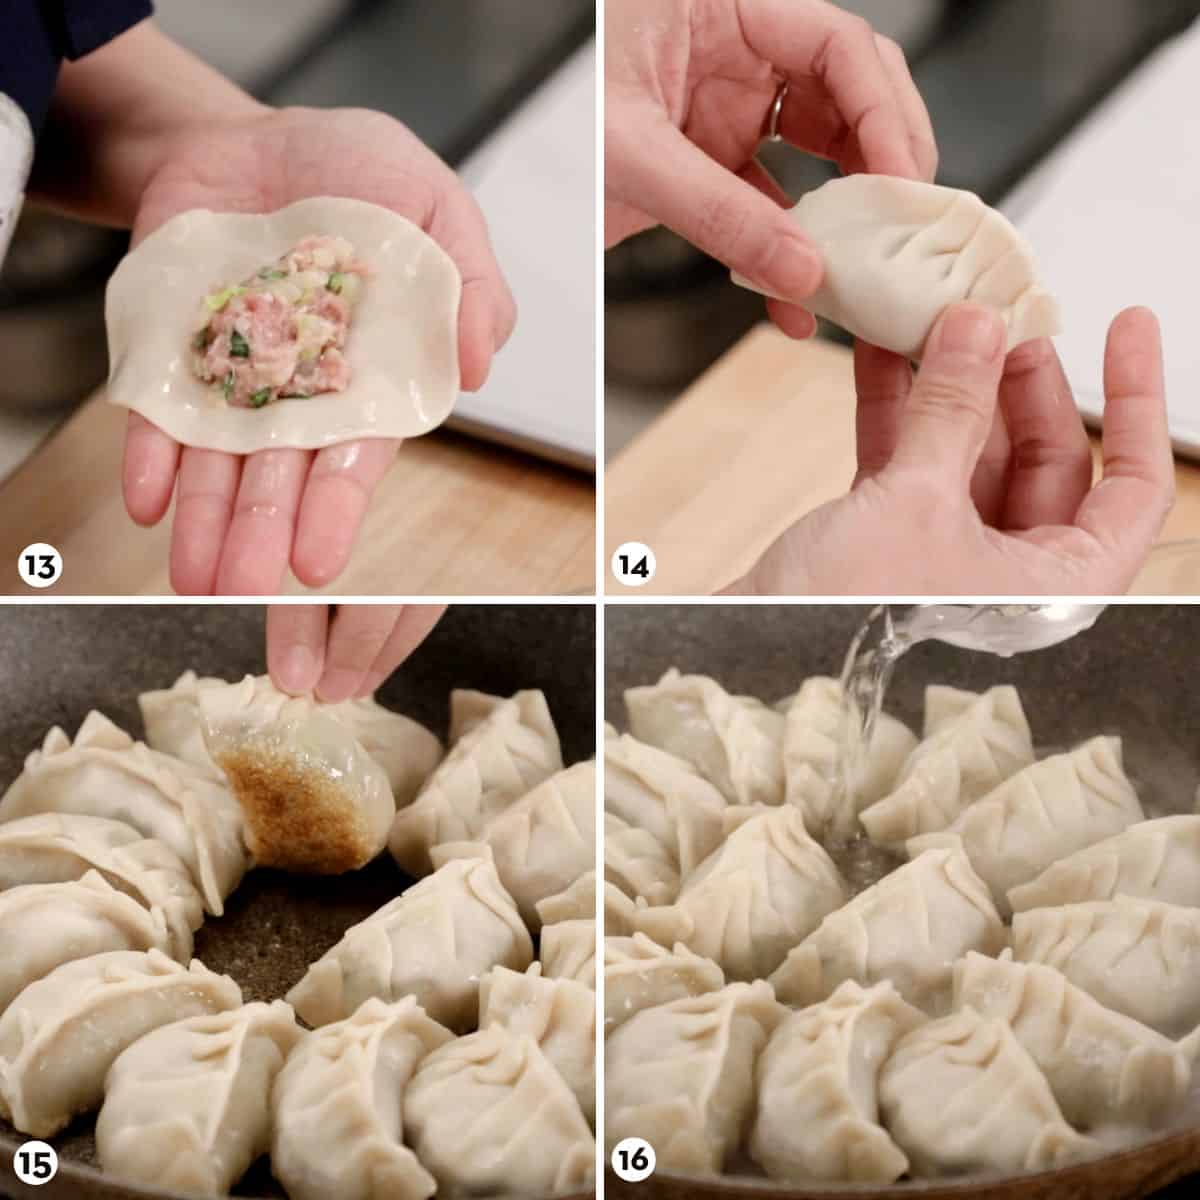
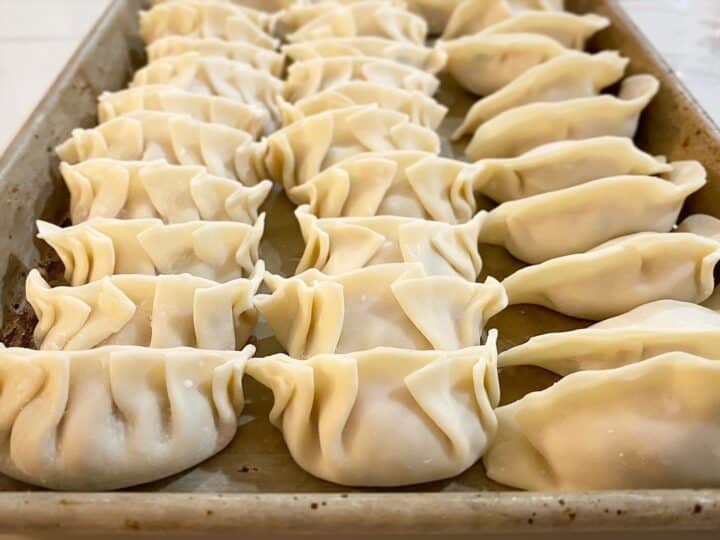
- Wet the edges of the dumpling wrapper and fill with about a tablespoon of filling.
- Pleat the dumplings if you wish, or keep them unpleated. (See video tutorial for how to pleat dumplings.) You can freeze them at this point.
- Pan fry the dumplings in oil in a skillet until the bottoms are golden brown.
- Add some water to the pan to create steam.
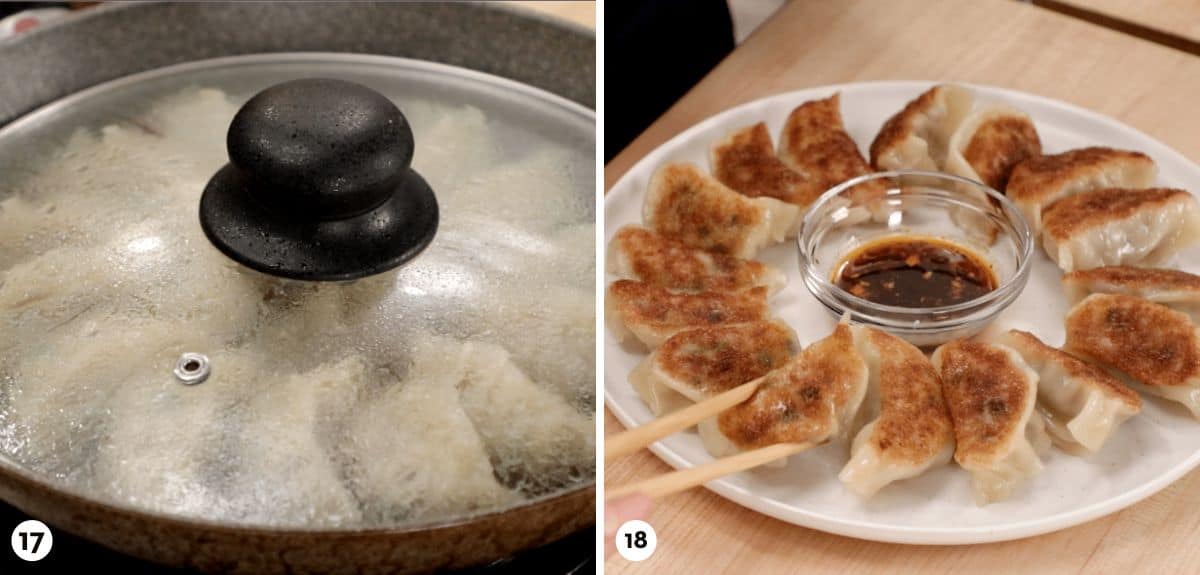
- Close the lid and steam the dumplings for 3-5 minutes. Then open the lid and allow excess moisture to evaporate.
- Serve immediately with dipping sauce.
Different Ways to Wrap the Dumplings
In the video I show you how to make dumplings with no pleats and lots of pleats. Pleats look nicer, clearly, but if you're not concerned about looks, here are some things to consider:
Pros of not pleating:
- Way less work, obviously.
- Without pleats, you can put more filling in and make dumplings with higher meat-to-wrapper ratio. Bigger dumplings = fewer dumplings = even less work.
- With no folded parts, the wrapper remains thin all throughout the dumpling. This makes a difference if your dumpling wrapper is on the thicker or chewier side.
Cons of not pleating:
- They won't naturally form the crescent shape, so you have to make sure to manually bend them (see video for how to do this). Without the crescent shape they won't be able to sit up and you won't get those nice browned, seared bottoms.
Pork Dumpling Recipe Secrets & Tips
As I was testing out this recipe, I discovered many tricks and tips that have made a big difference. You'll want to give it a try!
Secret #1: Key to Juicy Dumpling Filling
The most important factor for a juicy filling is the fat content of the ground pork. There is little you can do if you're starting out with pork that is too lean.
Many Western stores only carry lean ground pork, so check out Asian grocery stores which often have "regular" ground pork that is fattier.
If you have access to ground pork with different fat content percentages, shoot for 25-30% fat. For comparison, lean ground pork in Canada has a maximum of 17% fat, and regular ground pork is max 30%.
Secret #2: How to Keep ALL the Flavour In
Many recipes will ask that you salt the cabbage to draw out moisture, or boil and squeeze the daylight out of them to get rid of excess liquid. That's fine, but you lose a lot of that sweet napa cabbage flavour and not to mention nutrients!
I came across a technique from Lisa Lin of Healthy Nibbles, where she sautés the cabbage so that in the process of removing the liquid, the flavour gets concentrated rather than removed. Brilliant!
Secret #3: How to Keep the Meat Juices In
Starch! When meat cooks, muscle fibers tighten and the juice gets squeezed out. We all know this by experience of cooking burger patties. The little bit of added cornstarch or tapioca starch helps absorb and retain this juice inside.
Secret #4: How to Add Extra Umami
Dashi powder! Also called "hon dashi," it's a Japanese fish stock powder that adds umami and those iconic Japanese flavours. This is my secret weapon, which I've also used in my garlic fried rice recipe.
Secret #5: Getting the Right Texture
You don't want to just mix the meat, you want to knead it for a period of time. This develops the protein and make the filling smoother and "bouncier", as opposed to having that coarse burger patty texture.
Secret #6: Serve it With This
Honestly, these are so flavourful you do not need to serve them with any condiment, though I do think that they benefit from the simple soy-vinegar dipping sauce to balance the richness. But for MAX flavour, try adding "rayu" or "layu", which is Japanese chili oil with crispy garlic, sesame oil, and other delicious seasonings. If you've never had this, try it and you'll want to put it on everything!
Frequently Asked Questions
Yes, but again the important part is keeping the fat content high. If you want to do chicken or turkey, use dark meat, not white meat. You can also use ground beef but it will have a strong and quite different flavour.
You can take the time to make the wrapper, but I personally don't think there's much benefit apart from the joy of making things from scratch. I don't think homemade ones are necessarily "better", and if anything it might not be as good if you're not experienced in making them.
What I would recommend instead is to try a few brands of wrapper to find the one you like best, because they are all a little different - some chewier than others, some thicker, some thinner.
Yes and no. You CAN wrap them in advance but then you have to freeze them. If you wrap them and put them in the fridge, eventually the moisture from the filling will turn the wrapper soggy! Remember the wrapper is still raw, and so it will eventually "dissolve" if exposed to moisture long enough.
Freeze uncooked dumplings on a baking sheet without touching each other so they don't stick together. Line the tray with parchment paper otherwise they will stick to the tray. If you forget and they DO stick, you can use a flat spatula to pry them apart.
Once frozen, you can consolidate them into a freezer bag or container.
Do NOT thaw them. You can cook frozen dumplings using the exact same method as non-frozen ones, they just take a bit longer, about 5-6 minutes after adding the water.
In this recipe the dumplings are first pan fried for a crispy bottom, and then steamed. But simply boiled or steamed dumplings are also delicious and are much faster. After steaming or boiling, toss them in some chili oil and/or garlic oil for extra flavour, and it'll prevent them from sticking to each other.
Watch The Full Video Tutorial!
All my recipes come with step-by-step video tutorials with extra tips not mentioned in the blog post, so make sure you watch the video below to ensure success - and if you enjoy the show, please consider subscribing to my YouTube channel. Thank you!
My Best Pork Dumplings
- Prep Time: 1 hour
- Cook Time: 10 mins
- Total Time: 1 hour 10 minutes
- Yield: 35-40 pieces
Description
These have a juicy, umami filling, and are cooked using the "water frying" method for crispy bottoms without needing to boil a pot of water!
Ingredients
- 1 teaspoon white peppercorns
- 4 cloves garlic
- 2 tablespoons chopped ginger (~1-inch piece)
- 250g napa cabbage (~3.5 cups chopped)
- ½ teaspoon table salt
- 1lb (450g) ground pork (preferably not lean)
- 1 teaspoon toasted sesame oil
- 1 ½ tablespoon soy sauce
- 1 ½ teaspoon dashi powder (optional; if not using add 1 teaspoon more soy sauce)
- 2 teaspoon sugar
- 1 tablespoon tapioca starch or cornstarch
- ½ cup chopped garlic chives or 3 finely chopped green onions
- 1 package dumpling wrappers (40-50 pieces)
Dipping Sauce
(This amount below is per person as you want everyone to have their own bowl do they can double dip. Scale up proportionally according to the number of people.)
- 2 teaspoon rice vinegar
- 2 teaspoon soy sauce
- Optional: A pinch of sugar (Thai people like to add this to lessen the sharpness of the vinegar)
- Optional: A little drizzle of rayu (Japanese chili garlic oil, highly recommend!) or another chili oil of your choice
Want to save this recipe?
Instructions
- Separate the white and green part of napa cabbage leaves. Finely dice the white "stems" and finely chop the leaves, keeping them separate.
- In a mortar and pestle pound peppercorns until fine. Add garlic and ginger and pound into a fine paste.
- In a wok or a large skillet over medium heat add a tablespoon of oil and the garlic paste. Saute until aromatic; about 2 mins.
- Add napa cabbage STEMS ONLY and turn the heat up to medium high. Add ¼ teaspoon of the salt and cook until soft and translucent; about 4-5 minutes.
- Add the cabbage leaves and cook for another 2-3 minutes until wilted and there’s no pooling liquid. Remove from heat and spread it all out on a plate to cool quickly.
- While the cabbage cools, combine pork, the remaining ¼ teaspoon salt, soy sauce, dashi powder, sesame oil, tapioca starch, and sugar, and knead with your hands (I'd wear a latex glove) for at least 5 mins. After kneading it should look smooth and pasty.
- Add the cooled cabbage and garlic chives and mix gently using a "fold and squish" action just until the vegetables are evenly distributed.
- Cook a little bit of filling in the microwave to taste so you can adjust the seasoning if needed. (If you follow the measurements exactly, you won't need to adjust, but it's good habit to ALWAYS taste anything that can't be fixed after cooking, because you might have forgotten something!)
- Wrap the dumplings: Using a dessert spoon, scoop up a spoonful of filling (about 1 ½ Tbsp) per piece. Watch the video for how to wrap.
- If you're not cooking them right away, freeze them immediately. Do not wrap and let them sit unfrozen for any longer than a couple of hours. (See FAQ above for more details and how to properly freeze dumplings.)
- Mix together the dipping sauce before you start cooking so it'll be ready.
Cook the dumplings:
- In a nonstick skillet (or a well-seasoned cast-iron pa), add a little oil to thinly but thoroughly coat the bottom. Turn the heat on to medium high, and without waiting for the pan to get hot, go ahead and arrange the dumplings on the pan in a circular pattern. You can pack them pretty close together and fill the pan completely, but not so much that they are squished.
- Fry the dumplings for about 3-5 minutes or until the bottoms are well browned.
- Turn the heat down to medium and add about ¼ cup of water (it will splatter) and then close the pan with a tight fitting lid. Steam for about 3 minutes (5 mins if cooking from frozen) until cooked through. I like to use an "instant read" thermometer to check doneness, and I'm going for an internal temp of 160°F minimum.
- Once done, you can either use tongs to arrange them on a plate, OR if you're fancy, you can put a plate upside down on top of them pan and flip the whole pan onto the plate and serve the dumplings crispy side up. Just be quick and confident when you flip!


Kelli Brittain says
I finally can make dumplings!!!! Love this recipe and the explanations. I added a little tamarind paste cos I add it to everything and added Siracha to my dipping sauce. Thank you for an easy delicious recipe, no more store bought frozen semi ok dumplings for our family
Rachel says
I am making these for a large group, any tips to keep them warm since I'll have to cook them in batches? Thanks
Pailin Chongchitnant says
I would keep them in a casserole dish, covered with foil so they don't dry out, and keep the dish in a low oven (250-275F).
Jim and Greg says
Love this and made many times!
I’d like to switch it up and use minced and chopped shrimp. Any suggestions or need for additional or less corn starch etc.? I’d love to get your opinion.
Pailin Chongchitnant says
Thanks! I'd say keep everything the same and it should be fine 🙂
Missy says
This is our go to recipe for making dumplings! So good😍
Susan Caraher says
I've never made my own gyoza before, but I made these for dinner yesterday and they were amazing! Definitely going on to our regular rotation! I even used my much neglected mortar and pestle. I loved the process of just pulling everything together by hand and folding the dumplings was so satisfying. Thank you for a great new (to me) recipe!
Amin says
Frying the cabbage is changed my life. Why salt the water out when you an fry it out and get delicious browned cabbage flavour? Honestly I make this as an excuse to just polish off a new jar of lao gan ma, but by itself it is also truly delicious. Love your recipes, Pailin!
Lui says
Hi there, how are you? My love for dumplings led me to your page and really want to try your pork dumpling recipe, but i have some concerns...
• I am allergic to Sesame, is there any alternative or could i just leave it out?
• Also i am not much into soy sauce, can i sub it with fish sauce ?, if so how much?
I hope you'll see this sooner as i'm really excited to try this out. Thank you in advance and more power.😊
Pailin Chongchitnant says
Hi! You can leave out the sesame, and yes you can use fish sauce instead, and equal amount. Sorry it took so long!
Holli Martin says
Very good dumplings but personally did not like the dashi powder at all!!! Make the entire dumpling taste like fish with such little added!!
Caterina Malaer says
Hi, I made several times your Gyozas (the wrappers from scratch) and everybody who eated them were more than happy! They‘re so delicious! Thank you for posting this recipe. Love the video.
Best regards from Switzerland
Cate
Micki says
I love this recipe, it’s the second time I’m using it and making them, they are delicious
Cam Red says
Very good recipe, had a lot of fun making it too. Well def make again, Thank you!
Melissa says
My daughter would eat dumplings in her breakfast cereal if she could, she loves them that much! Thank you for this amazing recipe! I’ve made dumplings before but never this tasty. The corn starch part is pure genius!
Jen says
Super great recipe!
Emily Bennett says
This recipe is amazing!!!! I have made dumplings quite a few times before. Often they are dry or lack flavour, but not these! I added raw prawn and substituted some of the pork mince and it was delicious. Thank you for a recipe I will refer to from here on out.
Alexandra says
Love these! Really appreciate the recipe and all the secret tips and techniques. Your amazing thank you.
Kristy says
I made these for my daughter in-law who loves dumplings. She said she can never eat dumplings in a restaurant aging. These are truly the best dumplings. Thanks Pailin for an amazing recipe!
Chanel says
This is the best recipe ever! So much so that I can no longer eat dumplings at my (previous) favorite dumpling restaurant! Or anywhere else for that matter. I watched the video on how to wrap dumplings and now I feel like a pro! Your directions are so easy to follow and I look forward to trying another of your recipes 🙂
Craig says
Your recipe omits oil (& amounts) for frying the cabbage...
Pailin Chongchitnant says
Thank you for letting me know! Will add 🙂
Liza says
Hi, I have made these twice and they are super delicious. Now I want to know if I can steam them instead of frying.
Mark says
A video link directly to the recipe would be nice.
Annie says
I don’t usually review recipes but I just had these for a second time and was so pleased with the meal I had to come over here. These are *delicious*. So satisfying and the sauce recipe is perfect as well. They are super easy to cook up straight out of the freezer, too. I’m so glad I stumbled upon this recipe!
DJ says
Turned out beautifully (wish I could post pictures here) and everyone in my family loved it!
I didn't have chives and don't really care for the taste so I used green onion instead.
My mom said it's the best dumpling filling she's ever had!
Thank you Pai!
Jaz Parker says
I followed this recipe to a "T". The dumplings were absolutely delicious. Thank you for sharing your tips. I will keep these on-hand from here on out.
linda hafdahl says
This is the first time I have ever made potstickers and they came out so yummy! My hubby was very impressed. i will definitely make them again! They are much better than other potstickers I have had in restaurants! I really appreciated your special hints!
Lokesh says
Made these before and best dumplings I've ever made!
Can the filling be made in advance? Wanted to make the filling beforehand but not wrap them until I'm about to cook them. Is that ok?
Pailin Chongchitnant says
Absolutely! In the fridge it'll last a couple of days, but you can also freeze it.
Susan says
Hi Pailin,
It’s a good idea to do the filling in advance but I’m afraid it gets watery when thawed? Thanks.
Pailin Chongchitnant says
If you're going to freeze I suggest just wrapping it and freezing the finished dumplings, and then cook them from frozen. The filling will last in the fridge for a couple of days though.
Pailin Chongchitnant says
Having said that since the veggies are already cooked..I don't think the filling will become watery when thawed if you were to freeze only the filling.
Max Lang says
Hi Pailin
Great Gyoza recipe with nice tips for great taste. Your meat potion is 450g. If I want to make with 900g meat, should I just add double the amount of ingredients you used to make with 450g.
Thank you Pailin and God Bless.
Max
Pattarin says
I made these a few times now with different wrappers as you suggested and found my favorite. Thanks for all the secrets and tips! These are very delicious!
Natalie says
I made these today and they turned out beautiful.
I plan to use the frozen ones in soups for work.
Adam The HTK Intern says
Awesome! 🙂
Shawndra @ ExceptionalHomeCooking.com says
These were the tastiest homemade dumplings I have ever made! The dashi added a great flavor, and I really appreciated the step of pre-cooking the cabbage for maximum tenderness. Thank you for the lovely recipe.
Rizalina Agbulos says
You always make it easy for us to follow your instructions. And also please ,I wished more filipino dishes with your own twist put on it. I am looking forward to every dish you are making whether filipino or otherwise. You look awesome and very inspiring. I thank God you are sharing the gift of cooking. God bless you from your avid fan from Miami Florida and already retired .
Nada Rann says
First time I tasted Dashi powder and loved it !! I was always scared to use it thinking it would have a real stinky fish taste , but no , I was PLEASANTLY SURPRISED!! I’m European and we use VEGETA for our extra seasoning , now I know Dashi is my new VEGETA for all my Asian cooking !!! Can’t wait to try your recipe , I’ve learned a lot especially with adding cornstarch ( my dumplings were always watery !! Love and peace !! Happy cooking !! 🙏🤗