Here's how to make your own fresh soy milk and how to serve it for breakfast the way Thai people do! In Thailand, soymilk is sold be street vendors everywhere, and although it can be enjoyed any time of day, it's particularly popular in the morning. To make it a more substantial breakfast, we add beans, grains, and other "fixins" to make it more nutritious and filling. It's really quite simple to make, and in my opinion, tastes so much better than store bought versions!
Watch The Full Video Tutorial!
All my recipes come with step-by-step video tutorials with extra tips not mentioned in the blog post, so make sure you watch the video below to ensure success - and if you enjoy the show, please consider subscribing to my YouTube channel. Thank you!
Ingredients
Here are all the ingredients you'll need to make this recipe. For amounts, check out the full recipe card below.
Want to save this recipe?
- Dry soybeans, preferably split, but whole ones will work
- Water
- Pandan leaf, optional (see note)
- Salt
- Sugar or other sweeteners, to taste
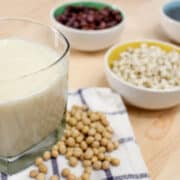
- Options for fixin's: red beans, mung beans (split), job's tears, lemon basil seeds, large tapioca pearls, plain agar agar cubes, gingko nuts
Note: Pandan leaves are available fresh and frozen at some Asian grocery stores.
How to Make Homemade Soy Milk นำ้เต้าหู้
Here are all the steps to make this recipe. If this is your first time, I highly recommend watching the video tutorial to ensure success.
- Rinse soy beans and soak in plenty of water. If using whole beans, soak for at least 10 hours; if using split beans, soak for at least 3 hours. To check if soybeans have fully hydrated, split the beans in half and check if there is any darker colour in the center of the bean (dark spot means it hasn't fully hydrated).
- If using whole beans, remove the skins from the beans (they have a weird aftertaste.) To remove the skins, leave the beans in the soaking water and scrunch them in your hands and the skins will be rubbed off.
- Once you have removed a lot of skins, pour off the water and most of the skins will come out with it. Add more water and repeat the process until most of the skins have been removed.
- In a blender, blend the beans until smooth with just enough water to get it going. Once blended add more water to thin it out, leaving about 1 ½ cups of water for later. Set a sieve or colander over a pot and line it with muslin or several layers of cheesecloth.
- Pour half of the puree into it, stir to strain off most of the liquid, then gather the edges of the cloth, and squeeze the remaining milk out (see video).
- Open the cloth, then pour in half of the remaining water to "rinse" out any remaining soy milk. Strain and squeeze. Repeat with the other half of the puree.
- Heat the soymilk with pandan leaf (if using) over meadium high heat, stirring constantly, and once it starts to bubble, lower the heat down as low as you can to maintain a gentle simmer.
- Simmer for 20-30 minutes, stirring occasionally, until the soymilk no longer has a raw, grassy smell.
- Remove from heat, add salt and sweetener as desired. Enjoy hot or cold! You can also add any of the optional fixin's listed above to make it into a more filling, street-style breakfast.
Homemade Soy Milk นำ้เต้าหู้
- Yield: Makes about 1.2 L
Ingredients
- 150 grams dry soybeans, preferably split, but whole ones will work
- 1.2 L (5 cups) water
- ½ pandan leaf, optional (see note)
- A pinch of salt
- Sugar or other sweeteners to taste
- Options for fixin's: red beans, mung beans (split), job's tears, lemon basil seeds, large tapioca pearls, plain agar agar cubes, gingko nuts
Note: Pandan leaves are available fresh and frozen at some Asian grocery stores.
Want to save this recipe?
Instructions
Rinse soy beans and soak in plenty of water. If using whole beans, soak for at least 10 hours; if using split beans, soak for at least 3 hours. To check if soybeans have fully hydrated, split the beans in half and check if there is any darker colour in the center of the bean (dark spot means it hasn't fully hydrated).
If using whole beans, remove the skins from the beans (they have a weird aftertaste.) To remove the skins, leave the beans in the soaking water and scrunch them in your hands and the skins will be rubbed off. Once you have removed a lot of skins, pour off the water and most of the skins will come out with it. Add more water and repeat the process until most of the skins have been removed.
In a blender, blend the beans until smooth with just enough water to get it going. Once blended add more water to thin it out, leaving about 1 ½ cups of water for later. Set a sieve or colander over a pot and line it with muslin or several layers of cheesecloth. Pour half of the puree into it, stir to strain off most of the liquid, then gather the edges of the cloth, and squeeze the remaining milk out (see video).
Open the cloth, then pour in half of the remaining water to "rinse" out any remaining soy milk. Strain and squeeze. Repeat with the other half of the puree.
Heat the soymilk with pandan leaf (if using) over meadium high heat, stirring constantly, and once it starts to bubble, lower the heat down as low as you can to maintain a gentle simmer. Simmer for 20-30 minutes, stirring occasionally, until the soymilk no longer has a raw, grassy smell.
Remove from heat, add salt and sweetener as desired. Enjoy hot or cold! You can also add any of the optional fixin's listed above to make it into a more filling, street-style breakfast.


Leave a Reply