My goal for this recipe is to prove to you that Thai fried chicken is the best in the world, no exaggeration 😉. Specifically, Hat Yai style fried chicken; Hat Yai being my hometown in southern Thailand. I’ve had fried chicken from all over the world, and I still haven't experienced one better than ours. Read on, then try the recipe (it's really quite easy) and see if you agree!
Want to save this recipe?
What is Thai Fried Chicken?
While this particular style of fried chicken originated from Hat Yai, it's now made all over Thailand because it's that good, (and therefore I'm simply calling them Thai fried chicken going forward). It's so popular that Lays Thailand now makes "Hat Yai Fried Chicken" flavour potato chips!
Thai fried chicken has a few unique features:
- The marinade/brine - a unique combination of Thai ingredients give them a distinct flavour; and in my version, the added water acts as a brine, which flavours the meat all throughout, so the meat and the crust are flavourful.
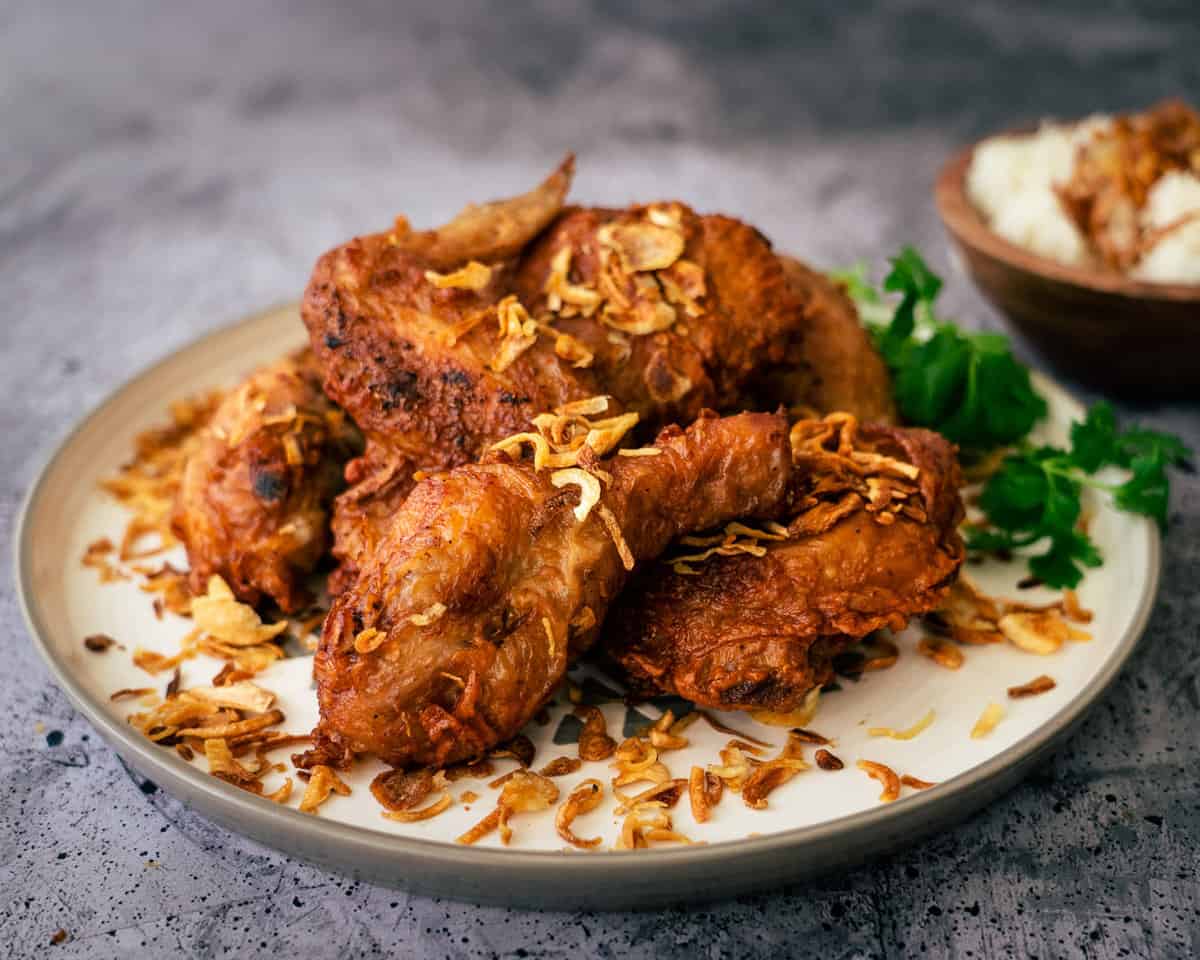
- The crust - unlike American style fried chicken, these do not have a thick, chunky, craggly crust. It's a thin and crispy crust that enhances, but doesn't overpower, the meat's wonderful flavour.
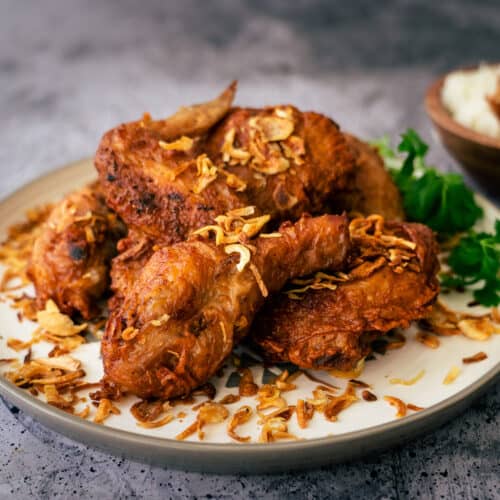
- The fried shallots - these sweet, crispy flakes of fried shallots compliment the chicken, sweetens the sticky rice, and takes the dish to the next level. You can make uber tasty Thai fried chicken without the shallots, but you cannot call it Hat Yai fried chicken without them.
Ingredients
Here are all the ingredients you'll need for Thai fried chicken. As you can see, it's really all quite basic, but the result will surprise you.
Note: Some people add spices like cumin and coriander seeds to their Hat Yai fried chicken marinade, but the version that I grew up with doesn't have any spices, which I prefer (biased, I know). I also find this simpler version to be a better "everyday" fried chicken that can go with any side dish, Thai or not.
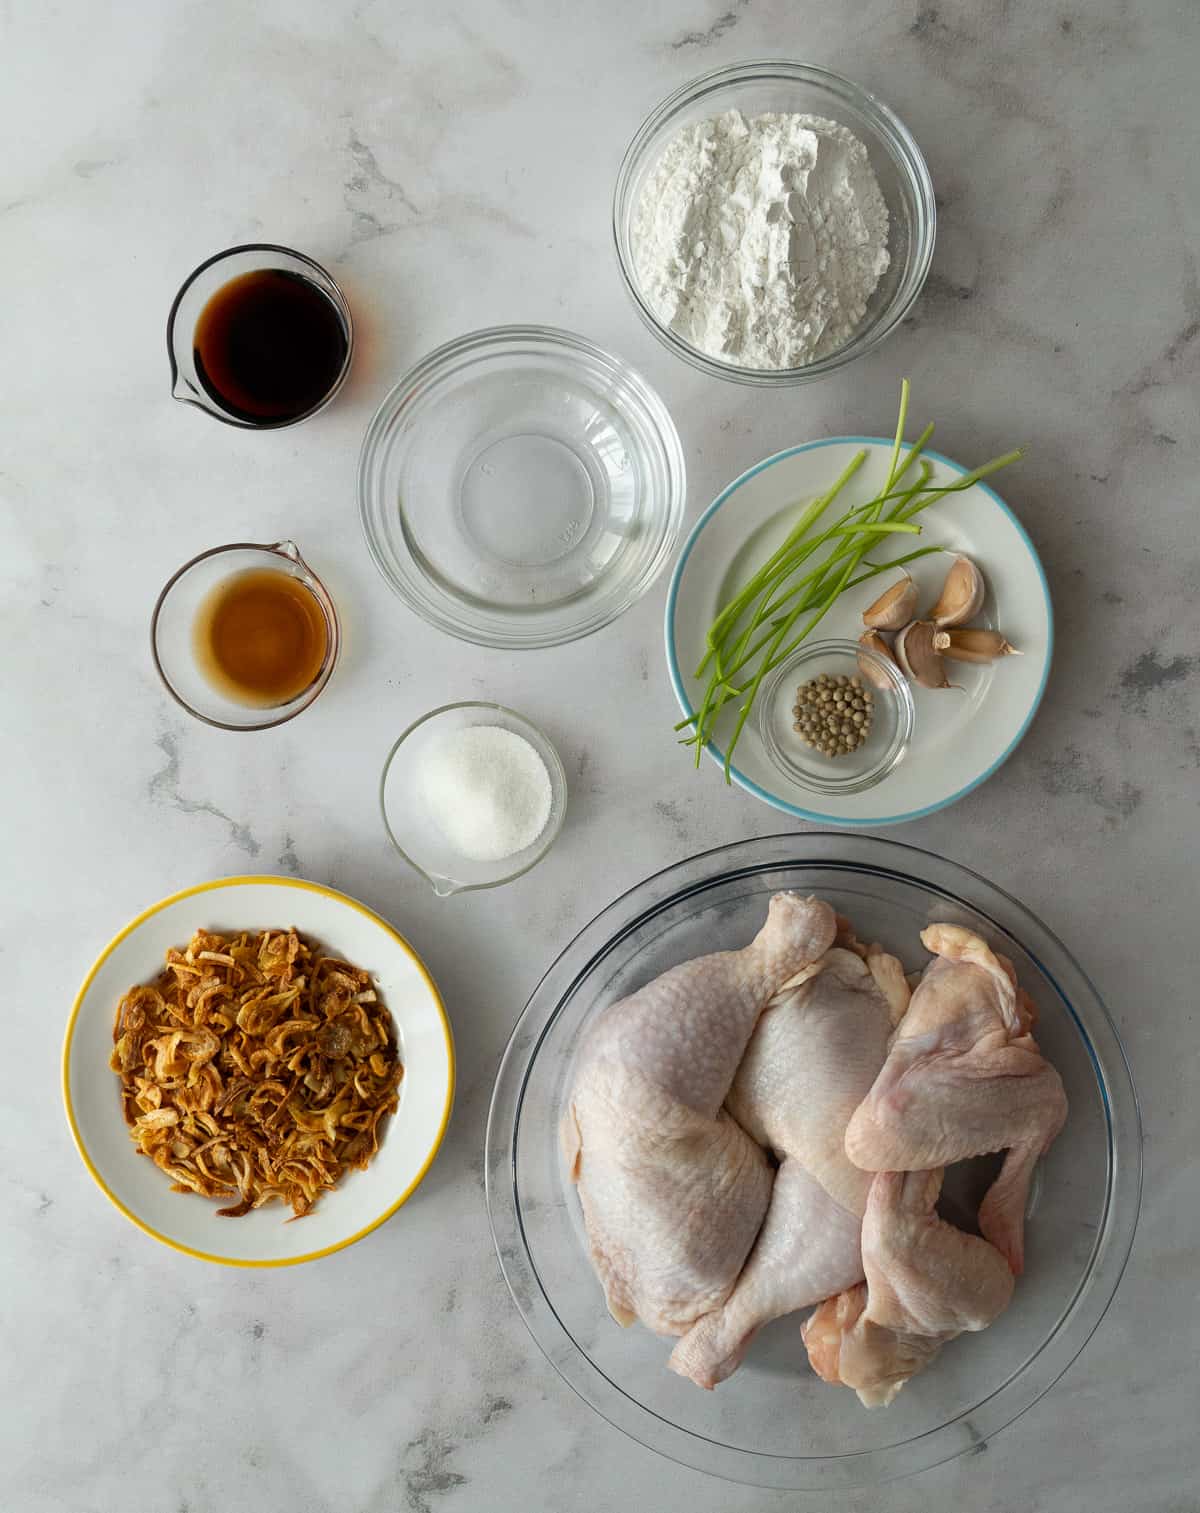
- Bone-in skin-on chicken - I only use thighs, drumsticks and wings. You can use breasts if you like them, but many chicken vendors in Thailand only sell dark meat because breasts can easily become dry. If buying wings, get whole rather than split wings for the more authentic Thai look.
- Garlic
- Cilantro stems or roots
- White or black peppercorns
- Sugar
- Soy sauce - This is one recipe where I strongly recommend getting Thai Healthy Boy Brand soy sauce; either the mushroom flavoured or the regular one. But if you can't find it, other kinds of light or regular soy sauce will work.
- Fish sauce
- Water
- Rice flour
- Crispy fried shallots - homemade or store bought. If using store bought the shallots can be a little stale, so please see my trick for refreshing and improving them in the recipe card. If making your own, check out this in-depth guide to making fried shallots to ensure success!
- Sticky rice for serving - this is optional but recommended for the Thai experience. Here are 7 different ways to cook sticky rice.
How to Make Thai Fried Chicken (Hat Yai Style)
Here's a bird's eye view of the process, but please watch the full video tutorial to ensure success before you start!
Prepping the Chicken Marinade
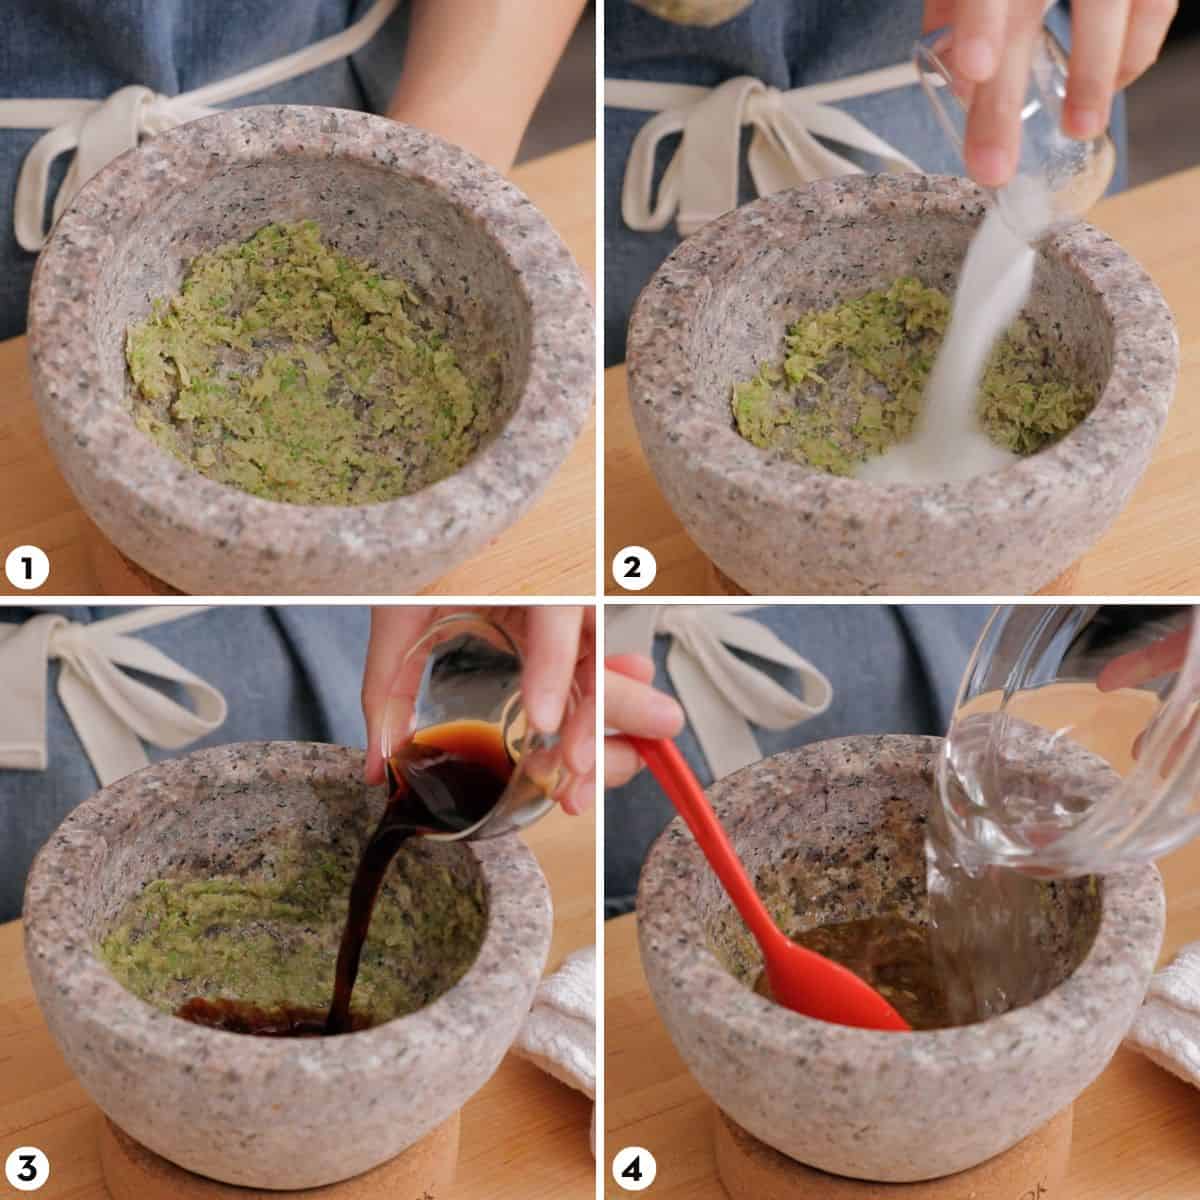
- Pound peppercorns, garlic and cilantro stems until fine.
- Add sugar and swirl with the pestle to dissolve the sugar and grind the herbs further.
- Add soy sauce and fish sauce.
- Add the water and mix.
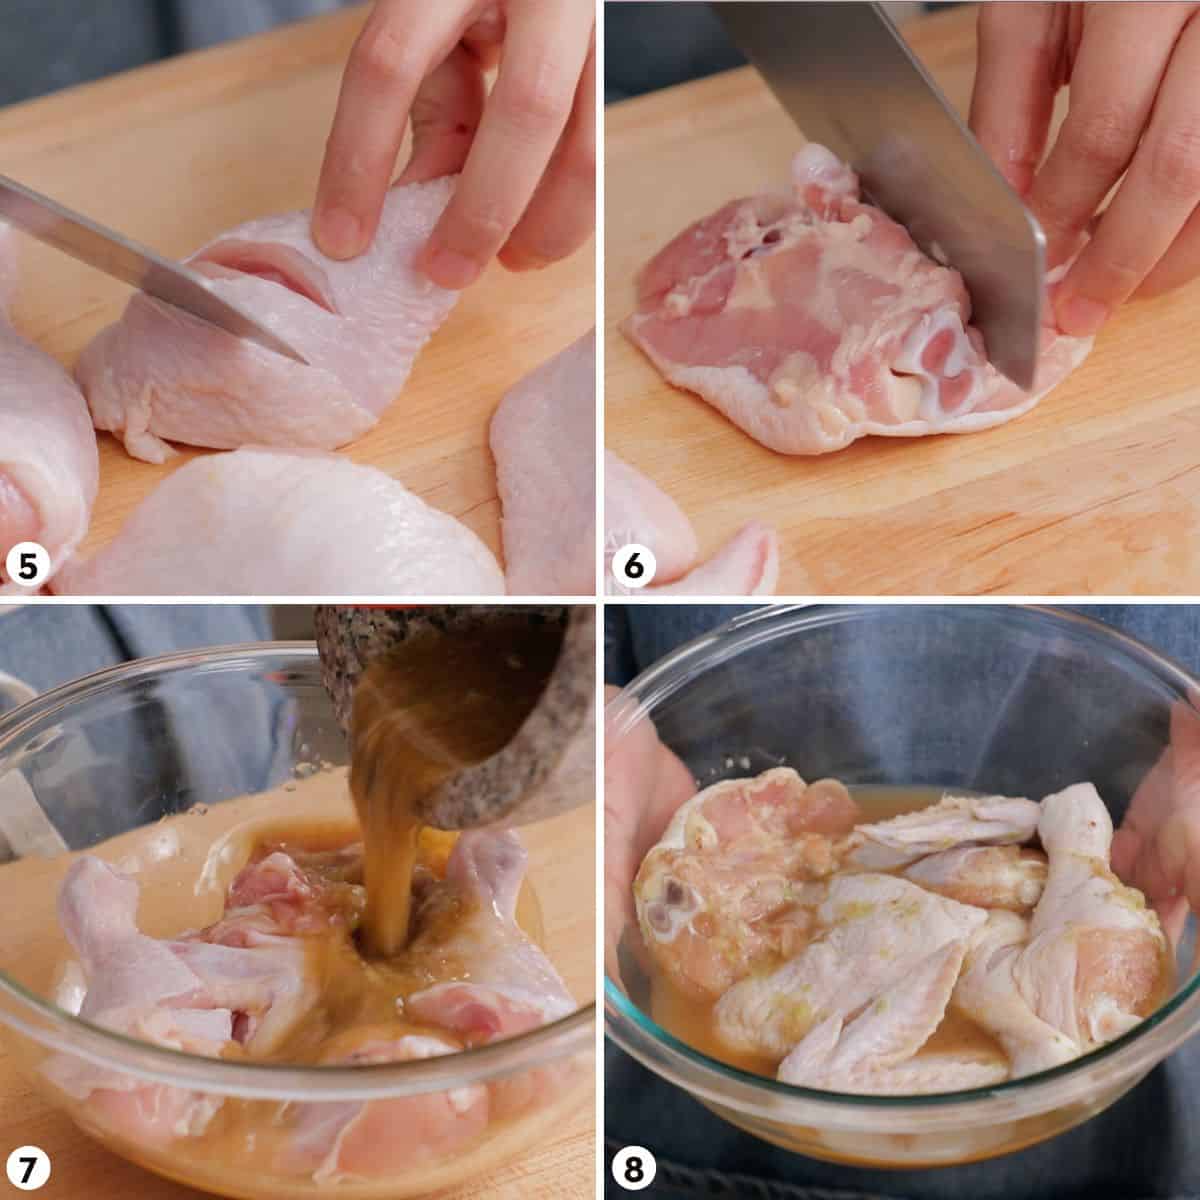
- For drumsticks, make two incision into the thickest part of the meat, one on each side of the leg.
- For thighs, make two incisions on either side of the bone.
- Pour the marinade onto the chicken and mix well.
- Allow to marinate for at least 4 hours, (preferably overnight), flipping halfway though. Bring the chicken out at least 30 minutes before frying.
Frying the Chicken
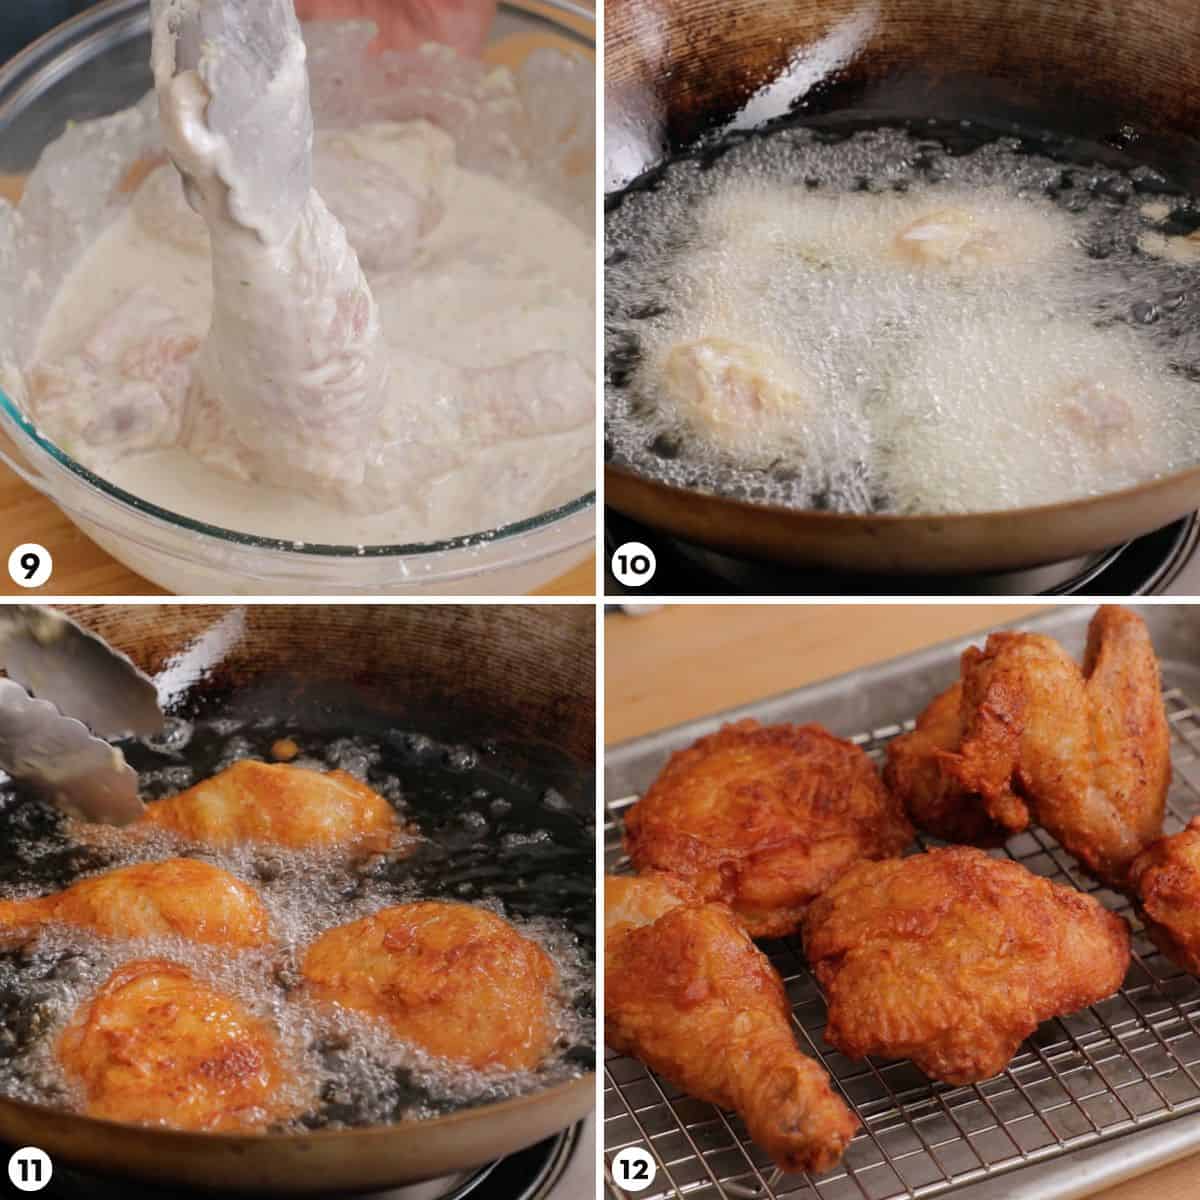
- Add rice flour to the chicken (still in the marinade) until you have a thin batter that thoroughly but lightly coats the chicken.
- In a wok or a large heavy-bottomed pot heat about 2 inches of oil to 375°F (190°C) and add as many pieces of chicken as will fit without crowding.
- Let the temperature drop to about 300°F ( 150°C) and adjust the heat to maintain it there. Flip the chicken regularly until well browned, and remove them when the internal temperature reaches 175°F (79°C) for dark meat and wings, and 155°F (68°C) for breast.
- Allow to cool for 5-10 minutes before eating!
To Make the Crispy Fried Shallots
Making homemade fried shallots isn't hard, but you can absolutely use store bought to save time if you'd prefer. But if buying, make sure you use my trick below for refreshing them and they will be 10x better than right out of the bag!
Note: Making fried shallots can be a bit tricky, so below is just an overview of the process - but be sure to watch the video tutorial for details to ensure success, or check out this post for an in-depth discussion on fried shallots!
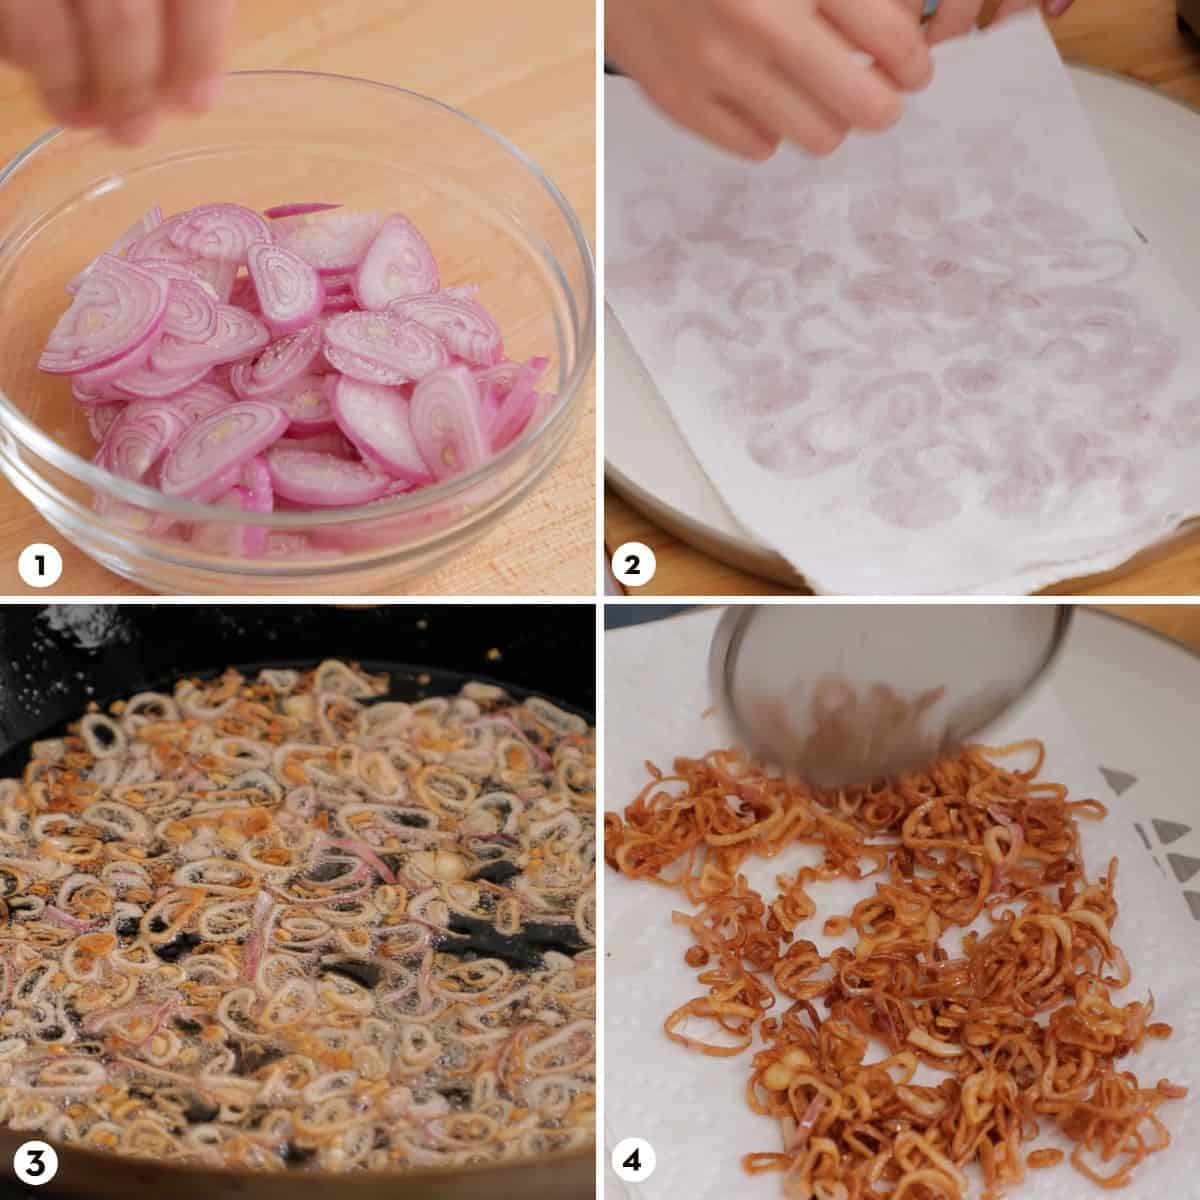
- Salt the shallots lightly and toss to mix. Let sit for 10 minutes to allow the salt to draw out the water.
- Spread the shallots out onto paper towel, and press another piece on top to dry them.
- Fry on low heat, stirring frequently, until golden brown and the bubbling has mostly subsided.
- Scoop them out and drain on paper towel.
Recipe Tips
Here are a few tips for success!
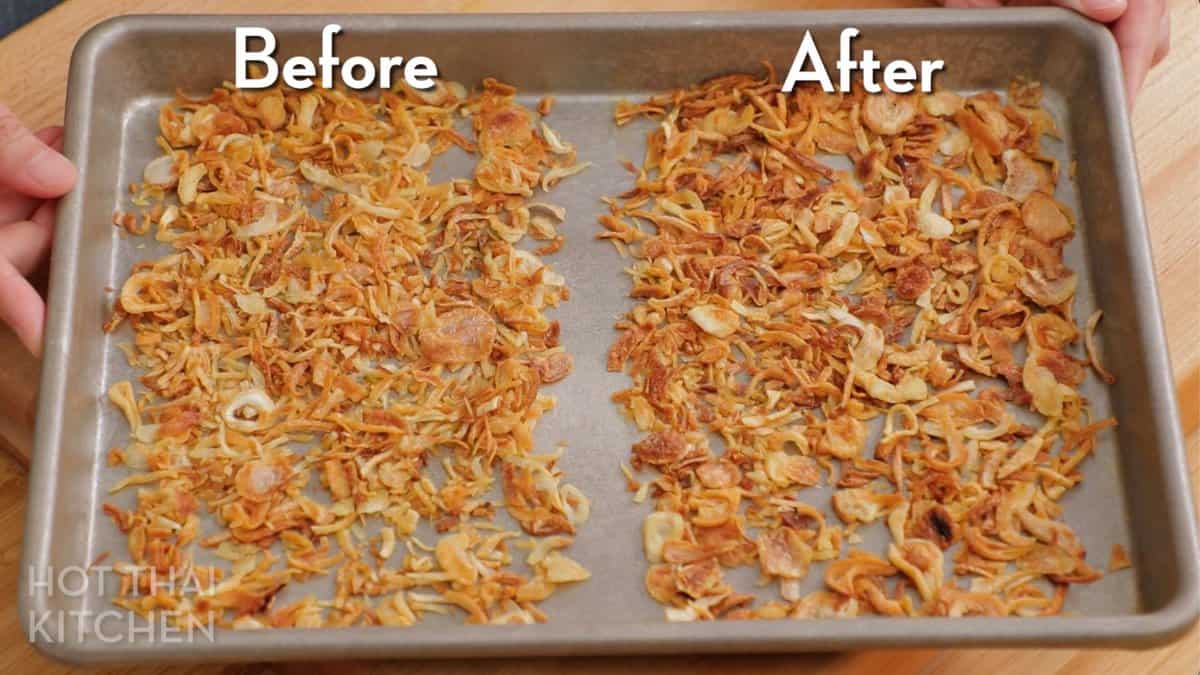
- If using store-bought fried shallots, they are usually a bit stale as they were fried long ago. Refresh them by baking them in a 300°F (150°C) oven for 5 minutes. They will be crispier and ever so slightly darker, and 10x more delicious!
- If making your own fried shallots, fry them in the same oil that you use to fry the chicken, so the chicken picks up some shallot flavour in the oil.
- Pull the chicken from the fridge at least 30 minutes and up to 90 minutes from the fridge before frying. If they go into the oil fridge-cold they will take a very long time to cook and you'll risk overcooking the exterior.
- Choose smaller chicken. Factory-farmed chicken these days can be massive, and in N. America they're much bigger than Thai chickens! If possible, choose smaller chicken and you'll be rewarded with a higher crust-to-meat ratio, and it'll take less time to fry. If the thighs are very big, consider trimming some meat off the sides and frying these off as snacks.
Best Sides for Thai Fried Chicken
You can eat Thai fried chicken with anything you normally love with fried chicken, but for the authentic Thai experience, the following are the classic side dishes.
Thai Sticky Rice
Sticky rice is an absolute must-have whenever Thai people eat fried chicken. While we eat jasmine rice with most meals, the heft and chewiness of sticky rice can better hold up to big pieces of meat than the lighter and fluffier jasmine rice.
It's theoretically optional, but you will never find a fried chicken vendor in Thailand, Hat Yai or otherwise, that doesn't also sell sticky rice. Here are 7 different ways to cook Thai sticky rice!
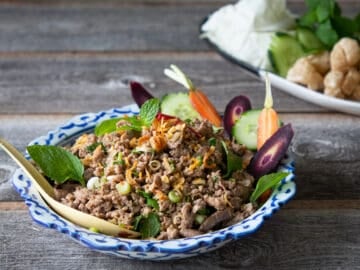
Green Papaya Salad
Thai cuisine is all about balance, and to balance the salt and fat in fried meats, we turn to green papaya salad or som tum. This is THE salad Thai people eat with any kind of grilled and fried meats.
If green papaya isn't available, replace the green papaya with a coleslaw mix of cabbage and carrots. Or try a similar recipe, like this Thai corn and cucumber salad, that uses a similar dressing and technique.
Before you start, be sure to watch the video tutorial to ensure success! I always include little tips and tricks not mentioned in the blog post. You can also watch it on my YouTube channel!
Thai Fried Chicken - Hat Yai Style
Ingredients
- 1 ½ lb bone-in, skin-on chicken, (see note 1)
- 5 cloves garlic
- 8 cilantro stems, chopped
- ¾ teaspoon white peppercorns, or black
- 2 ½ teaspoon sugar
- 2 tablespoon Thai soy sauce, (see note 2)
- 1 tablespoon fish sauce
- ½ cup water
- 1 cup rice flour
- Oil for frying, (see note 3)
- Fried shallots, store bought or recipe below (see note 4)
- Sticky rice, for serving (optional)
- Sweet chili sauce, for dipping (optional, see note 5)
Fried shallots
- 3 heads shallots, or however much you want
- a pinch salt
Want to save this recipe?
Notes
- I prefer drumsticks, thighs and wings only, but you can also do breasts if you like them.
- Non-Thai soy sauce is okay to use too, but for the true taste of Thai fried chicken, Thai soy sauce is recommended.
- Canola oil, peanut oil or any neutral-flavoured vegetable oil will work.
- I recommend refreshing store bought shallots by spreading them out onto a baking sheet and baking them in a 300°F (150°C) oven for 4-5 minutes. This makes them crispier!
- In Thailand people often serve sweet chili sauce with fried chicken so the sweet-and-sour flavour can balance the fat and salt. You can buy it or use my easy sweet chili sauce recipe. This chicken is so good I don't think it needs any sauce, but if you already have some, give it a try!
FULL VIDEO TUTORIAL
All my recipes come with step-by-step video tutorials with extra tips not mentioned in the blog post, so make sure you watch the video to ensure success. If you enjoy them, consider subscribing to the YouTube Channel to not miss an episode. Thank you!
Subscribe to my YouTube ChannelInstructions
To prep the chicken:
- For drumsticks, score the thickest part of the meat on either side of the chicken, about 1 cm deep, to help the marinade penetrate and to help it cook faster. For thighs, trim off any hanging excess skin, then flip the chicken so the meat side is up, then make a 1 cm incision on either side of the bone (this is the thickest part of the meat).1 ½ lb bone-in, skin-on chicken
For the marinade:
- Pound white peppercorns until fine, then add garlic and cilantro stems and pound into a fine paste. Add sugar and swirl the pestle around to help further grind the herbs.5 cloves garlic, 8 cilantro stems, ¾ teaspoon white peppercorns, 2 ½ teaspoon sugar
- Add fish sauce, soy sauce, and water and stir to mix; then pour into a large zip-top bag or a mixing bowl. Add the chicken, mix well, and let marinate for at least 4 hours, preferably overnight. Flip the chicken half way through.2 tablespoon Thai soy sauce, 1 tablespoon fish sauce, ½ cup water
For the fried shallots:
- Slice shallots evenly, crosswise, into 2mm thick pieces and place them in a bowl. Add a pinch of salt and give it all a toss to mix, then let it sit for about 10 mins. The salt will draw out moisture from the shallots during this time.3 heads shallots, a pinch salt
- Spread the shallots out on a paper-towel-lined plate and press another piece of paper towel on top to dry off the drawn out moisture. This helps the shallots crisp up faster, and the salt also seasons them.
- Add about 2 inches of frying oil in a wok or a large pot (this will also be for your chicken), then add one test piece of shallot into the oil. Turn the heat on high and keep an eye on it.Once the test shallot has a constant stream of bubbles coming out, turn the heat down to low and add the remaining shallots, stirring them frequently as they fry, (about 5-8 minutes). Meanwhile prepare a large plate or baking sheet lined with double layer of paper towel. and scoop them out with a wire skimmer once they are golden and the bubbles have mostly subsided .
- Once the shallots are golden, scoop them out with a mesh skimmer and drain them on the paper towel. They will darken more after the leave the oil, so take them out a little early. Use this same oil to fry the chicken.
To fry the chicken:
- Heat 2 inches of oil in a wok or a large pot to 375°F (190°C) on medium heat. Meanwhile, if the chicken is in a bag, transfer them into a large mixing bowl and add about ¾ cup of the rice flour and mix until there are no more lumps (your hands are best for this, but tongs are fine too). Add more rice flour as needed to get a thin batter that thinly, but thoroughly, coats the chicken. If the batter has become too thick, add a little water at a time to thin out.Oil for frying, 1 cup rice flour
- Once the oil is ready, add half of the chicken (or all of it if you've got the pan space) and allow the oil temp to drop to about 300°F/150°C - and from this point on, adjust the heat to maintain the temperature at 300°F/150°C.
- Fry the chicken, flipping them every 1-2 minutes until dark meat reaches 175°F/79°C internal temp, and breast (if using) reaches 155°F/68°C. The chicken should have a deep brown colour. Drums and thighs should take 10-12 minutes, and whole wings about 6-8 minutes; but timing will vary depending on the size of the chicken and how cold they were to start.
- Let the chicken cool for 5-10 minutes before eating so as to not burn yourself with incredible juiciness! Serve with sticky rice and fried shallots. I like to put the shallots on the sticky rice, but if not serving sticky rice you can just eat it along with the chicken.


Sandra Kubicki says
Hi there. Love your recipes nd videos! I am needing gluten free and have nit worked with rice flour before. Can you suggest a brand of rice flour and storage suggestions?
If you already have a video or link, that would be perfect!
Many thanks in advance!
Sandy
Benjamin Prusinski says
this looks super amazing but to be perfectly honest, deep frying in a wok sucks. Just buy a deep fryer and make life easier on yourself.
Kelly says
Can you make this recipe with boneless skinless chicken thighs?
Pailin Chongchitnant says
Yes, but with much less frying time.
Deborah Davis says
Amazing fried chicken. My husband loves fried chicken, but I have never been satisfied with my results. On Father's day, I made this. Unbelievable. Like you said, it's about the chicken, not the crust. Even my son, who doesn't like chicken, at a thigh after his two hamburgers (boys have hollow legs). I think next time, I will explore adding some additional spices to the marinade. Wonderful recipe
MathGeekRob says
So good, and easy
Chloe says
I made these today and the flavour was beautiful! The most flavourful fried chicken I've ever eaten ^_^
Gary Markham says
The only time I could say with confidence, “this fried chicken is better than my grandmother’s”.
Rom Chy says
Absolutely delicious! The flavor was just right. The chicken was juicy. The skin was extra crispy.
Charles Pascual says
This is good chicken! Easy, straight-forward recipe and the video is like having you in the kitchen showing me how. I rarely fry chicken but this was easy. It had not occurred to me to deep fry in my wok but this is the way to go - nearly no splatters to clean up. Served it with your corn cucumber salad (tum tang kao poad) and sticky rice (thanks to your "7 Ways to Make Sticky rice). A fun - and delicious meal. Thank you.
JoEmme says
Thank you for the recipe as well as the in-depth video! To be honest, I have used 2 tbsp of grated ginger instead of cilantro (cilantro/coriander are on my personal blacklist as I hate the taste). The chicken drumsticks were so fragrant and tasty that this brine will always be my go-to marinade for years to come! 🙂
Lorraine Shelstad says
I just read your story. I later taught Thai in Bangkok (St Francis Xavier in Pakkred). But the amazing thing is that I live in Vancouver, BC. Too bad you didn't stay here.
Lorraine (Janjiraa) Shelstad says
I lived in Saiburi, Pattani for 14 years (in the 1970s) and had fried chicken in Hadyai many times. I am going to try this recipe and am positive it will be aroy maak!
AL says
Where are the ingredients measurements
Pailin Chongchitnant says
In the recipe card at the bottom of the post 🙂
Lushendran Govender says
Hey, just wanted to know if i could sub oyster sauce for the fish sauce, lemme know thanks
Pailin Chongchitnant says
Oyster sauce isn't as salty as fish sauce, so I'd either use a little more oyster sauce or sub soy sauce instead.
Jeff says
So good. I’ve had ไก่ทอดหาดใหญ่ all over Thailand (never in Hat Yai though). This is better than all I’ve had before.
The brine/marinade minus the rice flour makes a terrific roast chicken too. 10/10
Albert says
I made this recipe a few times. It is very tasty but the deep frying process is time consuming. I am going to try grilling it over the bbq without the rice flour today. Should be wonderful.
Eunice says
Do you think I can subs rice flour with corn flour?
Pailin Chongchitnant says
Probably? But the texture of the crust will not be the same. Rice flour will result in a lighter crust.
wallace uy says
can I substitute all purpose flour for rice flour?
BTW, love your youtube channel and all the videos
Pailin Chongchitnant says
Using AP flour will result in a denser crust and potentially less crispy, and your batter will also be thicker if you used the same amount. So if you are going to try, add little by little until the desired consistency is reached.
Melanie DeYonker says
Nothing worked other than the fried shallots. Relentlessly spent hours upon hours seeking the best recipe for Thai fried chicken. I sought out the best ingredients (including small organic chickens) and only used the thighs and leg portions. Everything was done according to the recipe specifics. Total mess.
Marina says
Dear Pai, this recipe is just amazing, i adored it!
Unfortunately, my coating didn't turn out as beautiful and even as yours. The chicken was evenly coated with marinade and rice flour, but during the frying process the flour clumped together, some of the chicken was left with the coating and in some areas it completely detached. What could this be due to? Thanks again for the wonderful recipe. Greetings from Russia.
Pailin Chongchitnant says
Hi Marina, it sounds to me like a couple of issues, either the batter was a bit too runny so when you fry it, it dripped to one side. OR the heat was too low and it didn't set the batter as soon as it goes into the fryer.
Colin N. says
I was looking for a recipe for chicken wings and found your Thai Fried Chicken Video. Thought wings would work just as well.....and they did! The brining made them incredibly juicy with a light crisp crust from the rice flour! I love the idea of just mixing the brine with the flour so you get the same great flavor all the way through. My wife is Lao and also loved them! Also made the shallots which were amazing and simple!
George Lim says
You are so right of this being the best light Fried chicken, by not having a heavily crusted, salted, dry chicken under a dilectable coating. The marinating hours enhanced the chicken thighs. This recipe was really thought through well. The Hakka side of my family raved for more and more than I almost had a riot.
Geo. Lim. California
Sai Lin says
Burmese guy stuck in terrible blizzard in Buffalo,NY. We don’t deep fry that much at home but figured we’d make the best of the storm and do Burmese/Thai street food all weekend. I’ve eaten fried chicken all across Asia and the US and can say without a doubt this is the BEST fried chicken I’ve ever had… and I made it myself! Thanks so much sister!!!
Pailin Chongchitnant says
Thank you so much!! So glad to hear and you must be proud of yourself!!
Jonathan says
My first try at this receipe and I like it a super bunch! The only downside was I didn’t make enough of the sautéed shallots…oh many…those are so delish!
I got lost listening to really good jazz…and mixed up my plan…and ended up with a side of gai lan oyster sauce stir-fry! ;-0
Already looking forward to next time
J
Neal says
I made these last night and this was some of the best fried chicken I have had. I marinated over night and the flavor of the meat inside was amazing. I have a picture if you want to see it.
Pailin Chongchitnant says
Amazing so glad to hear! Do send pics! You can send it to the email listed in the contact page. Thank you!
Susan says
Hi Pailin, love your recipes n videos!! Can I use an air fryer for this recipe?
Pailin Chongchitnant says
You can, but you'd have to omit the flour and they'd just end up tasting like baked chicken instead of fried, which is not a bad thing.
flooc says
Thank you for asking this question. I plan to do this recipe w/ chicken wings for potluck: This recipe and Sinigang (Filipino sour soup/broth) What air fryer temp do you recommend? Thank you again
Pailin Chongchitnant says
I have not done it in an air fryer so I would consult other air-fried chicken wings recipe for time and temp. It should work the same.
Tina Trach says
What rice flour did you use ? White or brown ? We made this recipe, with white rice flour, it was very good but chicken skin was very dark (looked burnt) by the time it reached 175 internal temp- advice? Brought oil to 375 and then added chicken until oil was 300 consistently.
Pailin Chongchitnant says
Hi Tina, the chicken is darker than KFC colour because of the sugar, but it shouldn't look burnt. I used white rice flour, Thai brand. Did you by any chance add more sugar (either intentionally or by accident)? More sugar would make these cook up darker. Have you seen the video tutorial? Did anything else you did look different from what's shown?
Lyle says
Yet another amazing recipe! I loved this chicken when we lived in Thailand! I made this with chicken wings and drums, marinated for 4 hours and it was amazing! Pro tip, I used my mandolin to slice the shallots and it worked perfectly and took seconds to slice one. I used my normal electric deep fryer set to 375F, with great results. Also definitely cook a bit on the higher heat side to avoid that pink bone. Next time I will push for 180F and cook my wings and drumettes separately to have each done closer to the same time. I also had some boneless/skinless thighs that I cut into smaller pieces and fried these with the wings. They were also really great. We paired it with HTK som tum salad and it was a perfect meal with the rice.
Thanks Pailin!
Theresa says
Pai, love love love your videos and your site. Your calming voice always makes you such a pleasure to watch. However this flavor combination of cilantro stem, garlic and sugar wasn't something that appealed to our tastes this time. We used canola oil, brined overnite and chicken was juicy just llke you said it would be. However, we did enjoy using our morter and pestle as well as trying out rice flour as a coating. Would love to try more recipes that start with a freshly ground paste or that use the rice flour.
Jill says
Hi Pai, I don't have Mortar and Pestle, will my marinade still be good if I just finely chop all ingredients? Any workaround?
Pailin Chongchitnant says
Finely chopping isn't gonna do it for this, but you can throw everything into a blender!
Tina says
I can't wait to make these!! I only have corn starch on hand, would I be able to use that instead of rice flour?
Thank you!
Pailin Chongchitnant says
You can. You may not need the same amount and the texture might not be as light as rice flour, but should still be good!
steffie says
can this be air fried?
Pailin Chongchitnant says
Yes, but you would then omit the batter-making part of the recipe. Fry it without flour or do a light flour dredge.
Matthias says
Since I can find rice flour as well as “sticky rice flour” here where I live: which one works better or isn’t there a big difference crispywise?
Pailin Chongchitnant says
Hi Matthias, You should use regular rice flour.
Lucinda Lawrence says
The taste when biting into this chicken takes me right back to the streets of Bangkok. I have used this recipe on various occasions and my family loves it. Thank you for sharing this with us.
Pat says
Crispy yummy chicken wings!
Colleen says
Oooh, i can’t wait to make this. I lived in Hat Yai for a year teaching English and used to eat this a lot.
I’m so pleased i found your website, thank you.