These famous little Thai coconut pancakes are one of the most popular street foods in Thailand. So much so that even Trader Joe's now sells frozen kanom krok, and Thai people all over the US are going crazy over them!! They're so incredibly tasty that I seek them out every time I go to Thailand, and I love them so much I even had a station making fresh kanom krok at my wedding!
And if you ask me what is the one thing you absolutely have to try when in Thailand, the answer is: kanom krok! Luckily, you can also make it at home!
Want to save this recipe?
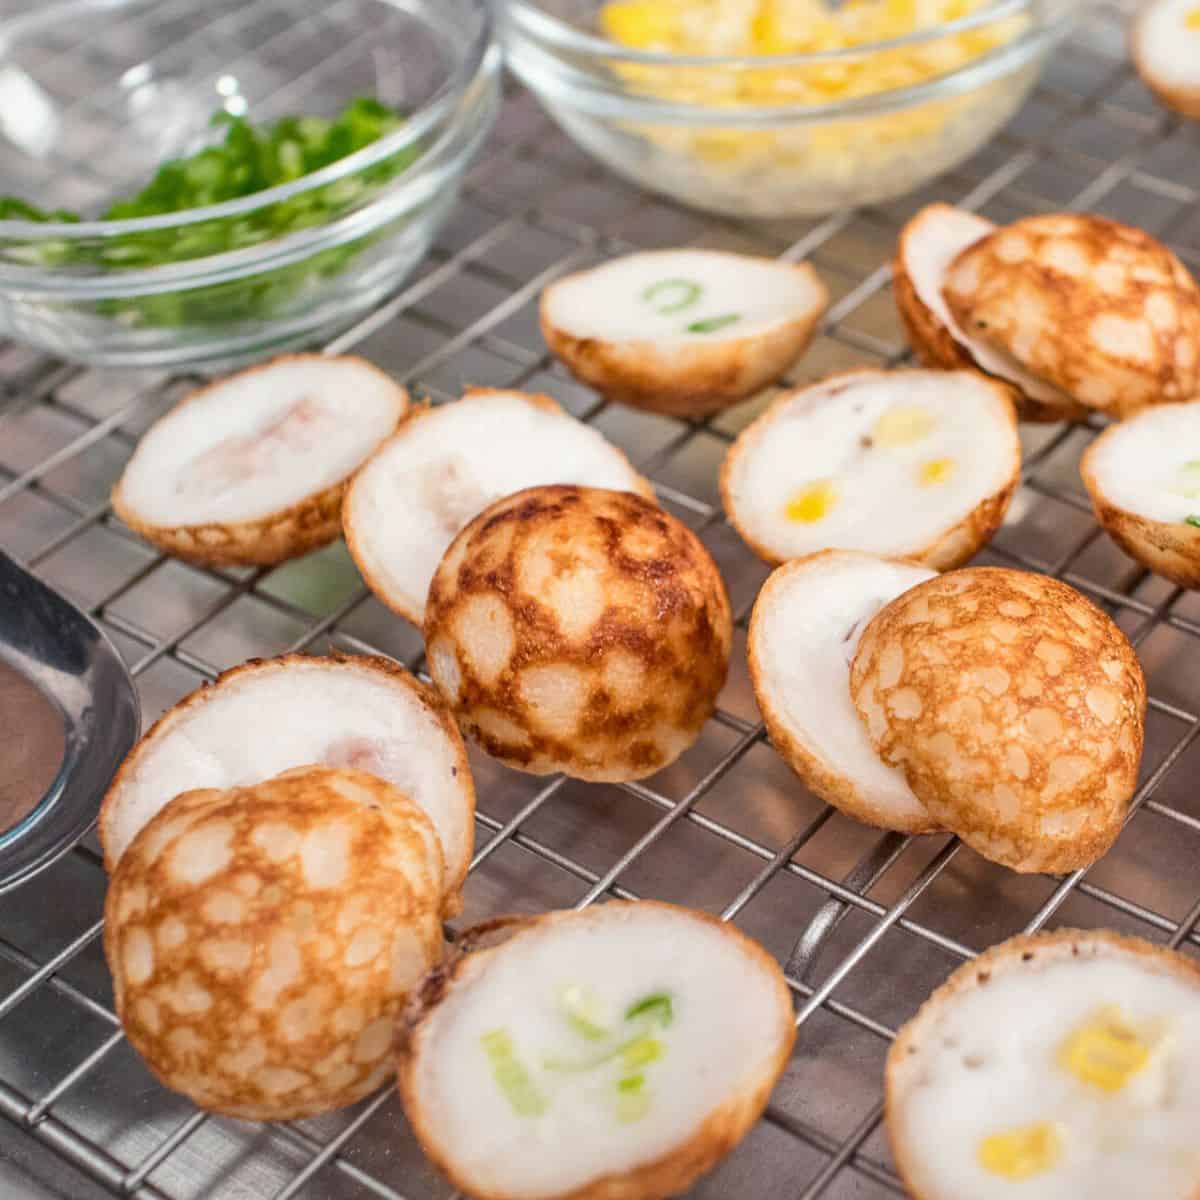
They're made in a pan with iconic round indentations, creating a little cup of goodness that's crisp on the outside and soft, warm and custardy on the inside. Topped with a variety of toppings from green onions, to corn, to taro, fragrant with the aroma of coconut and jasmine rice...these are easily one of my favourite snacks or desserts in Thailand that's also easy to make if you know the right techniques!
Watch The Full Video Tutorial!
I HIGHLY recommend you watch how this recipe is made before you make it to ensure success. It will be very helpful to see the technique!
Ingredient Notes
Here are all the ingredients you'll need to make this recipe and important notes about them. For amounts, check out the full recipe card below.
The Shell:
- Cooked jasmine rice. Using real Thai jasmine rice (hom mali rice) will make for a more aromatic dessert. See more about Thai jasmine rice here.
- Rice flour, make sure it is not glutinous rice flour. Regular rice flour from Thailand comes in a red bag.
- Coconut milk. The flavour of kanom krok depends SO MUCH on the quality of your coconut milk, and it won't taste as good with low quality coconut milk. I recommend reading my post on How to Choose the Best Coconut Milk, but briefly, I recommend using Aroy-D coconut milk in the cartons, not canned. If you live in Thailand or any other country where fresh coconut milk can be made easily, this is the time to do it!
- Shredded dried coconut, but if you can get fresh grated coconut, use fresh.
- Palm sugar, chopped. Read more about palm sugar here.
- Salt
The Filling:
- Coconut milk.
- Granulated sugar
- Salt
- Rice flour
Also:
- Coconut oil for greasing the pan, this will give extra coconut aroma, but you can use neutral flavoured oil if you don't have it.
Optional toppings:
- Chopped green onions (this is the most classic and my favourite, yes it works in dessert trust me on this), cooked sweet corn, cooked taro cubes, or feel free to experiment with other toppings!
How to Make Thai Coconut Pancakes - Kanom Krok
Here are all the steps to make this recipe. If this is your first time, I highly recommend watching the video tutorial to ensure success.
For the shell:
- Place all ingredients in a blender and blend until smooth.
For the filling:
- Whisk the rice flour, sugar and salt together until there are no more clumps of flour. Add coconut milk and whisk until sugar is dissolved. Easy peasy!
- Prepare toppings and a cooling rack.
*Both batters can be made in advance and stored in the fridge. Bring it out to room temp before using. If the shell batter has thickened up too much while it sat and is not hard to pour, you can add a bit of water to thin it out so it pours easily. The batter should have a runny consistency as shown in the video.
To cook:
- Heat the pan to 325°F. To test pan for readiness, sprinkle a bit of water onto the pan, and if it sizzles away immediately it's hot enough.
- Brush half the holes with coconut oil. I like to make only half a pan at a time in the beginning because you'll likely be a bit slow and clumsy to start, and it's just more manageable and less hectic to deal with a few at a time.
- Stir the shell batter and pour ½ tablespoon into the pre-heated holes (again, half a pan at a time until you're fast enough). Then stir the filling batter and add 1 teaspoon of the filling by dunking the teaspoon right into the middle of the shell and wiggle it slightly (see video for this technique). Let them cook for a minute or so, meanwhile, you can start filling the other half of the pan.
- After a minute or two of cooking, the cakes should be partially set, you can add your toppings. If you're using heavier toppings like corn or taro, and they sink too much into the cakes, just let the cakes set a bit more before topping.
- Continue to let them cook until the bottom is crispy and golden brown, and the top is no longer runny, about 5 mins. Give them at least 5 minutes to cook, do not rush them, that is how you get crispy bottoms.
- If the bottom is done but the top still needs more cooking, you can cover the pan with a pot lid to steam the top for 1 minute. To test doneness, tilt the pan slightly, and if the top doesn't run, then it's done. Tips: Feel free to adjust the temperature of the pan as needed during the cooking process.
- Remove the cakes by pushing them up with a toothpick or skewer, and scooping them out with a spoon.
- Place on a rack to cool for a few minutes just so you don't burn yourself, but you want to eat these while they're still warm and crispy. These do NOT keep well as they go mushy and soggy real fast!! Note: I'm only using the toothpick to push the cakes up because I don't want to scratch the nonstick pan with the spoon, but if you're using cast iron, you can just use the spoon alone.
The Right Pan for Kanom Krok
I used CucinaPro electric takoyaki pan, which isn't exactly made for kanom krok but works just fine. The reason I chose this is because it has a temperature control knob, which makes a huge difference in how you're able to control the doneness and speed of cooking of the pancakes. Other models have just an on/off button. This model also comes with 2 other interchangeable skillets, one is just a plain flat skillet (super useful) and another on that has 4 big circular holes (for whoopie pies?).
Other pan options:
- You can also buy takoyaki pans that are meant for stove top. I would imagine that they would not work well if you have flat electric burners because you wouldn't have enough contact surface with the pan. But if you have gas stoves, it's a good option for sure.
- Danish Aebleskiver pans will also work but I find them too big, so if you do use is, make sure you only fill it half way. It's not just about them being little and cute, though that's a bonus, but using a pan that is too big will alter the shell-to-filling ratio and it won't be as good. You will have less crispy bottom for the amount of soft filling!
- If the pan you use is cast iron, make sure it's well-seasoned or the batter will stick to the pan!
- What about real Thai kanom krok pans? Thai kanom krok pans are huge and made from cast iron. If you find ones that are light, it will not be as good so don't get those. Thai kanom krok pan will likely be quite big for home burners, but if are using one, it will need to be well seasoned before using or the batter will stick and this is disastrous! Thai people do this by stuffing the holes with shredded coconut (fresh, not dried) and then putting it over flame for several hours, letting the coconut burn in the holes. The oil from the coconut will come out and coat the holes and season it.
Can you reheat kanom krok?
Kind of... It's best to make only as much as you will eat, especially since the batter will keep in the fridge. But if you've accidentally made too much or people are taking too long to eat them and they've cooled down, they can be popped back into the pans to warm up and re-crisp the bottoms. I find they end up dryer and not as luscious as they once were because they've been cooked twice, but I guess it's better than throwing them away!
Can you freeze kanom krok?
I have not personally done this, but Trader Joe's now sells frozen kanom krok so I guess you can! The instructions for TJ's say to reheat in an air fryer for 7-8 minutes, and people have reported that it works well enough, though I don't know how well it'll work with my particular recipe, but it's worth a try 🙂
Recipe Card
Print
Thai Coconut Pancakes - Kanom Krok ขนมครก
- Yield: Makes about 50 pieces
Ingredients
The Shell:
- 50 g cooked jasmine rice
- 50 g rice flour
- 1 cup water
- ¼ cup coconut milk (see note about good coconut milk above)
- ¼ cup shredded dried coconut (if you can get fresh, use fresh)
- 30 g palm sugar, chopped
- ¼ teaspoon salt
The Filling:
- 1 cup coconut milk
- 2 tablespoon granulated sugar
- ¼ teaspoon salt
- 2 tablespoon rice flour
Also:
- Coconut oil for greasing the pan, this will give extra coconut aroma, but you can use neutral flavoured oil if you don't have it.
Optional toppings:
- Chopped green onions (this is the most classic), cooked sweet corn, cooked taro cubes, or feel free to experiment with other toppings!
Want to save this recipe?
Instructions
For the shell:
- Place all ingredients in a blender and blend until smooth.
For the filling:
- Whisk the rice flour, sugar and salt together until there are no more clumps of flour. Add coconut milk and whisk until sugar is dissolved. Easy peasy!
- *Both batters can be made in advance and stored in the fridge. Bring it out to room temp before using. If the shell batter has thickened up too much, you can add a bit of water to thin it out so it pours easily. The batter should have a runny consistency as shown in the video.
- Prepare toppings and a cooling rack.
To cook:
- Heat the pan at 325°F. To test pan for readiness, sprinkle a bit of water onto the pan, and if it sizzles away immediately it's hot enough. Brush half the holes with coconut oil. I like to make only half a pan at a time in the beginning because you'll likely be a bit slow and clumsy to start, and it's just more manageable and less hectic to deal with a few at a time.
**Stir both batters every time before you use it.**
- Add ½ tablespoon of the shell batter into the pre-heated holes. Then add 1 teaspoon of the filling by dunking the teaspoon right into the middle of the shell and wiggle it slightly (see video for this technique). Let them cook for a minute or so, meanwhile, fill the rest of the pan.
- After a minute or two of cooking, the cakes should be partially set, go ahead and add your toppings. If you're using heavier toppings like corn or taro, and they sink too much into the cakes, just let the cakes set a bit more before topping.
- Continue to let them cook until the bottom is crispy and golden brown, and the top is no longer runny, about 5 mins. Give them at least 5 minutes to cook, do not rush them, that is how you get crispy bottoms. If the bottom is done but the top still needs more cooking, you can cover the pan with a pot lid to steam the top for 1 minute. To test doneness, tilt the pan slightly, and if the top doesn't run, then it's done. Tips: Feel free to adjust the temperature of the pan as needed during the cooking process.
- Remove the cakes by pushing them up with a toothpick or skewer, and scooping them out with a spoon. Place on a rack to cool for a few minutes just so you don't burn yourself, but you want to eat these while they're still warm and crispy. These do NOT keep well as they go mushy and soggy real fast!! Note: I'm only using the toothpick to push the cakes up because I don't want to scratch the nonstick pan with the spoon, but if you're using cast iron, you can just use the spoon alone.
Can you reheat these?
Kind of... It's best to make only as much as you will eat, especially since the batter will keep in the fridge. But if you've accidentally made too much or people are taking too long to eat them and they've cooled down, they can be popped back into the pans to warm up and recrisp the bottom. However, they will end up dryer and not as luscious as they once were because they've been cooked twice, but I guess it's better than throwing them away!

Ang says
If I don't have rice flour, can I use more of the cooked jasmine rice as a substitute in the recipe (i.e. 100 grams of cooked jasmine rice, instead of 50 grams of rice flour and 50 grams of cooked jasmine rice?)?
Catarina Kidd says
Could you put all ingredients in cups rather than grams?
Sonia Ostrovsky says
bloody delicious. not much more to say.
Joan says
I went to my little local Asian market to buy rice flour, and they have two kinds: sweet rice flour and glutinous rice flour. Which would be best for this recipe? I’m so excited to make it! We were just in Thailand over the holidays, and this was my niece’s favorite food! I bought the pan you recommended, but now I just need the right ingredients!
anon says
This doesn't specify what to do w the shredded coconut-- it's nowhere in the written recipe besides ingredient list. I've made successfully and know the technique but hoped to quickly get from written-- can you possibly edit to instruct folks? Thanks!
Pailin Chongchitnant says
The shredded coconut is listed under "the shell", and the instructions for "The shell" says to blend "all ingredients" in the blender. All ingredients would include the shredded coconut.
Andrew Brixey-Williams says
We call these 'Phuket pancakes' but as we can't go to Thailand right now, this recipe has allowed us to bring a bit of Phuket to the UK. Unheard of to find these on the menu in Thai restaurants, though I've had them at festivals at the Buddhapadipa temple in Wimbledon. So delicious, can't make enough of them!!
Dhipanee Mayes says
Hands down the best kanom krok recipe out there. My ginormous Thai family requests this at every get together. It’s loved by young and old. I usually have to make 5x the recipe to satiate the masses. The pan from Amazon is a god send and I find that using a long, skinny floppy spatula along with a plastic spoon works best to remove the kanom krok from the pan. We top ours with corn and green onions just like the street vendors. Sooooooo incredible!!!!!
Thai says
Hello , What is the fat percentage of coconut milk
Adam The HTK Minion says
Hi! It depends on which you use ... https://www.google.com/search?q=Aroy-D+Coconut+Milk+Nutrition+Label ... Pai prefers the cartons, as in https://kit.co/hotthaikitchen/ingredients-i-use/aroy-d-100-coconut Cheers! Adam
Thai says
Hi , What is the fat percentage of coconut milk?
Pattarin says
This tasted just like what I had in Thailand! I tried the cast iron pan and seasoned it a few times before use, but still too sticky. Today I got a takoyaki pan from Amazon and used it right away on my glass stove top with heat at 3-4. They turned out perfectly! Thank you so much!
Maryann says
I made this a while ago with an iron pan and I thought I was going to go crazy because they just stuck! So, I think I’ll be buying the electric one. I can’t wait to make it. Hopefully I’ll have your luck!
Neisa says
What’s the conversion from grams to English conversion
The HTK Intern says
Hi Neisa! Just an FYI that one of the reasons she's not providing conversions is that Google is REALLY good at this, for example https://www.google.com/search?q=how+many+ml+in+a+cup Cheers and have fun! Adam
Michael says
Nobody knows them outside of Thailand and here one wonders how delicious they taste.
Everytime when I make it, my guests say "wow that is unbelievable"
Thanks Pai for this yumme recipe