Jump to video!
I love Indonesian food. I find the flavours similar to that of Thai cuisine yet distinct and wonderful in its own way. Nasi Goreng is a great entry into Indonesian cooking as it's simple, requiring few specialty ingredients, with flavours that are so easy to love.
What is Nasi Goreng?
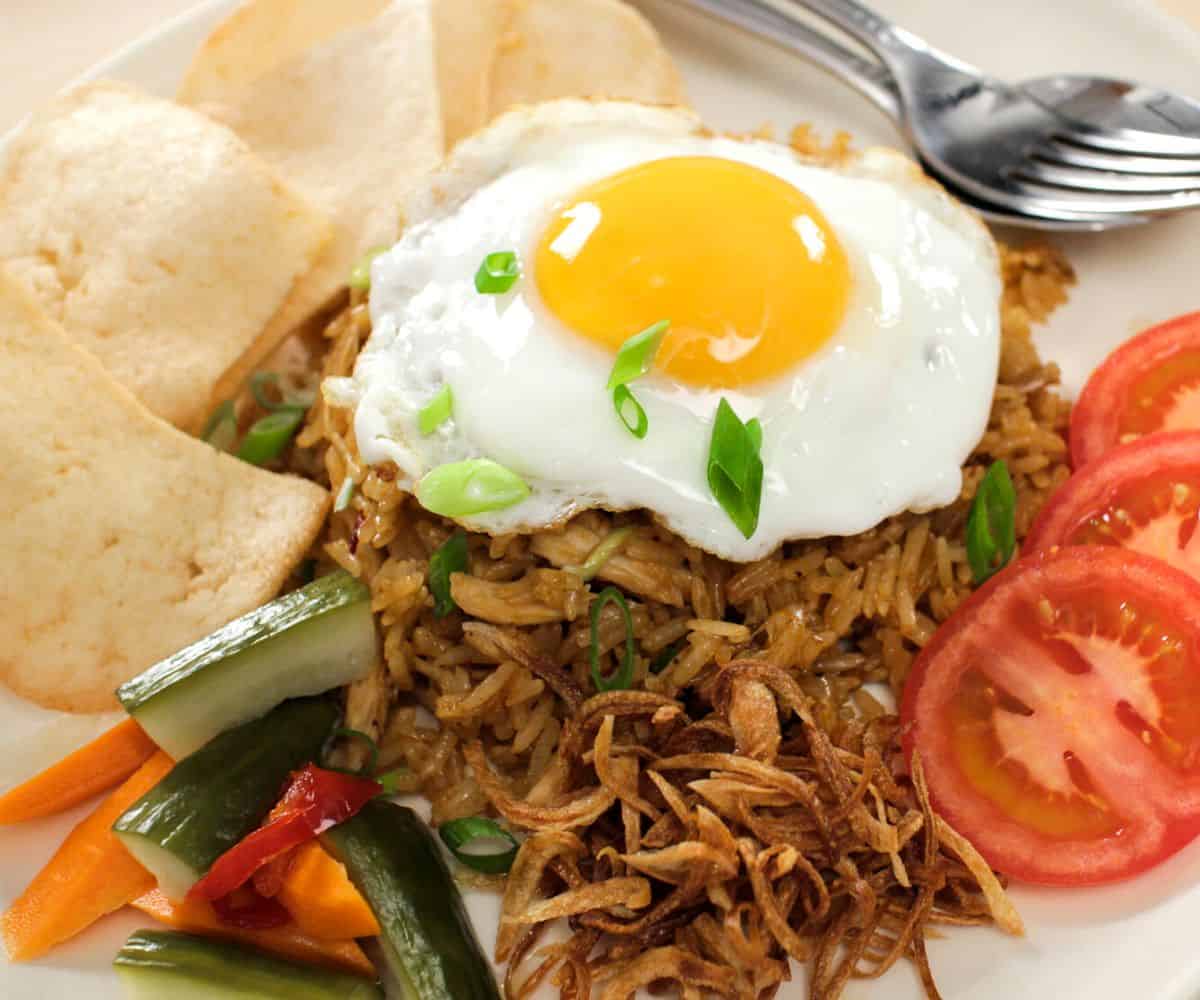
Nasi goreng literally just means "fried rice." It is a simple dish that you can find on the streets of Indonesia. What I love about it is the rich flavour from the sweet soy sauce and also the fun fixings that are placed around the plate—pickles, shrimp crackers, fried shallots, fried egg, fresh veggies...the options are endless!

Want to save this recipe?
There are many versions of nasi goreng, because after all it's just fried rice! So you can imagine that it's a great canvas for all sorts of bits of vegetables or meat.
If you are a fried rice lover like me, check out my other fried rice recipes here!
Ingredients
It looks like a lot of ingredients, but it's simpler than it looks! Many things can be store bought for made well in advance and kept as pantry/fridge staples.
For the Fried Rice
- Shallots
- Garlic
- Fermented shrimp paste, if you've used shrimp paste in Thai cooking, the Indonesian version is basically the same. It's called terasi in Indonesian, and belacan in Malaysian.
- Kecap manis, which is an Indonesian sweet soy sauce
- Fish sauce, see also my detailed guide to choosing good fish sauce
- Sambal oelek, a vinegary chili garlic paste, the most common one being Huy Fong brand (rooster brand) in a clear tub with a green lid. You can find this at any Asian grocery stores.
- Cooked jasmine rice. If you have day old rice, great, it'll make frying it easy, but you don't need it. If using freshly cooked rice, spread it out on a plate and allow it to cool and dry off a bit and it'll work just fine. If you are making rice from scratch for this, put a little less water than you normally do (a ratio of 1:1 is good for jasmine rice).
- Salt
- Green onion
- Optional: any protein/vegetables. You can keep the fried rice simple because it comes with toppings and garnishes already, but if you want to make it a little more substantial, you can add any protein or veggies you like. Leftover cooked proteins are great.
Toppings
- Sunny side up fried eggs
- Shrimp crackers (krupuk), also called shrimp chips or prawn crackers. You can buy them already fried (these should be disc shape, not sticks) or buy them as uncooked pieces which can be quickly fried at home. Shrimp crackers can be from many countries, but I think the Indonesian version is the best. I recommend using the uncooked pieces, Komodo brand.
- Fried shallots, store bought is fine, but if you want to make it yourselfm check out this detailed guide to perfect fried shallots
- Fresh tomato and/or cucumber slices
- Pickled cucumber & carrots (recipe included)
Indonesian Pickled Cucumber and Carrots (Acar)
This is a very quick pickle that will be ready to use as soon as it cools down, and then it can be stored in the fridge indefinitely like any other pickle.
- Carrot sticks
- Cucumber sticks
- Shallot
- Garlic
- Fresh chilies (optional)
- White vinegar
- Sugar
- Salt
How to Make Nasi Goreng
Here's a bird's eye view of the steps involved in making nasi goreng, and I've listed them in the order that you should make them. But when you're ready to cook, be sure to watch the video tutorial to ensure success, and read the full recipe card below!
For the pickles:
- Combine vinegar, sugar, salt, garlic, shallots and chilies in a small pot and bring to a boil.
- Meanwhile, place carrots and cucumber into a glass jar.
- Pour the boiled pickling liquid over the vegetables, making sure everything is submerged. Cover and let cool completely before using. Store in the fridge.
For Fried Shallots:
If using store bought fried shallots, which I'm sure most of you will, refresh them by baking them in a 300°F/150°C oven for just 5 minutes, and they will be crispier, a little more caramelized, and much better tasting.
If making your own, I recommend following this detailed guide on fried shallots as there are a lot of little details to know to ensure they are crispy and not burned and oily!
For Shrimp Crackers (if frying at home):
- Break the dry shrimp crackers into 2-3 pieces as they expand a lot once fried (I recommend watching the video to see how much they expand so you can allow for the right amount of room in your pot).
- Heat about 1 inch of oil in a pot to 375°F (190°C), then turn the heat to low.
- Fry the crackers, no more than 3 pieces at a time. Once they puff and expand, which only take a few seconds, they are done. If you want them darker, keep them in the oil a few seconds longer. Remove and drain on paper towel.
- Store in an airtight container once cooled completely.
For the fried rice:
- Pound garlic, shallots, and shrimp paste in a mortar and pestle into a rough paste.
- In a small bowl, combine kecap manis, fish sauce, and sambal oelek; stir to combine.
- Fry the eggs sunny side up, or to your liking, and set aside.
- If adding meat, cook it in a wok with a little oil just until done, then remove and set aside. If not adding, skip this step.
- Add a little more oil to the wok and saute the herb paste until aromatic. If adding vegetables or leftover cold meats, add them now and toss for just a minute or so.
- Add the rice, then pour the sauce mixture over the rice and add the salt. Stir the rice, breaking up rice lumps as you go.
- Once there are no more lumps and the rice grains are dry, add the meat back in (if using) and turn off the heat.
- Toss in half of the green onions. Plate the rice, and arrange all the fixins around/on the rice (See the video for how this is done). Top with the remaining green onions. Enjoy!
How to Serve Nasi Goreng
Like many fried rice dishes, you can serve nasi goreng as a one-dish-meal! It's a flavourful fried rice with everything you need on one plate and doesn't need anything else to complete it, aside from perhaps a nice cold Thai iced tea!
If serving multiple people, I recommend having all the toppings out in bowls for people to dress up their own plate. (But maybe make one plate as a demo). It's more fun that way!
Watch The Full Video Tutorial!
All my recipes come with step-by-step video tutorials with extra tips not mentioned in the blog post, so make sure you watch the video below to ensure success - and if you enjoy the show, please consider subscribing to my YouTube channel. Thank you!

Nasi Goreng (Indonesian Fried Rice) Recipe
- Yield: Serves 3
Ingredients
- 1 head shallot, roughly chopped
- 3 cloves garlic
- 1 - 1½ teaspoon shrimp paste (depending how strong of a shrimp paste flavour you like)
- 1 tablespoon + 1 teaspoon kecap manis
- 1 tablespoon fish sauce
- 1 tablespoon sambal oelek
- 400g cooked jasmine rice, cold if possible
- ¼ teaspoon salt
- 1 green onion, chopped
- Optional: any protein/vegetables you want to add (see note)
Note: I've given instructions for using leftover, cooked protein. If you're using raw protein, I would just cook it first, take it out of the pan, and then add it back in when you add the rice.
Fixins
- Sunny side up eggs, 1 per person
- Shrimp crackers (krupuk)
- Fried shallots (see instructions below, or check out this detailed guide to perfect fried shallots)
- Fresh tomato and/or cucumber slices
- Pickled cucumber & carrots (see recipe below)
Indonesian Pickled Cucumber and Carrots (Acar)
- 1 cup carrot, cut into 1.5-inch sticks
- 1 cup cucumber, 1.5-inch sticks
- ½ head shallot, sliced
- 2 cloves garlic, smashed
- Any kind of fresh chilies, to taste (optional)
- ¾ cup white vinegar
- ¼ cup sugar
- ¼ teaspoon salt
Want to save this recipe?
Instructions
For pickles: In a small pot combine vinegar, sugar, salt, garlic, shallots and chilies; bring to a boil. Meanwhile, place carrots and cucumber into a glass jar or another container that is heat-proof and acid-safe. Pour the boiled pickling liquid over the vegetables, making sure everything is submerged. Close the container jar, and once it is cooled to room temperature, it is ready to use. Store in the fridge.
For Fried Shallots: Thinly slice shallots lengthwise and spread them out on a piece of paper towel. Sprinkle salt over them and let sit for at least 10 minutes to let the salt draw out the moisture. Once the moisture has been drawn out, pat the shallots dry with a double layer of paper towel. Fry them on LOW heat in a small pot or a round-bottomed wok, with just enough oil to submerge them. Once they turn a deep golden colour, and the bubbling has subsided, fish them out with a mesh skimmer and drain them on paper towel. The may take 7-10 minutes depending on your heat and how much you are frying. They will darken a bit more once you've taken them out, so be careful not to let them get too dark. They also burn quickly so do not walk away!
For Shrimp Crackers: If you wish, break the dry shrimp crackers into 2-3 pieces as they expand a lot once fried. Heat about 1 inch of oil to 375°F and fry the crackers, no more than 3 at a time. Once they puff and expand, which only take a few seconds, they are done. If you want a darker colour you can keep them in a few seconds longer. Let drain on paper towel. Store in an air-tight container once cooled completely. Note: While you're frying, keep the heat low because, unlike most other foods, these crackers do not lower the oil temperature much when they're fried, so the oil can quickly get too hot if the heat is too high.
For the fried rice:
Pound garlic, shallots, and shrimp paste in a mortar and pestle into a rough paste.
In a small bowl, combine kecap manis, fish sauce, and sambal oelek; stir to combine.
Fry the eggs sunny side up, or to your liking, and set aside.
In a wok, add a little vegetable oil and saute the herb paste until aromatic. If adding meat or vegetables, add them at this point and toss just to heat them through. Add rice, then pour the sauce mixture over the rice and add the salt. Turn the heat up to high and toss, breaking up rice lumps by pressing them down with a spatula. Once there are no more lumps and the rice grains are dry and evenly coated in the sauce, turn off the heat and toss in half of the green onions.
Plate the rice, and arrange all the fixins around/on the rice. Top with the remaining green onions.


Jen says
Hi Pai,
I have shrimp paste in bean oil...can I use it in this recipe?