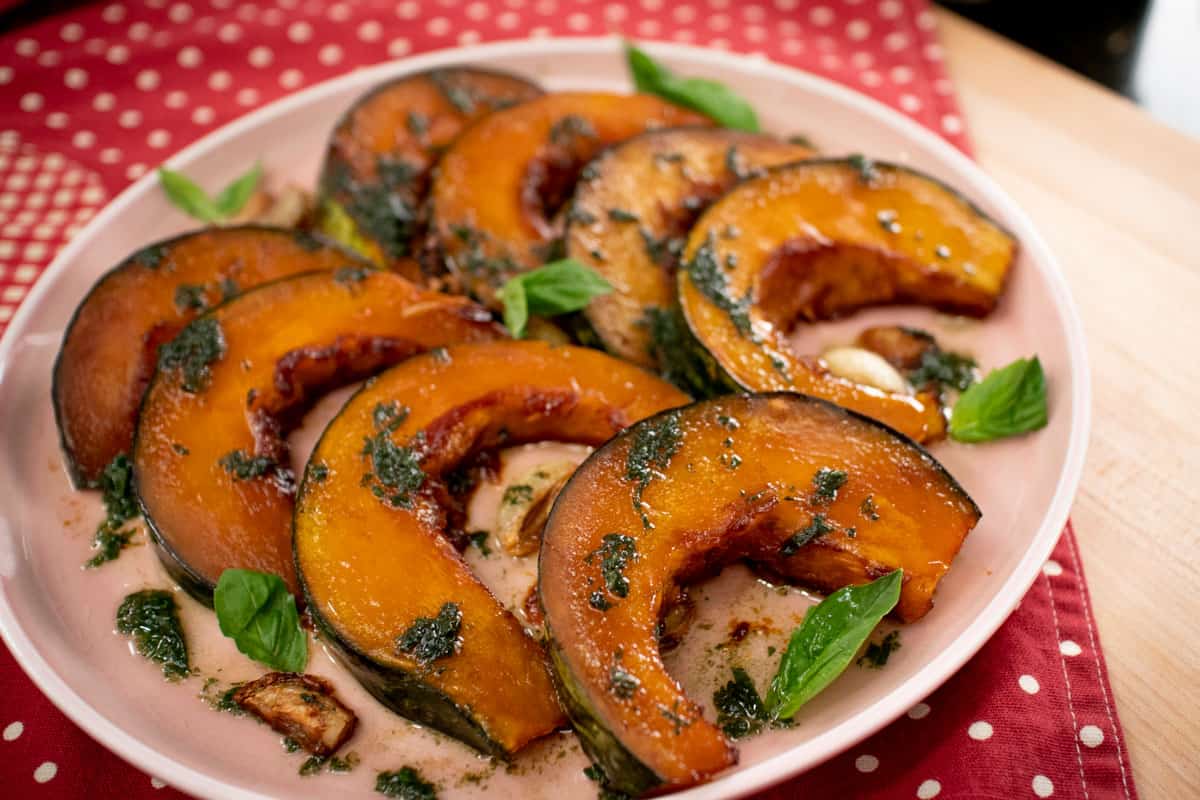
Sweet, creamy roasted kabocha squash glazed with soy sauce caramel, topped with roasted garlic, and drizzled with Thai basil oil. It's a fancy looking dish, but it's actually much easier and simpler than it sounds, I promise! It's a great side dish that adds subtle Asian flavours into your Christmas or Thanksgiving table, but it will still pair well with a traditional holiday feast.

Want to save this recipe?
This dish was inspired by a traditional Thai classic, kabocha squash with Thai basil stir-fry which was one of my favourites growing up. The combination of creamy kabocha squash, a salty-sweet-umami sauce, and Thai basil is one of the best I can think of. So I wanted to take this combo and present it as a vegetable side dish that would work with any traditional holiday meals; and the results were fantastic!
Can I Use Another Squash?
Yes. While kabocha is my favourite as it tends to be the sweetest AND you don't have to peel it since the skin is edible, any other creamy-fleshed squash will work: acorn, butternut, kuri, or even sweet potatoes. But keep in mind that some types of squash, like butternut, have to be peeled.
Also, different squashes vary in cooking time, so be prepared to adjust as you go.
Modification: Fish Sauce Caramel, Miso Caramel, and Butter
Originally I did this recipe using fish sauce, but I wanted to explore the possibility of making this vegan. Turns out not only does soy sauce taste delicious, it creates a darker glaze that looks scrumptious, AND it doesn't make your house smell like fish for a period of time!
The fish sauce caramel version, however, was also quite tasty. So you can give it a go if you wish, using the same proportions and method as the soy sauce version.
Miso caramel would also be fantastic. But you'll need few modifications though as miso is a dry chunky paste. So after caramelizing the sugar, I would add WATER to dissolve the caramel, then stir in about 1 tablespoon of miso paste once the sizzling has subsided.
To enrich the dish, you can also add butter! Butter is such an integral part of the holidays, isn't it? Brush some melted butter right when the squash comes out of the oven. Butter burns easily so it's best to add it at the end (despite me suggesting adding it to the glaze in the video!).
How To Make Soy Caramel Roasted Squash

- Saute garlic chunks and remove from the oil.
- Caramelize palm sugar in the garlic oil
- Add soy sauce to dissolve the caramel and turn off the heat.
- Brush squash with the glaze
- Roast the squash and the garlic (meanwhile make the basil oil)
- Glaze the sqaush again halfway through.
- Drizzle with basil oil
- Enjoy!
Can I Make This Even Simpler?
Yes! There are so many things going on when cooking for the holidays, so here are a few ideas for making this go faster.
- Skip the caramelizing sugar. Palm sugar is flavourful to start so it'll still be delicious. Once the sugar is melted, off the heat and add your sauce right away. It will take less time, it won't splatter much, and you won't need to thin out the glaze.
- Use store-bought pesto instead of making basil oil. Don't skip the basil because it's really important to the overall flavour of the dish. But store-bought pesto will do in a pinch.* This recipe is nut- and dairy-free, but most store bought pesto contains cheese and nuts.
Make Ahead Tips
- Roast the kabocha squash and garlic 1-2 days ahead and keep the extra glaze in a separate container (no need to refrigerate the glaze).
- On serving day, reheat in a 350°F (175°C) oven for about 10 minutes.
- Make the basil oil while they reheat.
- Brush the extra glaze on them right before serving so they glisten for the table!
Soy Caramel Roasted Kabocha Squash
Ingredients
- 1.5 lb Kabocha squash (about half a medium squash)
- 5-6 garlic cloves, or as much as you'd like
- 2 tablespoon vegetable oil
- 3 tablespoon palm sugar, chopped
- 1 ½ tablespoon soy sauce
- ¼ teaspoon ground black or white pepper
Thai Basil oil
- 3 tablespoon neutral flavoured oil
- A pinch of salt
- ¼ cup finely julienned Thai or regular basil
Want to save this recipe?
FULL VIDEO TUTORIAL
All my recipes come with step-by-step video tutorials with extra tips not mentioned in the blog post, so make sure you watch the video to ensure success. If you enjoy them, consider subscribing to the YouTube Channel to not miss an episode. Thank you!
Subscribe to my YouTube ChannelInstructions
- Preheat the oven to 425°F (220°C).
- Scoop out the seeds and fiber from the cavity of the squash with a spoon, then cut into 1-inch wedges (no need to peel it, and watch the video for safe cutting techniques). Place the squash on a large plate.1.5 lb Kabocha squash (about half a medium squash)
- Prep the garlic:Cut the root end off the garlic and crush the cloves with the flat of your knife until the cloves are broken into big chunks. Remove the peel, and tear apart or chop any chunks that are too big.5-6 garlic cloves
- Make the glaze:In a small pot, add the oil and garlic and turn heat on to medium low. Once the garlic is bubbling, cook for about 2 minutes, stirring frequently, until they start to turn golden. Turn off the heat and remove from the oil. Be sure to remove ALL the little bits of garlic otherwise they will burn in the next step.2 tablespoon vegetable oil
- To the same pot, add palm sugar and cook until it melts, then turn off the heat. OR if you want a deeper caramel flavour, keep the sugar cooking a bit longer until the colour darkens slightly and then turn off the heat. (If you chose to further caramelize the sugar, then when you add the soy sauce it will splatter aggressively, and you may need to add a splash of water to thin out the glaze)3 tablespoon palm sugar
- Take the pot off the heat then add the soy sauce, (it will splatter vigorously), and once the splattering settles you can stir to mix. If it is thick, add about 1 tablespoon of water to thin out the glaze so it can be easily brushed onto the squash. Add the pepper, then throw the garlic chunks back in to coat in the glaze.1 ½ tablespoon soy sauce, ¼ teaspoon ground black or white pepper
- Brush this glaze over the squash on both sides, then place them on a parchment-lined baking sheet in one layer. Be careful to get as little glaze as possible on the baking sheet cuz it'll just burn in the oven.
- Put the garlic chunks inside the curve of the squash pieces, shaking off excess glaze before placing them down—this will protect them from over-browning.
- Roast for 10 mins, then take the squash out and brush with more glaze on both sides; then roast them for another 10-15 minutes or until fork-tender. If the garlic is starting to get too dark, you can take them out first. To check for doneness, pierce the thickest piece with a fork and it should go right through without resistance.
- While the squash roasts, make the basil oil: Add the basil, a pinch of salt and oil into a mortar and pestle and grind to bruise and blend the basil with the oil. You can also just blend everything in a small food processor, but you may need to make a bit more basil oil than you need to make it blend effectively.3 tablespoon neutral flavoured oil, A pinch of salt, ¼ cup finely julienned Thai or regular basil
- AssemblePlace the squash on a serving platter in one layer and scatter the garlic pieces on top. Brush or drizzle the remaining glaze on the squash, then drizzle with basil oil. Serve warm or room temperature.


Meg Mayo Lucas says
Big hit at Easter dinner last night! I cut the squash in cubes for smaller portions. But, I could see my garlic overcooking when added at the beginning. Next time, I will add the garlic when I flip the squash pieces so it has no chance of burning.
Oleg D says
Hi I am from a small country Moldova. That is a very good recipe, In my family we started to eat squash more frequently because of this recipe. Bth, when done, I poured warmed coconut milk directly in the dish and it melts in your mouth. Thank you
Nurul Asyiqin Roslan says
sweet salty garlicky! i made it & i can't stop eating it ...could have a whole kabocha by myself!
Pailin Chongchitnant says
So glad you loved it!