When you have too many bananas, what's the first thing that comes to mind? Banana bread, most likely, right? But for Thai people, we turn to kanom gluay - Thai steamed banana "cake." My mom made these often when I was a kid as we had a banana tree, and they're super easy and tasty. Today I make them for my son, and he adores them. They're easier, faster, and healthier than banana bread!
Want to save this recipe?
What is kanom gluay?
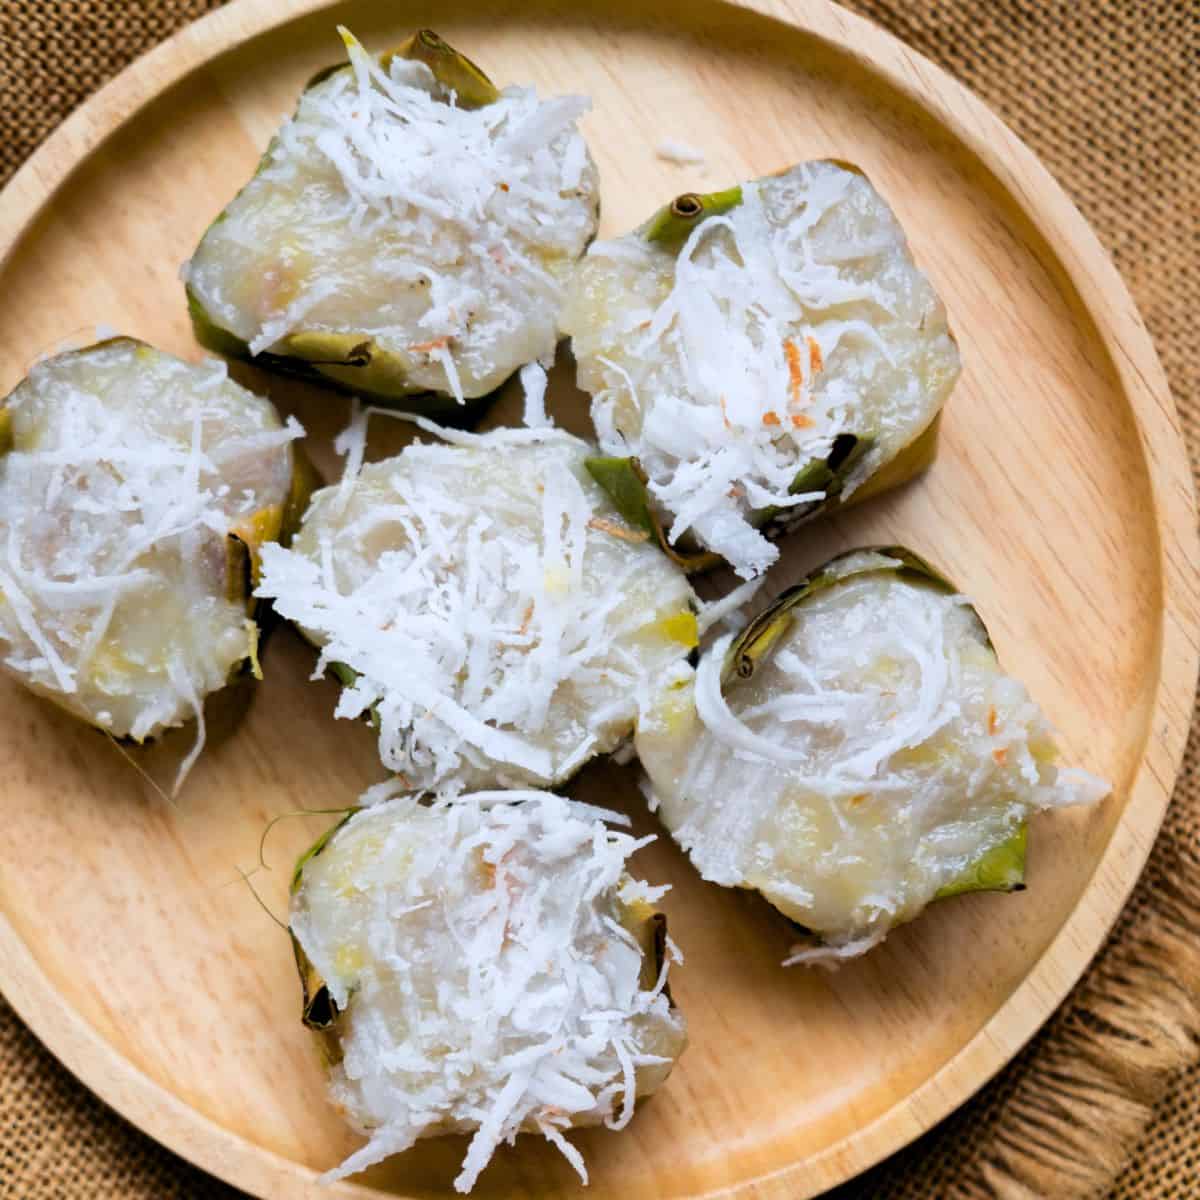
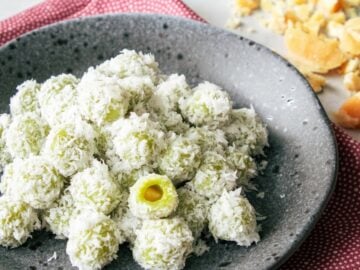
Kanom means snack, and gluay means bananas. Kanom gluay is a traditional dessert that is very common in Thailand. They're made mainly from mashed bananas, rice flour, coconut milk, and coconut meat, and then steamed, often in banana leaf cups, as seen in the picture above. It's considered a rustic and homey dessert, as it uses ingredients that are local and widely available to every class of Thais, and is very simple to make.
Though I am calling them "banana cake," it's not the fluffy cake in the western sense. The texture of kanom gluay is fudgy and tender, almost like a really fudgy brownie. A better way to describe it is "banana coconut fudge."
When you buy these in Thailand, cheaper versions use a lot of flour to keep the cost low, so the texture can be chewier and denser, but my recipe uses a LOT of bananas, with just enough flour to hold it together, for maximum banana flavour and softer texture.
Ingredients and Notes
Here are all the ingredients you'll need and important notes about them. For amounts, see the the full recipe card below.
- Ripe bananas. They do not have to be overripe, as long as they're not green they'll be fine to use. But if they are overripe, they will work too. Super flexible! Note: In Thailand we traditionally use namwa bananas which are a little fruitier-tasting, but regular bananas you find in North America also yield a delicious result and these are what I use here in Canada. So use whatever sweet bananas you have!
- Coconut milk. Use full-fat, unsweetened coconut milk. See my guide for how to choose good quality coconut milk here.
- Shredded coconut, unsweetened. I use dried shredded coconut which you can find at most grocery stores, however, traditionally, we use fresh shredded coconut meat, which is available frozen at many Asian grocery stores. You can also make a version that uses young coconut meat which comes in cans. This is a very flexible recipe, so any kind of coconut meat you have to add, it'll do!
- Thai rice flour. Use rice flour from Thailand as it has a finer texture than rice flour from the US or other countries.
- Tapioca starch. You CAN use all rice flour if you want to keep it simple, but I like to add a little tapioca starch to give it a little bounciness.
- Salt.
- Lime or lemon juice, optional. This is a trick I developed as a result of working with N. American bananas that are very ripe, because the riper they are, the less acidic they become. The Thai bananas we use for these cakes are a fruitier and more acidic, so adding just a few drops of lime or lemon juice to the batter brightens the flavour up noticeably. I always taste the batter first before deciding whether I want to add more lime juice or not, because remember when working with fresh fruit, every batch can be different!
Step-By-Step
Here's a bird's eye view of the process. The full instructions are in the recipe card below, and if this is your first time, I highly recommend watching the video tutorial to ensure success!
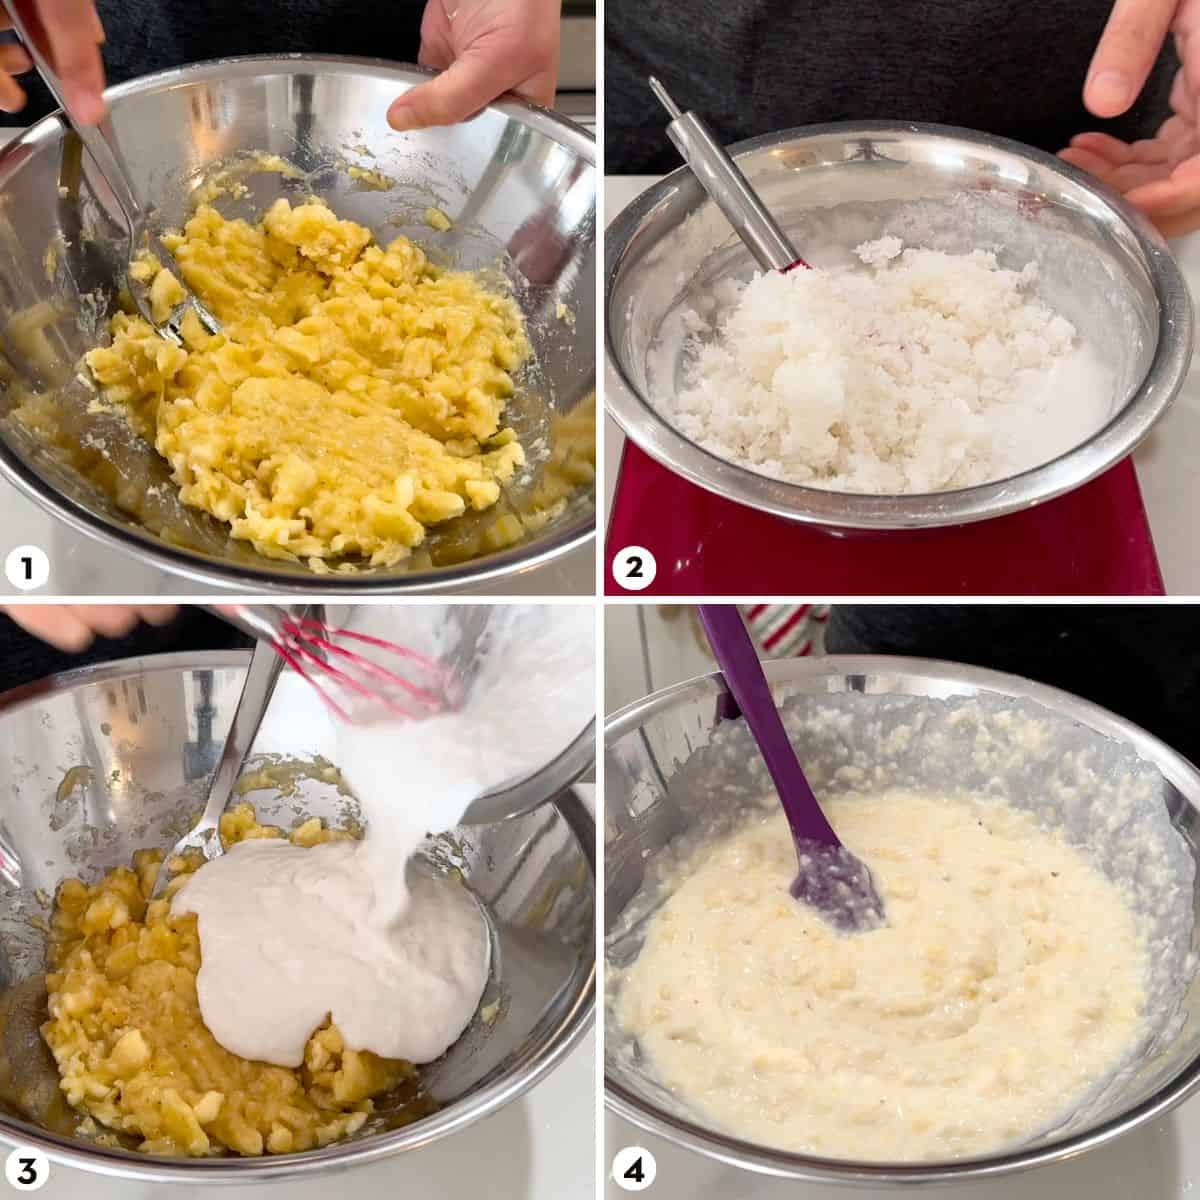
- Mash the bananas with a fork, but leave it a bit chunky.
- Combine the starches, sugar, salt and coconut milk and stir into a smooth batter. Then add the coconut meat, holding back about 1 ½ tablespoon for garnish, and stir to mix.
- Add the batter to the bananas.
- Stir until well combined. Taste the batter and see if it might benefit from a little bit of acidity, if so add a touch of lime or lemon juice.
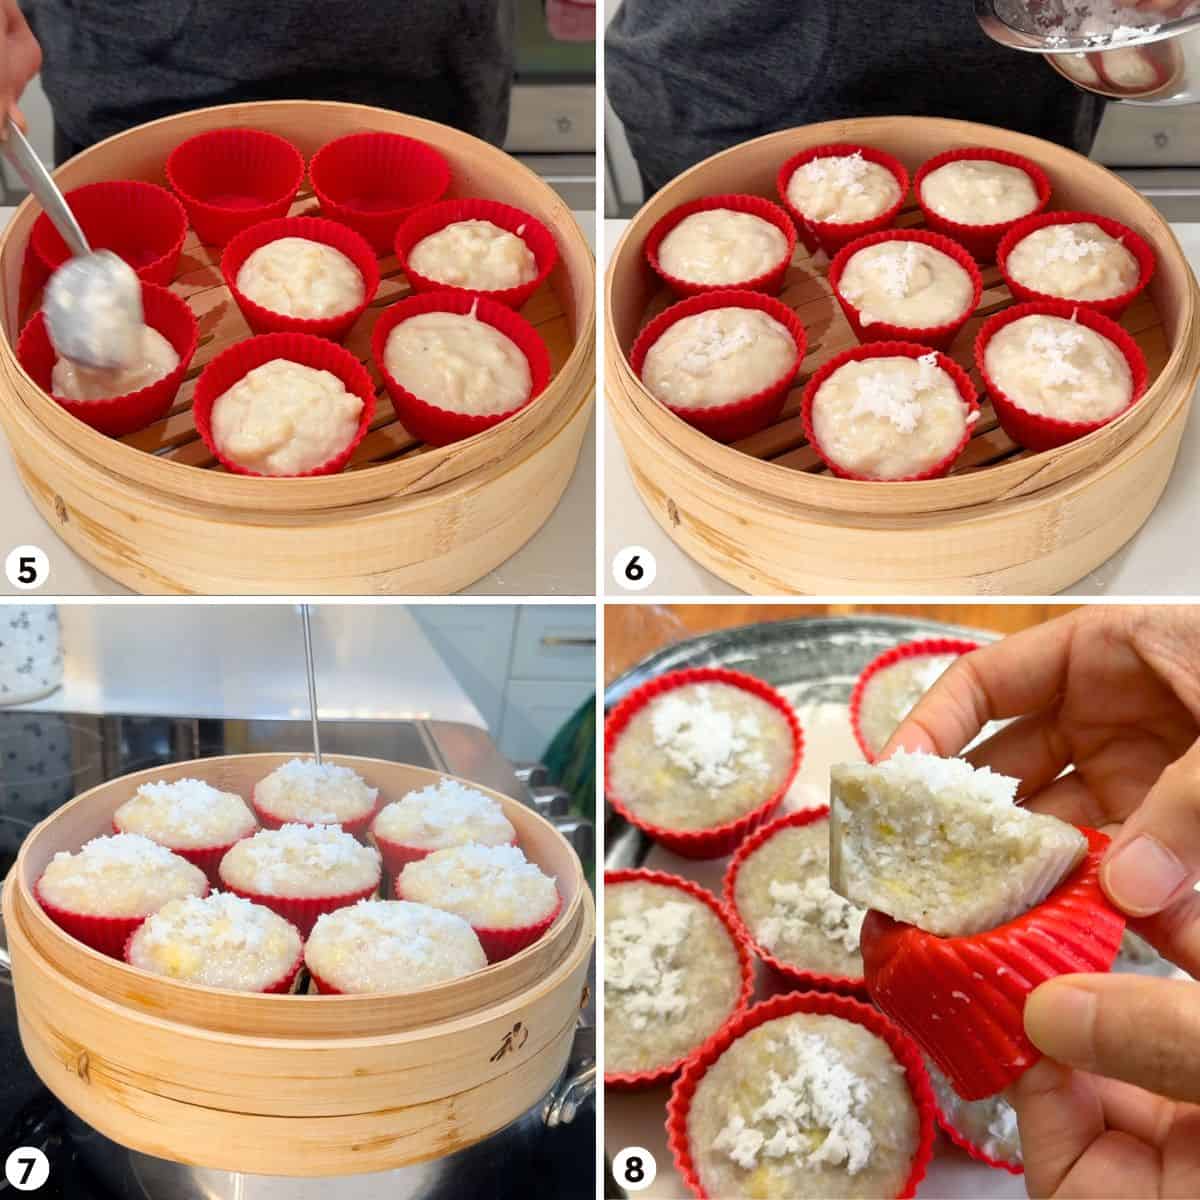
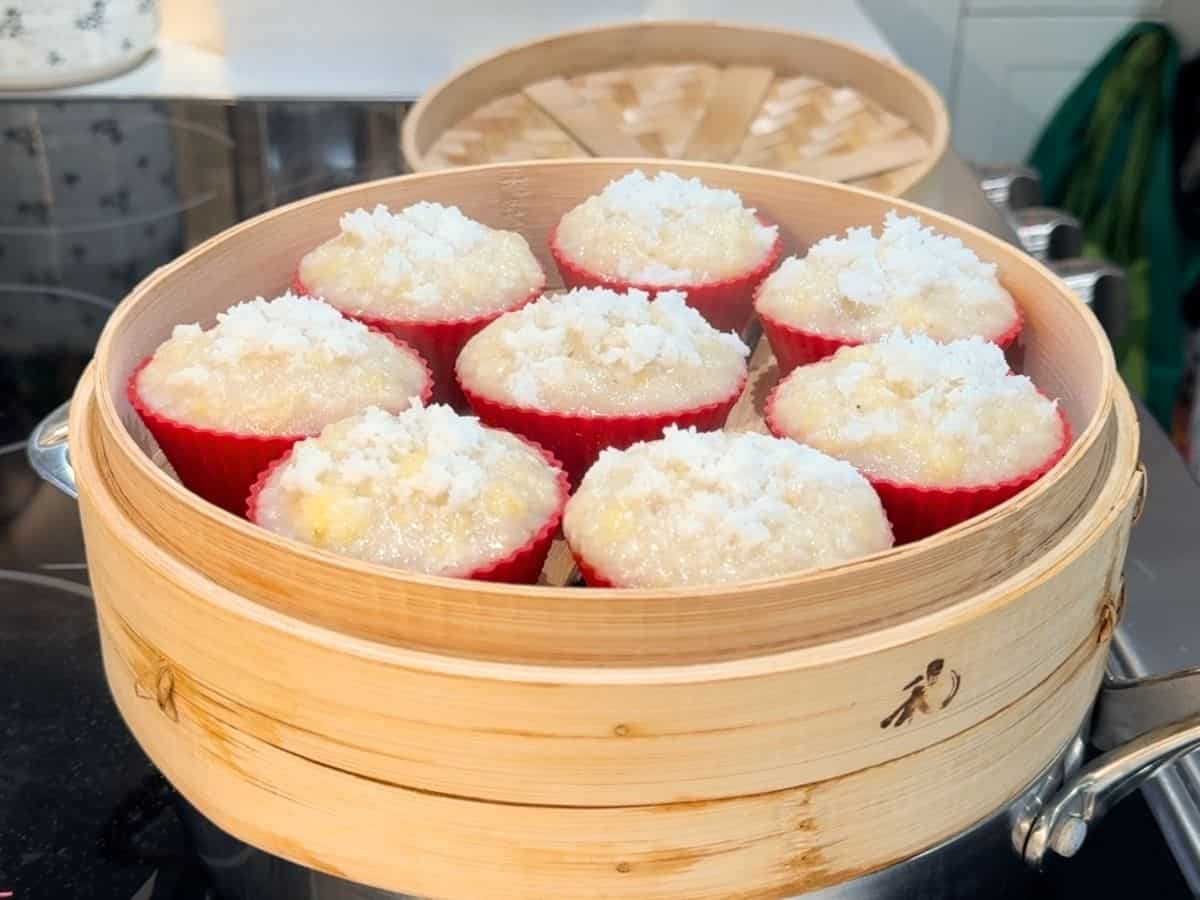
- Bring the steamer water to a boil, meanwhile, full your containers with the batter, leaving a little room to allow for expansion.
- Combine the reserved coconut meat with a teaspoon of hot water to moisten, then top each cup with some coconut to garnish.
- Steam for 20 mins (or longer if using larger containers) until internal temp reaches 200°F.
- Allow to cool, and the cakes will deflate and turn slightly grey, this is normal and to be expected! Enjoy warm or room temp.
Pro Tip: Making it Even Healthier
The great thing about kanom gluay is that it is very forgiving, remember, we never made these using any recipe! So unlike a traditional cake, reducing sugar from this recipe or replacing it with a sweetener of choice will not affect the texture in a significant way. This is why it's a great snack for kids!
If you are looking to reduce the fat, you can replace some of the coconut milk with another milk of your choice, however, keep in mind that the coconut milk provides good flavour.
Storage and Reheating
These will last in the fridge for up to a week, and before eating, simply reheat in the microwave or steamer until it's piping hot and fully heated through, otherwise it will not regain its original texture. Then let cool a bit before eating.
You can also freeze them! Reheat directly from frozen, or let them thaw first before reheating in the microwave or steamer. Just remember to reheat until it's steaming hot as rice flour based products will not be as soft as it was if it does not get hot enough.
Like Thai desserts? You'd also love these!


Thai Steamed Banana Cake (Kanom Gluay)
Equipment
- Any heat-proof container for steaming, e.g. ramekins, silicone muffin cups, or a glass food storage container.
Want to save this recipe?
Ingredients
- 300 g peeled ripe bananas, about 3 medium sized bananas
- 30 g Thai rice flour
- 25 g tapioca starch
- 30 g granulated sugar, see note 1
- 2.5 ml table salt
- 120 ml coconut milk
- 120 ml dried shredded coconut, see note 2
- ¾ teaspoon lime juice, optional
Notes
- This recipe is not very sweet, but if you're watching your sugar you can drop it even lower or replace it with any sweetener that withstand cooking. By contrast, you can make it sweeter if that's what you prefer.
- You can also use young julienned coconut instead, which will be closer to the original Thai version. You can find them frozen or canned. If the strings are long, you can chop them so they are not longer than the containers you're using to steam.
All my recipes come with step-by-step video tutorials with extra tips not mentioned in the blog post, so make sure you watch the video to ensure success. If you enjoy them, consider subscribing to the YouTube Channel to not miss an episode. Thank you!
Subscribe to my YouTube ChannelInstructions
- In a medium sized mixing bowl, mash the bananas with a fork, leaving it a bit chunky.300 g peeled ripe bananas
- In a small mixing bowl, combine the rice flour, tapioca starch, sugar, salt and whisk to combine. Add the coconut milk and whisk until smooth, then add most of the shredded coconut, holding back about 1½ tablespoon for garnish, and stir to mix.30 g Thai rice flour, 25 g tapioca starch, 30 g granulated sugar, 2.5 ml table salt, 120 ml coconut milk, 120 ml dried shredded coconut
- Pour the batter into the bananas and mix until well combined. Taste the batter, and if you want it a little brighter, you can add the lime juice, or you can add more sugar as well if you want it sweeter.¾ teaspoon lime juice
- Preheat the steamer by bringing the steaming water to a full boil. Meanwhile, drizzle your reserved coconut with roughly a teaspoon or so of hot water (which you can take from the steamer) to rehydrate; this will help the coconut shreds stick together and it’ll make a nicer mound of garnish on top of the cakes.
- Fill your containers, leaving a ¼ inch or so of headroom to allow for expansion. Garnish with the rehydrated coconut.
- Steam the cakes over boiling water until internal temp reaches 200°F (93°C). For cupcake size, it’ll take 18-20 minutes. Increase or decrease the time according to the size of your container and thickness of the batter. When in doubt, steam them for longer because nothing bad will happen if you over-steam them a bit. But do make sure you’ve got enough water in the pot so it doesn't dry out and burn the pot!
- Allow to cool until warm or room temp before eating, as it'll be too soft right out of the steamer. Keep in the fridge for up to 1 week, or freeze. Reheat in the microwave, making sure to heat them until steaming hot to regain the soft texture.


Leave a Reply