Hot Thai Kitchen

  • Recipes by Categories
  • Kitchen Tips & Ingredients
  • Thailand Vlogs
  • My Cookbooks
  • Newsletter
  • Patreon
  • Shop Ingredients & Tools
  • Find an Asian Grocer
  • Merch
  • About
  • Contact
menu icon
go to homepage
subscribe
search icon
Homepage link
  • Recipes by Categories
  • Kitchen Tips & Ingredients
  • Thailand Vlogs
  • My Cookbooks
  • Newsletter
  • Patreon
  • Shop Ingredients & Tools
  • Find an Asian Grocer
  • Merch
  • About
  • Contact
    • Facebook
    • Instagram
    • Pinterest
    • Twitter
    • YouTube
  • ×
    Home

    Aunty Jenny's Braised Chicken Wings

    May 3, 2019 by Pailin Chongchitnant 1 Comment

    Braised chicken wings with caramelized onions

    Jump to video!


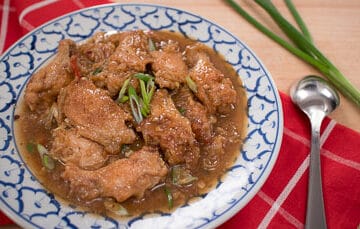
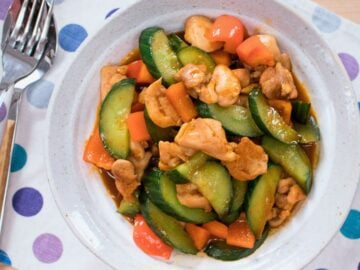
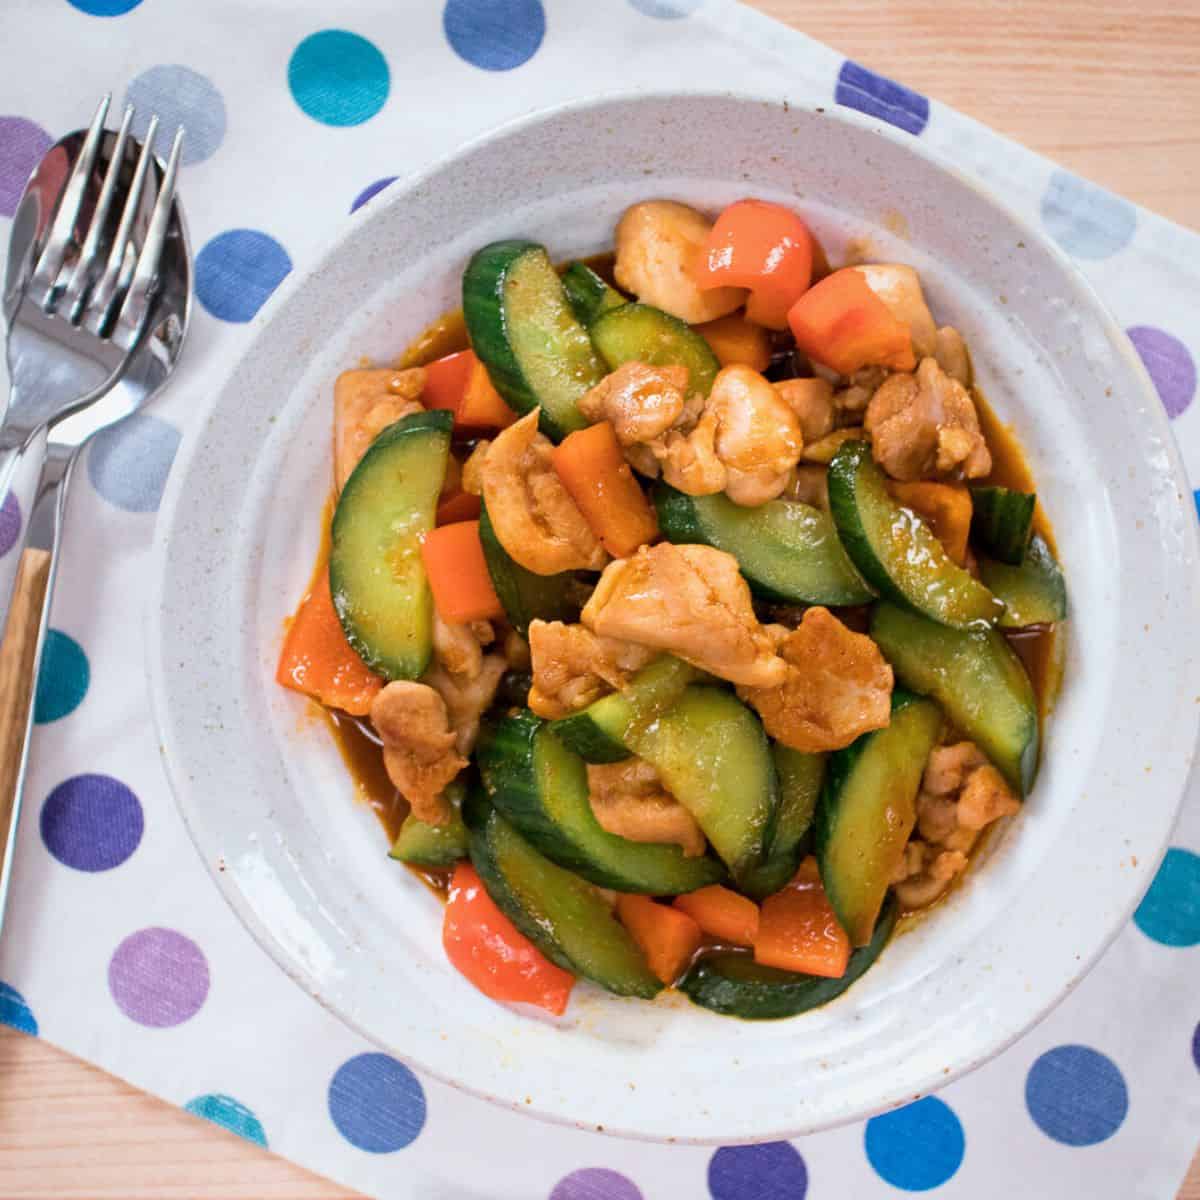
    Aunty Jenny is my Chinese mother-in-law, and this is something she makes ALL the time. And we love it because it looks like a luxurious stew that took time and effort to make, yet it's really quick and easy. I don't know if this is a traditional Chinese dish, but I do know it is delicious! Chicken wings are braised with sweet caramelized onions, so the chicken comes out tender and the onions practically melt in your mouth.

    Key to Flavourful Wings 

    The recipe starts out with searning the chicken wings until well browned. Even though once the wings are braised you may not see the searing job you did, and you may be tempted to just skip it, don't! It is super important because that browning of the skin adds so much flavour—think the flavour of fried chicken skin VS boiled chicken skins...yeah, a LOT of flavour. So take the time to really get a beautiful sear.

    Key to Tender Wings

    Wings are small and technically can cook in just a few minutes, but in this recipe we want more than just "cooked". We want tender, which means we need to braise them. Braising is when you cook meat gently in a liquid for an extended period of time until the meat is fork tender. So as the meat cooks it goes from raw, to cooked, to overcooked, and then eventually to scrumptiously tender.

    If we were doing red meat, this would take hours, but luckily for wings, it only takes 20 minutes! And this time also allows for flavour to penetrate the meat for a thoroughly flavourful wings. Not to mention the onions cook and become sweet and melty!

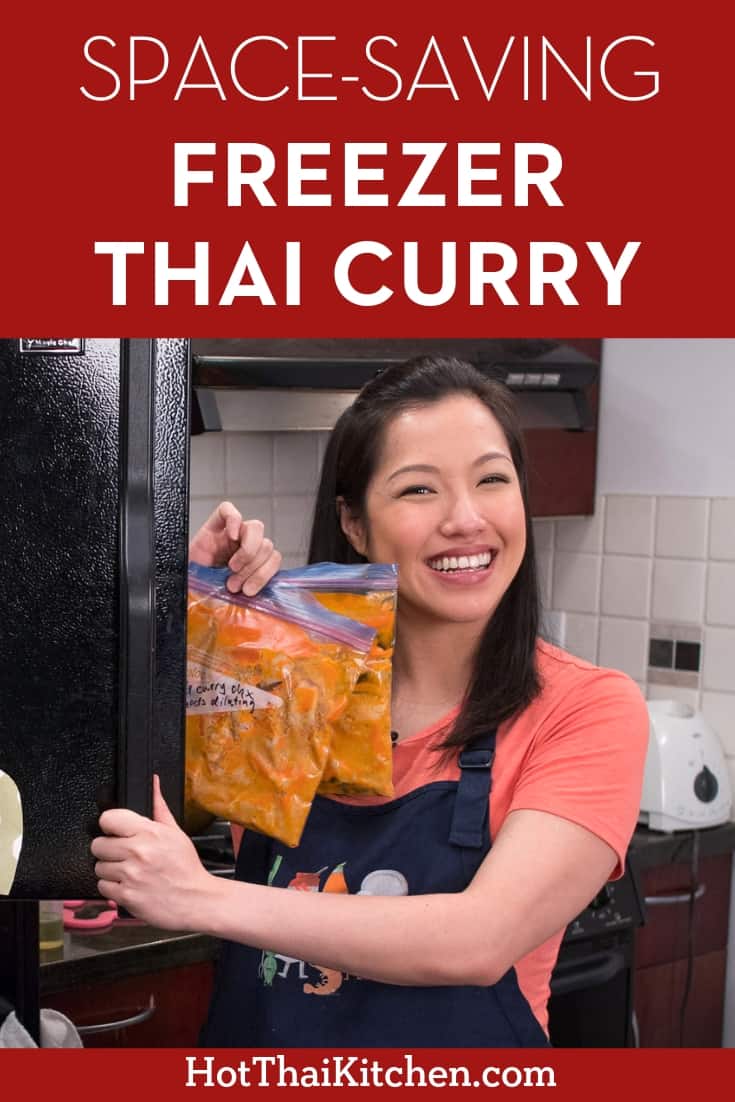
    The Perfect Freezer Meal

    Yes, you can freeze this dish! And it thaws and reheats so perfectly you couldn't tell the difference. Make the recipe as is, no need to modify anything, and freeze. You can let it thaw in the fridge first overnight (my preferred method) then microwave, or just microwave it from frozen. If using the microwave to reheat, I would stir it a few times in between for a more even heating. You can add some fresh green onions or cilantro to it after reheating to bring back some freshness, but otherwise, just eat! You can also freeze some rice to go with it so it can be a ready-made-meal for you.

    Bonus content for Patreon members: For this episode I share a cooking time guideline for braising different types of meat, a useful thing to know for sure! Click here to learn more about becoming a Patreon member.

    Watch The Full Video Tutorial!

    All my recipes come with step-by-step video tutorials with extra tips not mentioned in the blog post, so make sure you watch the video below to ensure success - and if you enjoy the show, please consider subscribing to my YouTube channel. Thank you!

    Homemade Asian Meatballs Recipe

    November 22, 2019 by Pailin Chongchitnant 8 Comments

    A Classic Street Food

    These meatballs are what you would find in Asian noodle soups, hot pot, or grilled on a stick. In Thailand, this is not something most people make at home, but rather something you buy. Kind of like sausages in the West; some people do make them at home, but for the most part it's something one buys from the store.

    However, it's not hard to make at all, and definitely easier than making sausages because there is no casing to fuss with! You do need a good food processor to get the meat super fine, and a bit of patience in getting the hang of forming the meatballs.

    Forming Meatballs by Hand

    Commercial meatballs are made by machine, but back in the day they used to be made by hand. In this video I show you how to do the classic hand squeezing technique, but if you don't care much about how smooth and round they look, you can simply form them into lumps with two spoons. You can also use a smaller disher (one of those spring-loaded scoopers).

    Watch this 7-min video of me just forming the meatballs by hand! I made this video for those who want to see the technique several times over, so you don't have to keep rewinding the video. You can have it playing in the kitchen while you make the meatballs, and it'll be like we're doing it together 🙂

    YouTube video

    Substituting Other Meats

    In Thailand pork is the most popular kind of look chin, hence this recipe. But you can use the same recipe and make beef or chicken meatballs instead. For the pork ones I'm using lean ground pork because fatty ground pork yields meatballs that are too soft. But if using beef, do not use lean or the balls will be too firm as I discovered myself. Beef is a chewier meat so it needs a bit more fat to help tenderize. I have never made them with chicken, but I suspect that you would need to use lean chicken because chicken is a tender meat.

    What to Use Look Chin For?

    These are SO versatile! Here are some ideas:

    • You can put them into noodle soups. You can even use the cooking liquid as the base for your broth.
    • Skewer and grill them. You can find these skewered look chin at many open air markets in Thailand. See recipe for the dipping sauce.
    • Eat them straight up like appetizers (think cocktail wieners), you can use the dipping sauce in the recipe provided.
    • Add them into any soups, stews, or curries.
    • Use them in stir-fries.
    • Put them in a hot dog bun and dress it like you would a regular hot dog. I have tried this, it's awesome!
    • Can't use them up? Freeze them!

    Watch The Full Video Tutorial!

    All my recipes come with step-by-step video tutorials with extra tips not mentioned in the blog post, so make sure you watch the video below to ensure success - and if you enjoy the show, please consider subscribing to my YouTube channel. Thank you!

    $200 vs $30 Rice Cooker Review & Taste Test

    June 5, 2020 by Pailin Chongchitnant 4 Comments

    Do Rice Cookers Really Make a Difference?

    If you talked to me years ago, I would've told to just get the cheapest rice cooker - they're all the same, you don't even really need one! But times have changed and so has my mind, haha! Turns out, the rice cooker really makes a difference, and if not in the rice itself, then in the user experience. But is that difference worth the money you pay? Watch the video to find out!

    In Thailand, people don't really put much thought into their rice cookers, and as I've discovered in my taste test, it turns out that it's because white jasmine rice, the rice most Thais eat most of the time, is very forgiving. You can cook it in anything, and as long as you used the right amount of water, it'll turn out fluffy and soft and delicious.

    But not all rice is like that. There is a reason why the Japanese put so much thought into their rice cookers...because Japanese short grain rice is a lot more finicky.

    How I'm Testing

    As you'll see in the video I do two different tests: one for jastmine rice, the other for Japanese short grain rice. And for each type of rice, I cook it in the fancy Zojirushi Micom Neuro Fuzzy rice cooker, my old red Sunbeam ($30 when I bought it), and simply in a pot on the stove. Then I do a blind taste test to see which one I like best!

    Watch the video above to see the verdict!

    PS. I still need to do a test on brown and other whole grain rice!

    Buy The Recommended Rice Cookers Online

    You can check out my "Kit" where I list all my kitchen tools and appliances, including the rice cookers I recommend. These are affiliate Amazon links, so if you buy something on Amazon through my link I will get a little bit of commission.

    Watch The Full Review!

    Vegan Laab with Tofu & Corn

    January 10, 2020 by Pailin Chongchitnant 10 Comments

    I really surprised myself how well this dish turned out! I made a vegan version of laab, a northeastern Thai salad normally made with ground meat, using leftover pressed tofu and corn, and it turned out so well I had to share it!

    It's perfect as an appetizer, served with some lettuce leaves and eaten as a lettuce wrap. Or for a more traditional accompaniment you can serve it with sticky rice or jasmine rice. It's also low carb and super healthy for those of you who might be on an "eat healthy" new year resolution!

    What is Laab?

    Laab is a quintessential dish of northeastern Thailand, a region known as Isaan. It's a homey salad made typically from ground meat, seasoned with lime juice, fish sauce, lots of herbs, and the defining ingredient, toasted rice powder. I always say "you can laab anything" and it's true! It's a flavour that amazingly works with all sorts of ingredients.

    If you search the website for laab you will see many, many varieties - the classic Laab Gai (chicken), Laab Woonsen (glass noodles), Laab Salmon, Laab Kai Jiew (omelette salad), Laab Tod (meatballs), Laab Moo (pork), and of course the Epic Laab Burger - however, this is the first vegan version that I have created a video for.

    Is it Laab? Or is it Larb?

    Laab is sometimes written as "larb" in English, but in Thai you don't pronounce the R so I prefer to spell it with a double A. For those of you who speak with American or Canadian accent, please do not pronounce it as if it were an English word; in other words it is not laRRRRb. It actually drives me a bit crazy when I hear it. In the movie Spiderman Homecoming, there is a scene where Peter Parker and Aunt May are eating Thai food, and they said laRRRb repeatedly and I just about died in the theatre in frustration, lol!! Of course you're not at fault if that's how your local Thai restaurant spells it. But now you know better.

    Watch The Full Video Tutorial!

    All my recipes come with step-by-step video tutorials with extra tips not mentioned in the blog post, so make sure you watch the video below to ensure success - and if you enjoy the show, please consider subscribing to my YouTube channel. Thank you!

    Ingredients

    Here are all the ingredients you'll need to make this recipe. For amounts, check out the full recipe card below.

    • Uncooked jasmine rice or sticky rice (for toasted rice powder)
    • Kaffir lime leave (optional, for toasted rice powder)
    • Pressed tofu
    • Cooked corn kernels (see note)
    • Soy sauce
    • Golden Mountain Sauce
    • Lime juice
    • Roasted chili flakes, to taste, or use any chili flakes you have
    • Thinly sliced shallots
    • Lemongrass, very thinly sliced (optional)
    • Kaffir lime leaves (optional)
    • Mint leaves, torn into small pieces if large
    • Cilantro, chopped 
    • Lettuce or cabbage leaves for serving, optional
    • Jasmine rice or sticky rice for serving, optional

    Note: In the video I used waxy corn which is less sweet and chewier and denser than regular sweet corn. If you're also using waxy corn they take a lot longer to cook, about 45 minutes.

    How to Make Tofu & Corn Laab (Vegan)

    Here are all the steps to make this recipe. If this is your first time, I highly recommend watching the video tutorial to ensure success.

    1. To make toasted rice powder: In a dry saute pan, add the rice and the kaffir lime leaf, if using, and stir constantly over high heat until the rice has a deep brown colour (see video for colour). Remove from heat immediately and transfer into a mortar and pestle or a coffee grinder. Grind until fine (yes, grind the lime leaf too), but if using a coffee grinder, be careful not to over-grind—you don't want it to look like flour, you still want a bit of grittiness to it.
    2. Crumble the tofu into small pieces with your hands.
    3. In a medium pot, add about 2 tablespoon of water then turn the heat on high. Add tofu and corn and stir until hot.
    4. Turn off the heat then add shallots, lemongrass, kaffir lime leaves, and chilies; stir to mix well.
    5. Add soy sauce, Golden Mountain Sauce and lime juice.
    6. When ready to serve stir in toasted rice powder, mint and cilantro. (Don't add these too far in advance as the rice will absorb the liquid and make it dry, and the herbs will wilt.)
    7. Serve with lettuce leaves and eat like a bite-sized lettuce wrap, or serve with jasmine or sticky rice as part of a meal.

    Recipe Card

    Classic Thai salad made vegan! Made from pressed tofu, corn, and a refreshing tart dressing. #thairecipe #vegan #hotthaikitchen

    Tom Yum Pizza พิซซ่าต้มยำกุ้ง

    February 8, 2019 by Pailin Chongchitnant 9 Comments

    Add some Thai flavours to your pizza with this Tom Yum Pizza recipe. Tart, bold flavours of lemongrass and lime, on an easy, flavourful homemade dough. And it only takes 5 minutes to cook this pizza! #hotthaikitchen #thaipizza #homemadepizza #tomyum

    Jump to video!


    This is my favourite pizza ever. I was first introduced to the concept of tom yum pizza when I was a teen by none other than Pizza Hut Thailand! They put "tom yum goong pizza" on the menu and I loved it! I loved the bold, bright flavours of lime and lemongrass on an otherwise rich and cheesy pizza.

    Changing up the toppings:

    The most important thing about this recipe is the Tom Yum Pizza Sauce. In fact, if you already make pizza at home, you just need the sauce recipe and apply it to your pizza making regimen, and put whatever toppings you like on it. (Although you might want to check out my brilliant pizza cooking method as well!)

    I'm using classic Tom Yum toppings here: shrimp and oyster mushrooms, through straw mushrooms would be more traditional but I can't get those here. You can change the shrimp to chicken (make sure the chicken is precooked), or add calamari (which is what a big pizza restaurant chain does in Thailand), or keep it meat free and load up on a couple of types of mushrooms. Hey it's pizza, top it with whatever you want!

    I love using fresh mozzarella cheese on pizza, but the regular block type that you need to grate would be fine.

    Storing Leftover Sauce

    The sauce recipe uses up one whole can of tomatoes, but it'll make more than you need if you're only making 2-3 pizzas. You can make about 6-8 10-inch pizzas with this amount of sauce. You can make only half the sauce recipe if you don't want to have much leftover, however, the sauce freezes really well so you can keep it and have it for future pizza cravings! It'll also last about a week in the fridge. You can also thin out the sauce a bit and use it as a pasta sauce as well.

    My Pizza Cooking Method

    The coolest part of this recipe might be the way the pizza is cooked. I use a broiler-skillet method which I got from Serious Eats and I think it's brilliant. Saves so much time and yields better results than baking in the oven. I love that I only need to preheat the broiler, which takes only a few minutes, as opposed to preheating the whole oven to 450°F or 500°F which would take nearly an hour. No pizza stone needed, and the bottom crust still gets a nice crisp, slightly charred bottom. And it's done cooking in 5 minutes!

    Oven Broiler Safety Note:

    I've had one person report to me that when he put his pizza under the broiler, the baking sheet buckled, putting the pizza in direct contact with the broiler element which caught it on fire! Though this has never happened to me personally, and I've made this in 3 different ovens, please watch your pizza carefully if this is your first time using this method. A few things to keep in mind:

    1. When I put my pizza on the highest rack, it is 3 inches away from the element. On your oven, the "highest rack" may put your pizza closer to the element, so if it seems precariously close, use the second highest rack instead and it may just take another minute to cook.
    2. Your baking sheet will warp under the heat; mine does too, but it should return back to its original shape once it comes out of the broiler (you can see in the video that the baking sheet comes out flat, but it did buckle in the oven).
    3. To minimize pan warping, use thicker, sturdier baking sheet rather than thinner ones.
    4. Because the broiler is extremely hot, don't put any liner on the baking sheet (no parchment paper, no silicone mat, etc.). And don't use a non-stick, teflon-coated baking sheet which are not meant to be placed under high heat.

    Watch The Full Video Tutorial!

    All my recipes come with step-by-step video tutorials with extra tips not mentioned in the blog post, so make sure you watch the video below to ensure success - and if you enjoy the show, please consider subscribing to my YouTube channel. Thank you!

    Add some Thai flavours to your pizza with this Tom Yum Pizza recipe. Tart, bold flavours of lemongrass and lime, on an easy, flavourful homemade dough. And it only takes 5 minutes to cook this pizza! #hotthaikitchen #thaipizza #homemadepizza #tomyum

    Thai Sukiyaki Stir-Fry (suki hang)

    August 2, 2019 by Pailin Chongchitnant 2 Comments

    a plate of suki hang with chopsticks

    Sukiyaki might sound like a Japanese dish, and it is, but trust me, this dish is very Thai. Here's the story. Sukiyaki is a Japanese hot pot, and Thai people took the inspiration and started making our own Thai hot pot served with a spicy, flavourful red sauce that's more suited to the Thai palate. We still call this hot pot sukiyaki, or more commonly just "suki" for short.

    Then the hot pot evolved into a noodle soup, using that same sauce to flavour the broth, and we call that "suki nam", the word "nam" referring to the broth (get suki nam recipe here). And THEN suki nam evolved into this dish, "suki hang" สุกี้แห้ง or "dry suki" which is the stir-fried version. The common thread among these versions is the luscious red sauce that is uniquely delicious.

    Key Ingredient: Red Bean Curd

    The red in the sauce comes from this important ingredient that you'll need to get: Red bean curd. Red bean curd is called "taohu yee" in Thai, but it is originally a Chinese ingredient. You can think of it as a type of fermented tofu, and the red colour comes from the specific fungus that's responsible for the fermentation. It's got a very unique, funky flavour unlike any other ingredients.

    It's widely available at most Chinese supermarkets. Once you've bought it, here are a couple other dishes you can make using the rest of your red bean curd: Yen Ta Fo, pink noodle soup and Mee Gati, pink noodles with coconut gravy.

    Advanced Prep Tip

    The sauce can be made in advance, and once this is done, the meal comes together very quickly, making it very weeknight-friendly. You can keep the sauce in the fridge for a few weeks. For longer term storage, cook the sauce first and bring it to a boil, then store it in a well-sealed jar in the fridge. This should last at least a few months.

    Watch The Full Video Tutorial!

    Ingredients and Notes

    Here are all the ingredients you'll need to make this recipe with important notes. For amounts, check out the full recipe card below.

    • Marinated chicken (recipe below), or another protein of your choice. Other typical protein options are thinly sliced pork, shrimp, and squid. A seafood mix is also popular. You can use thinly sliced beef although it isn't commonly done. 
    • Napa cabbage, cut into bite-sized pieces
    • Water spinach or another leafy greens such as spinach. This is to add some nice colour to the dish, julienned carrot works too.
    • Chinese celery or regular celery. Cut Chinese celery into 2-inch pieces, if using regular celery thinly slice them.
    • Glass noodles, soaked in room temp water for 10 minutes and cut a couple of times to shorten. Make sure you buy Thai glass noodles made from mung bean starch, not Korean ones.
    • Suki sauce (recipe below)
    • Eggs
    • Green onions and/or cilantro for garnish

    Marinated Chicken

    • Chicken thigh or breast, boneless, skinless, cut into bite-sized pieces
    • Soy sauce
    • Oyster sauce
    • Sesame oil

    Suki Sauce "Nam Jim Suki"

    You can make suki sauce in advance and store in the fridge for a few weeks. If you want to keep it longer, cook the sauce first and it should last in the fridge for a few months.

    • Thai chilies, to taste, I put 2 for a medium heat. When in doubt, add only 1.
    • Garlic
    • Granulated sugar
    • White sesame seeds, toasted
    • Red bean curd, see above for picture and description.
    • White vinegar
    • Toasted sesame oil
    • Soy sauce

    How to Make Sukiyaki Stir-Fry (suki hang)

    Here are all the steps to make this recipe. If this is your first time, I highly recommend watching the video tutorial to ensure success.

    For Suki Sauce:

    1. In a mortar and pestle, pound garlic and chilies into a rough paste, then add the sugar and grind until fine.
    2. Add sesame seeds and crush briefly just to break them up and release aroma.
    3. Add bean curd cubes and mash with pestle until there are no more lumps.
    4. Add all remaining liquid ingredients and stir to mix.

    For the Suki Hang

    1. Combine chicken with all marinade ingredients and mix well; marinate for at least 20 minutes.
    2. In a wok heat just enough oil to coat the bottom over medium high heat. Once hot add chicken and sear without stirring until about halfway done. Flip the chicken then toss until completely done. Remove and set aside.
    3. Add a little more oil to wok if needed. On medium high heat add napa cabbage, water spinach, and celery and toss a couple of times just to coat in oil.
    4. Add noodles and sauce and keep tossing until noodles are cooked and all the sauce has been absorbed. If noodles dry out before it is cooked, add a splash of water.
    5. Add chicken back into the wok and toss to mix, then push noodles to one side to make room for eggs. Add a little more oil to the empty space, add eggs, then break the yolks. Put the noodles over the eggs and let sit for about 30 seconds so the eggs can cook. 
    6. Toss everything to mix the eggs, then turn off the heat.
    7. Stir in green onions and/or cilantro.
    8. Serve immediately with extra sauce if desired. Enjoy!

    Recipe Card

    Stuffed Chicken Wings Recipe ปีกไก่ยัดไส้

    December 13, 2019 by Pailin Chongchitnant 15 Comments

    A plate of stuffed chicken wings, sliced up, with sweet chili sauce

    This recipe is sponsored by Pine Brand glass noodles.

    A Unique Appetizer for the Holiday Season

    If you're looking for a unique appetizer that will impress your guests, or a dish that can be a conversation starter, look no further! These stuffed chicken wings are SO delicious, can be prepped well in advance, and will likely be something new for your party guests!

    Stuffing chicken wings is a technique that I've only seen done in Asia (do let me know if you've seen it elsewhere!). In Thailand it is done, but it's not the most common of dishes because it does require some skill and time to debone the wings, which I will give you complete guidance for. The result is totally worth the effort, especially for a special occasion that calls for special food!

    Deboning the Wings

    For this recipe I'm starting with the whole wing because I want the wing tips, but I'm removing the drumettes and using just the flat + tip. Some people debone the whole wing, which you can totally do, but if you've never deboned wings before I'd stick to doing just the half because it's much simpler. Also, this makes the wings servable as is, no need to slice, with the wing tip serving conveniently as the stick for people to grab. If you do the whole wing, you'll need to slice them up first otherwise it's too large of a portion for an appetizer. Stuffed whole wings also look kinda funny, so definitely prettier to slice them!

    And because you'll likely need to see the deboning technique more than once, I've made a separate video of me deboning the wings for 9 minutes so you can keep watching without having to rewind the main video. You can also leave it to play while you're doing yours so it's like we're doing it "together" :).

    YouTube video

    What are Glass Noodles Exactly?

    Glass noodles are widely available, but few people actually know what they're made from! They are made from mung bean starch which has a special property where they turn clear when cooked. This is why some brands will label them "bean vermicelli". Good quality glass noodles are made from 100% mung bean starch, and Pine Brand is one them. Some less expensive brands (not that glass noodles are expensive to begin with) have other starches such as pea or potato starches mixed in. Why is this important? 100% mung bean starch makes the noodles more resistant to overcooking and I think they have a better texture as well.

    Advance Prep Tips

    The great thing about this recipe is you can split up the work in a number of ways. The day before serving you can debone and marinate the wings, and/or make the filling, then the day of you can stuff and bake. Or you can stuff them the day before and just take them out and bake on party day. If you want to spread the work even more, you can also make the filling 2 days in advance, debone and stuff the next day, and bake on party day. As always, if you're prepping raw meats more than just one day in advance, make sure your meats are fresh and kept cold as much as possible.

    Watch The Full Video Tutorial!

    All my recipes come with step-by-step video tutorials with extra tips not mentioned in the blog post, so make sure you watch the video below to ensure success - and if you enjoy the show, please consider subscribing to my YouTube channel. Thank you!

    Thai Glass Noodle Salad (laab woonsen)

    March 22, 2019 by Pailin Chongchitnant 3 Comments

    Laab woonsen Thai glass noodle salad

    When most people think about Thai glass noodle salad, they are often thinking of yum woon sen, but this one laab woonsen is another iteration that is just as tasty. It's easy, healthy, spicy, and full of fresh herbs. If you're familiar with the classic laab which is quite meaty, you can think of this as the lighter noodley version!

    a plate of laab woonsen

    What is laab?

    In its classic form, laab is a spicy and tart northeastern Thai salad made from ground meat, toasted rice powder, and lots of fresh herbs. Traditionally laab is meat-based, but because it's got such a delicious flavour, nowadays people make laab out of just about anything.

    So laab woonsen is more of a modern variation of traditional laab, but it has become quite popular so you can find it at many restaurants in Thailand that serve Northeastern or Isaan food.

    If you want to check out other kinds of "non-traditional laab" see my recipes for Laab Omelette, Laab Salmon, Laab Burger and Laab Meatballs. As I said, laab is a really great flavour that you can turn into so many delicious things!

    Is it a Laab? Or larb? Or laap?

    This popular dish goes by many English spellings: laab, larb, or laap are a few common ones you see on Thai restaurant menus. Spell it how you want, but for the love of god do NOT pronounce the "r" (I'm looking at us North American English speakers here). It is not "laRRRRb". It should be pronounced quite simply: laab.

    Writing out Thai words in English is a challenge because English has such limited consonants and vowels compared to Thai, this is why people will be looking for a dish on my website and they can't find it because they spell it differently!

    Watch The Full Video Tutorial!

    All my recipes come with step-by-step video tutorials with extra tips not mentioned in the blog post, so make sure you watch the video below to ensure success - and if you enjoy the show, please consider subscribing to my YouTube channel. Thank you!

    How to Freeze a Thai Curry

    April 5, 2019 by Pailin Chongchitnant 2 Comments

    How to Make Space-Saving Freezer Thai Curry

    Jump to video!


    As my pregnancy came to its last weeks, freezer meals were on top of my mind in preparation for this baby! But with an always-packed freezer, I have to be conscious of how much space things take.

    Here's how I make Thai curries for the freezer that will reheat well AND will not take up unnecessary space. This video isn't so much as recipe, but more of a tips and tricks video. You can apply this method to any of my coconut-based Thai curry recipes. And now you will have a meal that's ready to be served in just a few minutes!

    Tricks & Tips for Making Freezer Curries that Reheat Well and Saves Space

    1. Concentrate the sauce. When making a freezer curry I reduce the amount of sauce down to only what's necessary to cook the meat. Then I simply add more water when I reheat it! If you're working with a recipe that calls for stock or water in addition to coconut milk, be sure to omit it and and add it when you reheat. You will still reduce the coconut milk as shown in the video.
    2. Use overcook-resistant meats. Because you need to reheat the curry, the chances of you overcooking the meat is high. So don't freeze protein that is not something you want to eat if it's overcooked. For example, I really dislike overcooked chicken breast, so I opt for thighs instead. Apart from chicken, any stewed and braised meats are perfect as they are essentially overcooked-proof.
    3. Consider adding vegetables when you reheat. If you are particular about veggie texture, please note that thawed vegetables will be completely soft, so if you like that "al dente" or firm vegetables, I recommend adding them at the end when you reheat. Most veggies only take a couple of minutes to cook anyway, and this way you save even more space!
    4. If freezing veggies, choose them wisely. Of course you CAN add in veggies if you want to make it a microwave-ready meal. Here's the rule of thumb: Choose vegetables with low water content. Water turns into ice crystals in the freezer, and those ice crystals are sharp and they puncture the cells of the vegetables causing them to be soft when thawed (which is why thawed berries "bleed" out their juices). Broccoli, cauliflower, potato, bell peppers, peas are some vegetables that will be intact when thawed. Bamboo shoots in particular will come out almost exactly the way it went in!
    5. If possible, add delicate herbs when reheating. Delicate herbs such as Thai basil will look and taste much better if you add them at the end. This is not to say that you cannot freeze the curry with Thai basil, but just so you are aware that the Thai basil will be dark and mushy when thawed.

    Which curry freezes the best?

    Any kind of curry sauce will freeze equally well, however, there is one curry that lends itself particularly well to freezing and that is panang curry. This is because panang has a very small amount of sauce naturally, and doesn't have any vegetables or delicate herbs, so you don't have to make any modification to the recipe and just freeze it as is!

    Bonus content for Patreon members: For this episode I share what other foods I regularly freeze which makes my cooking much easier. Click here to learn more about becoming a Patreon member!

    Watch The Full Video Tutorial!

    All my recipes come with step-by-step video tutorials with extra tips not mentioned in the blog post, so make sure you watch the video below to ensure success - and if you enjoy the show, please consider subscribing to my YouTube channel. Thank you!

    Tricks & tips for making a Thai curry for the freezer so that it will reheat well AND saves you some freezer space. Try it and I promise you wouldn’t know it was ever frozen! #freezermeal #freezercurry #thaifood #hotthaikitchen

    Red Rubies Dessert (Tub Tim Grob)ทับทิมกรอบ

    December 27, 2019 by Pailin Chongchitnant 18 Comments

    Jump to video!


    This is a beautiful, yummy, classic Thai dessert that's super easy! It's so easy you barely need a recipe. Once you understand what it's made from, and how it's done, most people can just wing it. Water chestnuts are coated in a soft and chewy tapioca gel, served in a pandan-scented coconut syrup and ice. Ah....so refreshing!

    Watch The Full Video Tutorial!

    All my recipes come with step-by-step video tutorials with extra tips not mentioned in the blog post, so make sure you watch the video below to ensure success - and if you enjoy the show, please consider subscribing to my YouTube channel. Thank you!

    Beautiful and easy traditional Thai dessert that's vegan and gluten free! Crunchy water chestnuts in soft and chewy tapioca gel in scented coconut broth. #thaidessert #vegandessert #glutenfree

    Quick & Easy Congee with Meatballs

    April 19, 2019 by Pailin Chongchitnant 7 Comments

    Quick congee

    Breakfast in Thailand

    There are not many dishes in Thailand that are considered specifically "breakfast food". Our breakfast often looks like lunch, snacks, or even dinner foods. Growing up in Thailand my breakfast was often just leftover dinner!

    Congee is the one exception. Congee, or what we call "jok" in Thai, is one of the few dishes considered "breakfast" and you can easily find it on the streets of Thailand in the morning (although you can buy jok at all times of the day, even night time, too.)

    Slow VS Quick Method for Making Congee

    I have a video that shows you the traditional way of making congee from scratch, starting with raw rice, just like street vendors do. This takes a long time stirring broken rice in a pot until thick and creamy.

    This version is much quicker and takes only 30 minutes. It still comes out equally delicious if you ask me, and is the reason why I never go back to the from-scratch method anymore! It does require that you have some rice already cooked (perfect for leftover rice), and you also need some good pork stock or chicken stock on hand as well.

    Watch The Full Video Tutorial!

    All my recipes come with step-by-step video tutorials with extra tips not mentioned in the blog post, so make sure you watch the video below to ensure success - and if you enjoy the show, please consider subscribing to my YouTube channel. Thank you!

    Ingredients

    Here are all the ingredients you'll need to make this recipe. For amounts, check out the full recipe card below.

    Congee:

    • Cooked jasmine rice, can be leftover
    • Pork or chicken stock, unsalted (or if salted, reduce seasoning)
    • Soy sauce
    • Fish sauce
    • Ground white pepper, to taste
    • Green onion, chopped
    • Ginger, julienned, or more to taste

    Meatballs:

    • Ground pork or chicken, preferably not lean
    • Cloves garlic, finely grated
    • Ground white pepper
    • Soy sauce
    • Fish sauce
    • Sugar
    • Sesame oil (optional)

    How to Make Quick and Easy Congee with Meatballs

    Here are all the steps to make this recipe. If this is your first time, I highly recommend watching the video tutorial to ensure success.

    1. If the rice is chilled, microwave it for a minute so it’s hot, which will help it absorb liquid more readily.
    2.  Add rice to blender along with just enough of the stock to blend. Blend the rice briefly (several seconds) until you have your desired consistency—this could be coarser or finer depending on your preference, but make sure not to over-blend it cuz you do not want a smooth puree! (Tip: You do not actually have to blend the rice at all, but if you use whole rice it'll take longer to break down in the pot.)
    3. Pour blended rice into a heavy-bottomed pot, then use the remaining stock to rinse out the blender so you get everything out and add to the pot.
    4. Add soy sauce and fish sauce and bring rice to a simmer.
    5. Simmer for at least 10 minutes, or up to 20 minutes. The longer you simmer, the softer and smoother the texture will be, but for a “quick” version, I find that 10 minutes will do just fine. Once the rice starts to thicken up, stir frequently with a rubber spatula to prevent the bottom from sticking to the pot.
    6. While the rice is cooking, make meatballs simply by combining all ingredients in a mixing bowl and knead everything together with your hands until smooth (wear gloves if you have them).
    7. When rice is done, add meatballs in chunks directly into the rice using 2 teaspoons. Cook the meatballs for about 3 minutes until done.
    8. Taste and adjust seasoning.
    9. Stir in julienned ginger if you want, or you can leave it for each person to add to their own bowl when serving.
    10. Serve with green onions and extra white pepper if desired. Enjoy!

    If you want to add eggs, you can poach eggs separately and add it to the congee when serving. Or if you want the eggs mixed in, you can crack the eggs right into the congee, let them poach submerged in the congee for 3-4 minutes to firm up the whites slightly, then stir it up to mix into the congee.

    Recipe Card

    Congee is a traditional, classic Asian breakfast dish. With this method you can make this delicious comfort food in less than 20 minutes using leftover rice! #congee #thaifood #chinesefood #asianbreakfast

    Pandan Coconut Cookies with Cashews

    June 14, 2019 by Pailin Chongchitnant 7 Comments

    Sponsored by the makers of Becel.

    Many of you who have been following the show for a long time probably know that I love adding Thai twists to non-Thai food. So when the makers of Becel asked me to partner with them to take their customizable cookie recipe and add my own spin on it, I was excited by the challenge! This cookie recipe is called "Plant-Based Anything Goes Cookie Dough", and it's a versatile soft and chewy cookie dough recipe that you can use as a base and customize by adding your choice of flavours and mix-ins. The recipe uses Becel Original which is a non-hydrogenated, trans-fat free margarine that can replace butter 1:1 in baking. As a busy mom, I also love that it's soft when refrigerated, so I can use it right away without having to wait for it to soften!

    Pandan and Coconut: Quintessential Thai Dessert Flavours

    When it comes to Thai dessert flavour, there is nothing else more classic than the flavour of pandan leaves and coconut. So it wasn't hard for me to come up with this recipe using these two flavours. I added cashews for texture and nuttiness, and fun fact: cashews are one of the only 2 nuts we use in Thai cuisine! The other being peanuts, of course.

    What are Pandan Leaves?

    Pandan is basically our vanilla. Pandan leaves are long, thin, dark green leaves that have a floral aroma that goes incredibly well with coconut. It's commonly used in Southeast Asian desserts, and in Thailand, it's added to almost all of our sweets. It is even used in some savoury dishes, such as the broth of boat noodles. 

    You can buy pandan leaves fresh or frozen at Asian grocery stores that carry a lot of Southeast Asian products. If you buy them fresh, you can store any leftovers in the freezer. Make sure you wash and dry them first and store them in a heavy-duty freezer bag and they'll last you several months.

    My Best Fluffy Pancake Recipe

    April 17, 2020 by Pailin Chongchitnant 17 Comments

    Jump to video!


    Well, since we're all social distancing and/or on lockdown due to covid19, filming for HTK has had to be postponed. So I'm home...as we all are. But since the cooking continues, I thought I would share with you anyway what I am cooking! It's not the slick video that you're all used to seeing on my channel, but it's what we can manage right now given the circumstances. Hope this finds everyone well, safe, and sane, and I hope I can provide some entertainment and inspiration while you're all stuck a home!

    For many of you, there's no longer a need to get up early to go to work or school because of lockdown/social distancing, so you might have more time to make a pancake breakfast! I am not one of them unfortunately...with a baby at home and no more childcare help...I'm busier than ever before!

    But for those who do, I wanted to share my best pancake recipe for this occasion. These are the best pancakes I've ever had, honest. So good I've been making it for over 10 years and still haven't had any better ones! So light, super fluffy, just perfect.

    There are a few reasons why these are extra good. The cake flour for extra tenderness, the yogurt for the wonderful flavour, just the right amount of salt and sugar, and most importantly the whipped egg whites for that light fluffiness!

    Enjoy!

    Watch The Full Video Tutorial!

    All my recipes come with step-by-step video tutorials with extra tips not mentioned in the blog post, so make sure you watch the video below to ensure success - and if you enjoy the show, please consider subscribing to my YouTube channel. Thank you!

    Super fluffy pancake recipe for the perfect morning. A few secret ingredients make these light, tender, and perfect for any toppings. #breakfastrecipe #pancakes
    Super fluffy pancake recipe for the perfect morning. A few secret ingredients make these light, tender, and perfect for any toppings. #breakfastrecipe #pancakes

    My BEST Granola Recipe!

    March 30, 2020 by Pailin Chongchitnant 6 Comments

    Jump to video!


    Well, since we're all social distancing and/or on lockdown due to covid19, filming for HTK has had to be postponed. So I'm home...as we all are. But since the cooking continues, I thought I would share with you anyway what I am cooking! It's not the slick video that you're all used to seeing on my channel, but it's what we can manage right now given the circumstances. Hope this finds everyone well, safe, and sane, and I hope I can provide some entertainment and inspiration while you're all stuck a home!

    We just ran out of granola so it's a great opportunity for me to share my recipe with you because this is an AWESOME granola recipe. It's one that I have been making for years and years because it is so good, and hubby loves granola and yogurt for breakfast! Granola is a great thing to make during this time as it uses only pantry, shelf-stable ingredients. You can change up the dried fruit and nuts to whatever you have, change up the spices, and you can even change the honey to maple syrup for a different flavour or for a vegan version as well!

    Watch The Full Video Tutorial!

    All my recipes come with step-by-step video tutorials with extra tips not mentioned in the blog post, so make sure you watch the video below to ensure success - and if you enjoy the show, please consider subscribing to my YouTube channel. Thank you!

    My BEST granola recipe I've been making for years! Perfect during lockdown, or any time! #granola #lockdownrecipe

    Meet Baby & Ask Me Anything!

    June 7, 2019 by Pailin Chongchitnant Leave a Comment


    In this video I introduce my brand new baby to you! Also I took this opportunity to do an AMA (Ask Me Anything). I asked for questions submissions on Facebook and Instagram and boy were there lots of really good questions! If you want more AMA, there are some more questions answered on my Instagram Stories (click on the AMA highlight circle).

    Also, many people asked about my story. I've done a video dedicated to that questions before, so check this out: MY STORY: Who Am I and How I Got Here?

    Watch The Full Video!

    Malaysian/Indonesian Beef Rendang

    July 20, 2018 by Pailin Chongchitnant 21 Comments

    Voted the most delicious food in the world, this Indonesian/Malaysian beef rendang is one of the most complex flavoured dishes I've ever made. Herbs, spices and coconut milk are slowly cooked and reduced into a thick flavourful sauce that coats the fork tender beef.

    It's a dish that takes patience, but it's quite easy and is well worth every minute spent. Beef is my favourite but you can also try making chicken rendang, using bone-in dark meat chicken.

    PS. Don't have a few hours to make rendang quite yet? Try this bo luc lac recipe which is a Vietnamese favourite, also known as shaking beef. It's much faster and easier, but will satisfy your beef cravings!

    Watch The Full Video Tutorial!

    All my recipes come with step-by-step video tutorials with extra tips not mentioned in the blog post, so make sure you watch the video below to ensure success - and if you enjoy the show, please consider subscribing to my YouTube channel. Thank you!

    Thai Peppery Shrimp & Veggie Soup - Gaeng Liang

    January 25, 2019 by Pailin Chongchitnant 3 Comments

    Kaeng liang - Breast milk boosting soup

    When I became pregnant, many people have asked whether there is a dish in Thai culture that pregnant and new mothers are encouraged to eat. And this is it!

    Gaeng Liang is a peppery, light, yummy vegetable soup (or sometimes called a curry) believed to help boost breast milk supply in Thai culture. Whether or not it actually does, who knows, I don't think there's been a real study on it. But hey, it's comforting, healthy, and keeps well in the fridge, perfect for new moms so why not!

    a bowl of gaeng liang with shrimp and veggies with a chayote squash and thai basil on the side.

    Now, if you're not having a baby, you can still enjoy it! This is not something that is reserved only for new moms—people do have it at home regularly, but new moms are especially encouraged to eat more of it. This is a dish I grew up seeing a lot at home, and my grandmother makes it quite often because my mom loves it. It's also popular amongst the health conscious because it's light and full of nutritious vegetables!

    Gaeng Liang - A Unique Flavour in Thai Cuisine

    I have to say that the flavour of this dish is unlike any other dish in Thai cuisine. The combination of dried shrimp, shrimp paste and grachai (fingerroot) in the curry paste creates an aroma that is truly unique.

    It's a bit funky, thanks to the shrimp paste, and when I was a kid I didn't love it and didn't understand why my mom loved it so much. But now as an adult I do and finally get it! So if you're up for a culinary adventure and want to try a dish that's unlike anything the average Thai restaurant offers, this is the perfect thing!

    So Many Vegetables! 

    As you can see, gaeng liang uses a ton of different kinds of vegetables, especially squashes. You don't have to have everything I used, as it can be a bit much and you'll have so much leftover veg, but I recommend having at least the following 3 vegetables:

    • Kabocha squash - This will give a sweet, rich, creamy element which you will need to balance all the other lighter vegetables. If you don't have kabocha, any other sweet, creamy winter squash (like acorn) will do.
    • One type of light summer squash  - We traditionally use angled luffa or angled gourd (sing gua), but you can use zucchini, patty pans, cousa squash (shown in the video), chayote, or whatever lighter squash you have access to.
    • One type of Asian mushroom - Oyster mushroom is my favourite, but you can do straw mushrooms, king oyster mushrooms, beech/shimeji mushrooms, or enoki mushrooms. Do not use dried mushrooms as they have a strong earthy flavour that will interfere with the soup.

    Is it a Curry or a Soup?

    To Thai people, this dish is actually a curry (gaeng or kaeng means curry), but I understand that it's light and brothy, and eats more like a soup in the Western sense of the word.

    This is because Thai people define curries differently from people in the western world. To us, a curry or a gaeng is any soupy dish that uses a "curry paste"—a ground up mixture of herbs and spices—as the flavour base. So that's why this is classified as a curry, even though to you it might look like a soup. To us, the richness or consistency of the liquid has nothing to do with whether it's a curry or not.

    Another "soupy curry" that's really popular in Thai cuisine is gaeng som, or a sour curry that is an absolute classic. You should try it out!

    Watch The Full Video Tutorial!

    All my recipes come with step-by-step video tutorials with extra tips not mentioned in the blog post, so make sure you watch the video below to ensure success - and if you enjoy the show, please consider subscribing to my YouTube channel. Thank you!

    Thai Spicy Chicken & Cucumber Stir-Fry

    February 1, 2019 by Pailin Chongchitnant 4 Comments

    A plate of cucumber stir fry with chicken

    It’s one of my life’s purpose to spread the word that COOKED cucumber is delicious. They’re just like any other veg, so let's stop confining them to the land of salads and pickles! 😂

    This spicy chicken and cucumber stir fry recipe was part of my “Ingredient Challenge” video, where I took an ingredient (cucumber in this case) and cooked with it on the fly … and it turned out amazing! Spicy, crunchy, healthy, and the whole thing was done in 20 mins from start to finish.

    A plate of cucumber stir  fry with chicken

    Cucumber is an underappreciated vegetable, so my challenge was to actually COOK the cucumber and make it quick and delicious 🙂 Perfect for dinner, pack it for lunch or anytime you want!

    Watch The Full Video Tutorial!

    All my recipes come with step-by-step video tutorials with extra tips not mentioned in the blog post, so make sure you watch the video below to ensure success - and if you enjoy the show, please consider subscribing to my YouTube channel. Thank you!

    How to Clean and Prepare a Whole Squid

    July 5, 2019 by Pailin Chongchitnant Leave a Comment

    Jump to video!


    A Whole Squid is Easily Deconstructed

    If you like to eat squid but have not cooked much with it because the idea of breaking down a whole squid seems intimidating, well this video is all you need! It's really not hard...and in fact, once you see it, it's almost as if squids were made for simple disassembly. Each part comes apart distinctly, easily, and intuitively. Nothing like filleting a fish, trust me.

    Want a delicious Thai recipe that uses squid? Check out my Dry Tom Yum recipe here. This recipe uses a mix of seafood, but you can totally do all squid if you like.

    P.S. I buy my whole squid from the seafood counter at an Asian grocery store.

    Watch The Full Video!

    Like squid but don't know how to break down a whole squid? It's super easy, this video is all you need! #squid

    Dry Tom Yum Seafood ต้มยำแห้ง

    July 5, 2019 by Pailin Chongchitnant 1 Comment

    Dry Tom Yum is on Netflix

    This is a luxurious recipe that is incredibly simple and delicious. I was reminded of it because it was talked about in a Netflix documentary "Street Food" in the Bangkok episode. The episode featured Jay Fai, a street food vendor who started incorporating expensive seafood into otherwise common everyday dishes, and she became globally known after she earned a Michelin Star for her humble establishment. Dry tom yum is one of the dishes that she makes.

    The documentary implied that she invented the dish...but I actually don't know if that is true. This is a dish that has been around for a long time, made by many people, and I am not aware of any evidence that she was the one who invented it. It's not even a dish associated with her, or anyone in particular. Perhaps she was the one who popularized it? Note, however, that Jay Fai did not claim that she invented it; it was implied by one of the people interviewed.

    What is a "dry" dish?

    In Thailand there are many dishes that has "dry" in its name, or in Thai, hang. These dishes are typically derived from a normally soupy dish, and have been modified so that the soup part is gone. A classic example is a "dry noodle soup" which sounds like an oxymoron, but basically you can order most types of noodle soups in Thailand without the broth, and the noodles are instead tossed in the seasoning. It actually makes it much easier to make at home, check out this "dry wonton noodles" recipe here.

    So as you probably know, Tom Yum is originally a soup, and a dry tom yum is basically the stir-fried version of it. Plain and simple. It uses all of the same herbs and seasonings, minus the broth. So what you end up with is a tom yum flavoured sauce that is light and herbaceous and just delightful to pour over some jasmine rice.

    Watch The Full Video Tutorial!

    All my recipes come with step-by-step video tutorials with extra tips not mentioned in the blog post, so make sure you watch the video below to ensure success - and if you enjoy the show, please consider subscribing to my YouTube channel. Thank you!

    A stir-fried version of the popular Thai Tom Yum soup. The same bold flavours of lemongrass, galangal, and lime leaves, but much faster to make! #thairecipe #tomyum #thaifood #seafoodrecipe

    Epic Thai Red Curry Tacos!

    August 21, 2020 by Pailin Chongchitnant 14 Comments

    Jump to video!


    This video is sponsored by the Thai Trade Centre Vancouver

    Can You Cook Delicious Thai Food Without an Asian Grocery Store?

    Turns out not only is it possible, but this was one of the best things I've ever made on the show! Our good friends at the Thai Trade Centre Vancouver asked if I could make a recipe that uses only ingredients people can buy at their regular non-Asian grocery stores. No problem! Especially because nowadays most grocery stores stock at least a few basic Thai products. I was sure I would find coconut milk, at least one type of curry paste and fish sauce. Indeed those were what I found, but not much more!

    You Don't Need to Make a Traditional Dish to Enjoy Authentic Thai Flavours

    I decided to make a Thai taco with what I was able to find because I wanted to show you that can enjoy REAL Thai flavours by integrating Thai ingredients into dishes you're already familiar with. Making a full-on traditional dish is great, but it's certainly not necessary if you just want to enjoy the flavours of Thai food that you love. The key is in using real Thai ingredients!

    Don't Want to do Tacos? Here are some modification ideas

    Tortillas are great, but this recipe can be easily modified to many other dishes, such as...

    • Lettuce wrap - Use crisp lettuce leaves instead of tortillas.
    • Pita - Use pita bread instead of tortillas.
    • Over rice - Simply serve the pork filling over rice and serve the cabbage slaw as a side dish.
    • Shepherd's Pie - Use the pork filling as a base, maybe add a little more coconut milk to make a moist filling, and perhaps extra veggies. Top with mashed potatoes and bake. Slaw on the side.
    • Fill anything with it! What kind of "filled pastry" do you have in your culture? Filo? Puff pastry? Empanadas? Samosas? Dumplings? Buns? Use the pork filling for any of them!

    Watch The Full Video Tutorial!

    All my recipes come with step-by-step video tutorials with extra tips not mentioned in the blog post, so make sure you watch the video below to ensure success - and if you enjoy the show, please consider subscribing to my YouTube channel. Thank you!

    Unbelievably delicious Thai-inspired tacos filled with ground meat flavoured with red curry paste, topped with a crunchy Thai cabbage slaw and coconut crema. #thairecipe

    Hong Kong Mango Pancake - Dim Sum

    August 28, 2020 by Pailin Chongchitnant 5 Comments


    Pinterest friendly image of Hong Kong mango pancakes and mango cubes on a white plate. With hot-thai-kitchen.com text on the bottom.Improving Upon the Classic

    Mango crepes are a classic dessert at dim sum, and while I enjoy them, I always thought they had more potential. I always wished they were more...mangoey...more flavourful, more fruity. The pancakes are simple, a delicate crepe filled with fresh mango and whipped cream. But there lies the problem...the whole thing depends on how good the mango is, and let's face it, more often than not the mango isn't as sweet, ripe, and juicy as it could be.

    Fixing Less-Than-Perfect Mango

    So to fix that, I turned the mango trims that you will inevitably have from prep into a luscious mango sauce. You can make this sauce as sweet or tart as needed in order to compensate for the flavour (or lack of flavour) of the mango. Mango a little tart and not super sweet? Make your sauce sweeter. Super sweet mango but not a lot of acidity? Make a mango sauce that's a little more tart to up the 'brightness'. This simple trick here adds juiciness and extra mangoey-ness that makes ALL the difference!

    Watch The Full Video Tutorial!

    All my recipes come with step-by-step video tutorials with extra tips not mentioned in the blog post, so make sure you watch the video below to ensure success - and if you enjoy the show, please consider subscribing to my YouTube channel. Thank you!

    Unbelievably delicious Thai-inspired tacos filled with ground meat flavoured with red curry paste, topped with a crunchy Thai cabbage slaw and coconut crema. #thairecipe

    Egg Noodle Pad See Ew หมี่เหลืองผัดซีอิ้ว

    January 20, 2017 by Pailin Chongchitnant 1 Comment

    mee leuang pad see ew

    Pad See Ew is our famous stir-fried rice noodle dish (yes, I have a recipe), but this egg noodle version is something I've only ever seen in southern Thailand where I grew up! These chubby fresh egg noodles have the most perfect chewiness, and with the salty-sweet-smoky flavour, it's one of the hardest dishes to stop eating!!

    These egg noodles are also much easier to find and much easier to work with than the fresh wide rice noodles, which makes this a very doable weeknight dinner. If you have noodles left after making pad see ew, try them in my easy garlic noodles!

    Watch The Full Video Tutorial!

    All my recipes come with step-by-step video tutorials with extra tips not mentioned in the blog post, so make sure you watch the video below to ensure success - and if you enjoy the show, please consider subscribing to my YouTube channel. Thank you!

    Glass Noodle Stir-Fry Recipe Hainanese Style ผัดวุ้นเส้นไหหลำ

    August 4, 2017 by Pailin Chongchitnant Leave a Comment

    glass noodle stir fry hainanese

    Jump to video!


    Pad Woon Sen or glass noodle stir-fry is a well-known Thai dish, but this version is lesser known. However, it is the one we make most often at home because it comes from Hainan, my grandma's birthplace! This is one of her signature dishes, and a dish she makes every time I come home to visit. Makes me so happy to know that her recipe will now live on!

    If you love noodle stir fries, may I suggest another great recipe? Pancit canton, a Filipino egg noodle stir fry that's very weeknight friendly!

    Watch The Full Video Tutorial!

    All my recipes come with step-by-step video tutorials with extra tips not mentioned in the blog post, so make sure you watch the video below to ensure success - and if you enjoy the show, please consider subscribing to my YouTube channel. Thank you!


    • « Previous Page
    • 1
    • …
    • 11
    • 12
    • 13

    Sawaddee ka!

    I'm Pai, a chef, author, and YouTuber. I'm here to demystify Thai cuisine and help you cook great Thai food at home. Want to learn more about me?

    Here's my story

    My Latest Cookbook

    Popular Classics

    • a plate of pad see ew
      Authentic Thai Pad See Ew Recipe
    • a plate of grilled chicken thighs with lime wedges on the side and a bowl of dipping sauce.
      Ultimate Thai BBQ Chicken (Gai Yang)
    • a plate of cashew chicken
      Thai Cashew Chicken Recipe
    • A plate of Thai grilled steak salad with sticky rice - nam tok neua
      Thai Grilled Steak Salad - Neua Yang Nam Tok

    Footer

    Subscribe to my newsletter!

    Subscribe for free!
    • Privacy Policy
    • Accessibility Statement
    • Merch
    • All Recipes
    • Contact
    • My Cookbook
    • Patreon
    ↑ back to top

    As an Amazon Associate I earn from qualifying purchases.

    Copyright © Pailin's Kitchen Inc. 2025